Personalize Your Device
A.Change the Today screen background
Tap Start > Settings > Personal tab > Today.
B.Set the date and time
Tap Start > Settings > System tab > Clock & Alarms > Time tab.
C.Manage power settings
Tap Start > Settings > System tab > Power > Advanced tab.
D.Enable SIM lock
Enabling the SIM lock requires you to enter a PIN code first before you can use the phone features of your device.
 Go Online and Surf the Web
You can use
Note If there is no
 Get
Get E-mail On Your Device
Get
Select this check box.
Read Me First
This Read Me First will help you get started with using your Windows Mobile® 6 powered device. We recommend that you have this guide handy when you start using your device.
For a more complete reference, consult the User Manual that came with the device.
You can enable the SIM lock by tapping Start > Settings > Personal tab > Phone and selecting Require PIN when phone is used.
E.Set a device password
Enabling the device password requires you to enter a password to unlock the device after it has been left idle for a set period of time.
1.Tap Start > Settings > Personal tab > Lock.
2.Select the Prompt if device unused for check box and enter the time you want.
3.Select the Password type.
4.Enter and confirm the password, then tap OK.
 Take a Photo
Use the Camera of your device to capture those precious moments.
1 | Press the CAMERA button. |
| The screen orientation |
automatically switches to landscape mode when you use the camera.
1 | Tap Start > Settings > | 2 | Select the wireless | 3 | Select The Internet |
| Connections tab > |
| network you want to |
| and tap Connect. |
| Comm Manager and tap |
| connect to and tap OK. |
|
|
|
|
|
|
|
If you are connecting to a secured network, you may need to enter a network key before you can connect to it.
Use Internet Explorer® Mobile (tap Start > Internet Explorer) to surf the Web.
Use Camera Album to view your photos.
1 Tap to open Camera Album. | 2 | Slide your finger on the screen to scroll up and |
|
| down your photos. Touch a photo to view it. |
1Tap Start > Messaging > New
2Enter your
3Auto Setup downloads
Note If Auto Setup is unsuccessful, you need to manually enter the settings in the succeeding screens.
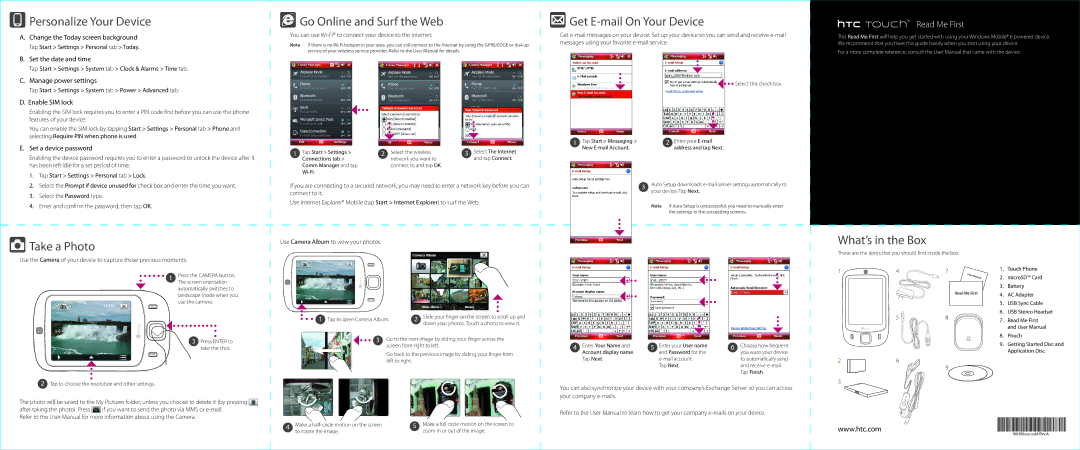
What’s in the Box
These are the items that you should find inside the box.
1 | 4 | 7 |
Read Me First
5 | 8 |
1. | Touch Phone |
2. | microSD™ Card |
3. | Battery |
4. | AC Adapter |
5. | USB Sync Cable |
6. | USB Stereo Headset |
7. | Read Me First |
| and User Manual |
8. | Pouch |
3 Press ENTER to take the shot.
2Tap to choose the resolution and other settings.
The photo will be saved to the My Pictures folder, unless you choose to delete it (by pressing ![]()
after taking the photo). Press ![]() if you want to send the photo via MMS or
if you want to send the photo via MMS or
3 Go to the next image by sliding your finger across the screen from right to left.
Go back to the previous image by sliding your finger from left to right.
4 | Make a | 5 | Make a full circle motion on the screen to |
to rotate the image. | zoom in or out of the image. |
4 | Enter Your Name and | 5 | Enter your User name | 6 | Choose how frequent |
| Account display name. |
| and Password for the |
| you want your device |
| Tap Next. |
|
| to automatically send | |
|
|
| Tap Next. |
| and receive |
|
|
|
|
| Tap Finish. |
You can also synchronize your device with your company’s Exchange Server so you can access your company
Refer to the User Manual to learn how to get your company
26
9
3
www.htc.com
9. Getting Started Disc and |
Application Disc |