CABLE REMOVAL

Use the following procedure to remove worn or damaged cable from reel prior to installation of new cable.

CAUTION

Failure to relieve all spring tension prior to removing

cable could result in damage to equipment or personal injury. Follow instructions carefully

1.Move machine serviced by reel to a position closest to reel. Springs will still be under pre-tension at this point.

2.Turn off all electric power.

3.Lock spool to prevent turning using wither a spool lock mechanism or by tying off.

4.Disconnect cable from machine junction box.

5.Grip spool by hand and carefully release spool lock or tie. Slowly unwind remaining tension.

6.Again lock or tie spool to prevent rotation.

7.Remove cable from spool. Loosen U-bolt and water-tight connector and disconnect conductors from slip ring.

8.Install new cable following instruction at right.

CABLE INSTALLATION

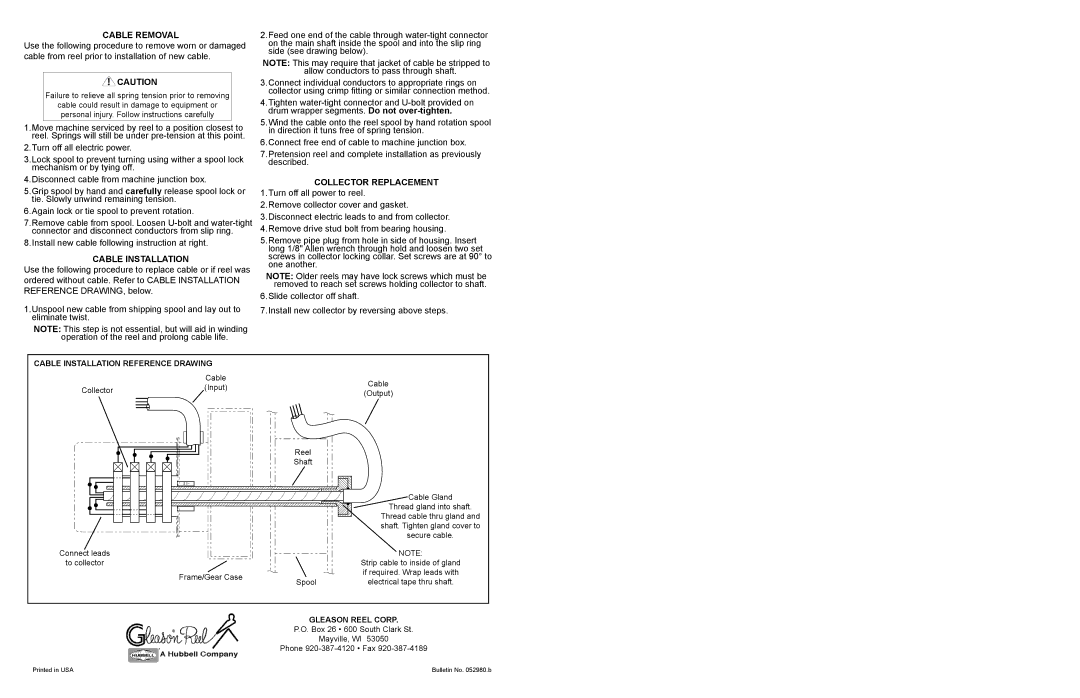
Use the following procedure to replace cable or if reel was ordered without cable. Refer to CABLE INSTALLATION REFERENCE DRAWING, below.

1.Unspool new cable from shipping spool and lay out to eliminate twist.

NOTE: This step is not essential, but will aid in winding operation of the reel and prolong cable life.

2.Feed one end of the cable through water-tight connector on the main shaft inside the spool and into the slip ring side (see drawing below).

NOTE: This may require that jacket of cable be stripped to allow conductors to pass through shaft.

3.Connect individual conductors to appropriate rings on collector using crimp fitting or similar connection method.

4.Tighten water-tight connector and U-bolt provided on drum wrapper segments. Do not over-tighten.

5.Wind the cable onto the reel spool by hand rotation spool in direction it tuns free of spring tension.

6.Connect free end of cable to machine junction box.

7.Pretension reel and complete installation as previously described.

COLLECTOR REPLACEMENT

1.Turn off all power to reel.

2.Remove collector cover and gasket.

3.Disconnect electric leads to and from collector.

4.Remove drive stud bolt from bearing housing.

5.Remove pipe plug from hole in side of housing. Insert long 1/8" Allen wrench through hold and loosen two set screws in collector locking collar. Set screws are at 90° to one another.

NOTE: Older reels may have lock screws which must be removed to reach set screws holding collector to shaft.

6.Slide collector off shaft.

7.Install new collector by reversing above steps.

CABLE INSTALLATION REFERENCE DRAWING

Cable

Collector(Input)Cable

(Output)

Reel

Shaft

Cable Gland

Thread gland into shaft.

Thread cable thru gland and shaft. Tighten gland cover to secure cable.

Connect leads


NOTE:

to collector


Strip cable to inside of gland

Frame/Gear Case


if required. Wrap leads with

Spool

electrical tape thru shaft.


GLEASON REEL CORP.

P.O. Box 26 • 600 South Clark St.

Mayville, WI 53050

Phone 920-387-4120 • Fax 920-387-4189

Printed in USA

Bulletin No. 052980.b

Page 4
Image 4
Hubbell SHO Series Failure to relieve all spring tension prior to removing, Cable Installation Reference Drawing, Spool

SHO Series specifications

The Hubbell SHO Series represents a significant advancement in lighting technology, designed to combine efficiency, durability, and versatility for various applications. This series is particularly noted for its robust construction and innovative design, catering to the demands of both industrial and commercial environments.

One of the main features of the SHO Series is its exceptional efficacy. With energy-efficient LED technology, the SHO fixtures provide substantial energy savings while delivering high-quality illumination. This efficiency not only reduces electricity costs but also minimizes the environmental impact, making it an ideal choice for sustainability-conscious organizations.

The SHO Series is equipped with advanced optics that maximize light distribution while minimizing glare. This feature is vital in settings like warehouses, manufacturing facilities, and outdoor spaces where visibility is crucial for safety and productivity. With a unique lens design, these fixtures ensure uniform light output, reducing dark spots and enhancing overall illumination.

Durability is another hallmark of the SHO Series. Constructed from high-quality materials, these fixtures are designed to withstand harsh environmental conditions, including extreme temperatures and moisture. With an IP65 rating, the SHO lights are resistant to dust and water, making them suitable for both indoor and outdoor applications. This ruggedness translates to a longer lifespan, reducing the need for frequent replacements and maintenance.

In terms of installation, Hubbell has prioritized user-friendly features. The SHO Series offers a lightweight design, making it easier for technicians to install and handle. Many models come with flexible mounting options, allowing for various configurations to meet site-specific requirements. This adaptability is crucial in addressing the diverse needs of industrial spaces and large commercial areas.

Moreover, the SHO Series incorporates smart technology integration. Optional sensors can be added for occupancy and daylight harvesting, further enhancing energy efficiency. This enables automatic adjustments based on real-time data, optimizing energy consumption and ensuring that lighting is only used when needed.

In summary, the Hubbell SHO Series stands out due to its energy efficiency, superior optics, durable construction, and adaptability. These characteristics make it a top choice for any facility looking to improve lighting quality while reducing operational costs. With the incorporation of smart technology, the SHO Series not only illuminates spaces effectively but also aligns with modern sustainability goals, making it a forward-thinking solution for today’s lighting challenges.