1.
22
23
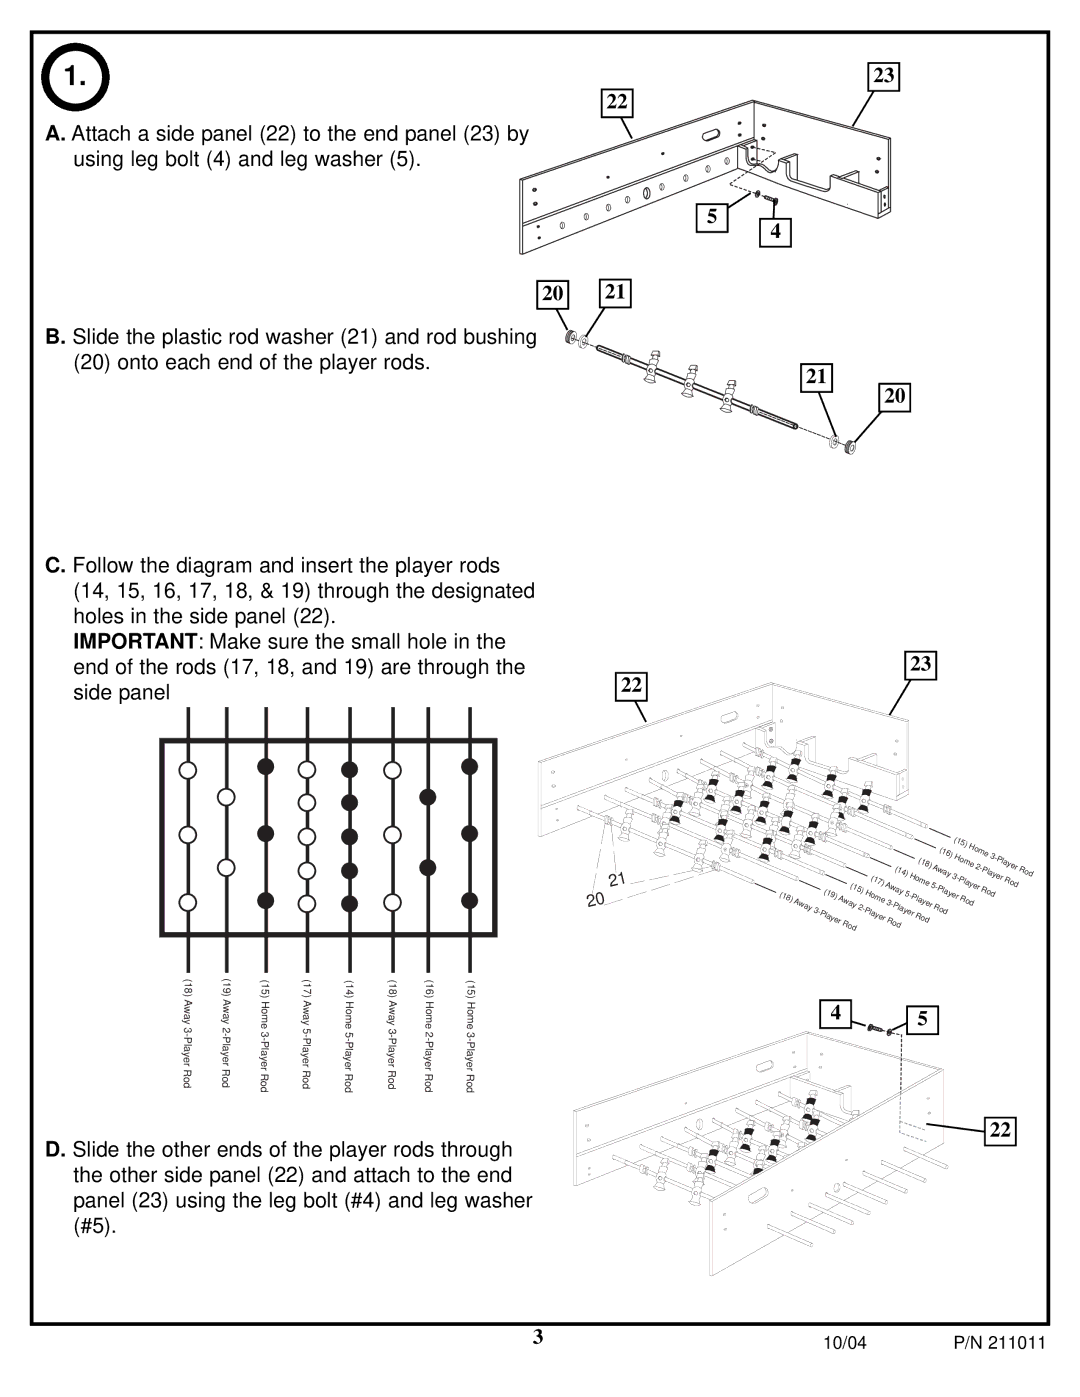
A. Attach a side panel (22) to the end panel (23) by using leg bolt (4) and leg washer (5).
20
B. Slide the plastic rod washer (21) and rod bushing (20) onto each end of the player rods.
C. Follow the diagram and insert the player rods (14, 15, 16, 17, 18, & 19) through the designated holes in the side panel (22).
IMPORTANT: Make sure the small hole in the end of the rods (17, 18, and 19) are through the side panel
5
21
22
4
21
20
23
21 20
(18) | (19) | (15) | (17) | (14) | (18) | (16) | (15) |
Away | Away | Home | Away | Home | Away | Home | Home |
3 | 2 | 3 | 5 | 5 | 3 | 2 | 3 |
- | - | - | - | ||||
Player | Player | Player | Player | Player | Player | Player | Player |
|
| - |
| - |
| - | - |
Rod | Rod | Rod | Rod | Rod | Rod | Rod | Rod |
D. Slide the other ends of the player rods through the other side panel (22) and attach to the end panel (23) using the leg bolt (#4) and leg washer (#5).
|
|
|
|
|
|
|
|
|
|
|
|
| (16) | (15) | Home |
|
|
| ||
|
|
|
|
|
|
|
|
|
|
|
|
|
|
|
|
|
| |||
|
|
|
|
|
|
|
|
|
|
|
| (18) |
|
|
|
| 3- |
|
| |
|
|
|
|
|
|
|
|
| (14) |
|
| Away | Home 2- | Player | Rod | |||||
|
|
|
|
|
| (17) |
|
| Home | 3- |
| Player | Rod | |||||||
|
|
|
| (15) | Away 5 | 5- |
| Player | Rod |
|
| |||||||||
(18) A |
| (19) |
| Home |
|
| Player |
|
|
|
|
| ||||||||
|
|
|
| 3 |
| - |
| Rod |
|
|
|
| ||||||||
way 3 |
| Away |
|
|
| Player |
|
|
|
|
|
| ||||||||
|
|
|
| 2- |
|
| Player |
| Rod |
|
|
|
|
|
|
| ||||
| - |
|
|
| Play | er |
| Rod |
|
|
|
|
|
|
| |||||
|
| Player | Rod |
|
| Rod |
|
|
|
|
|
|
|
|
|
| ||||
|
|
|
|
|
|
|
|
|
|
|
|
|
|
|
|
|
|
|
| |
4 ![]() 5
5
22
3 | 10/04 | P/N 211011 |
