Preparing the Fan Site (continued)

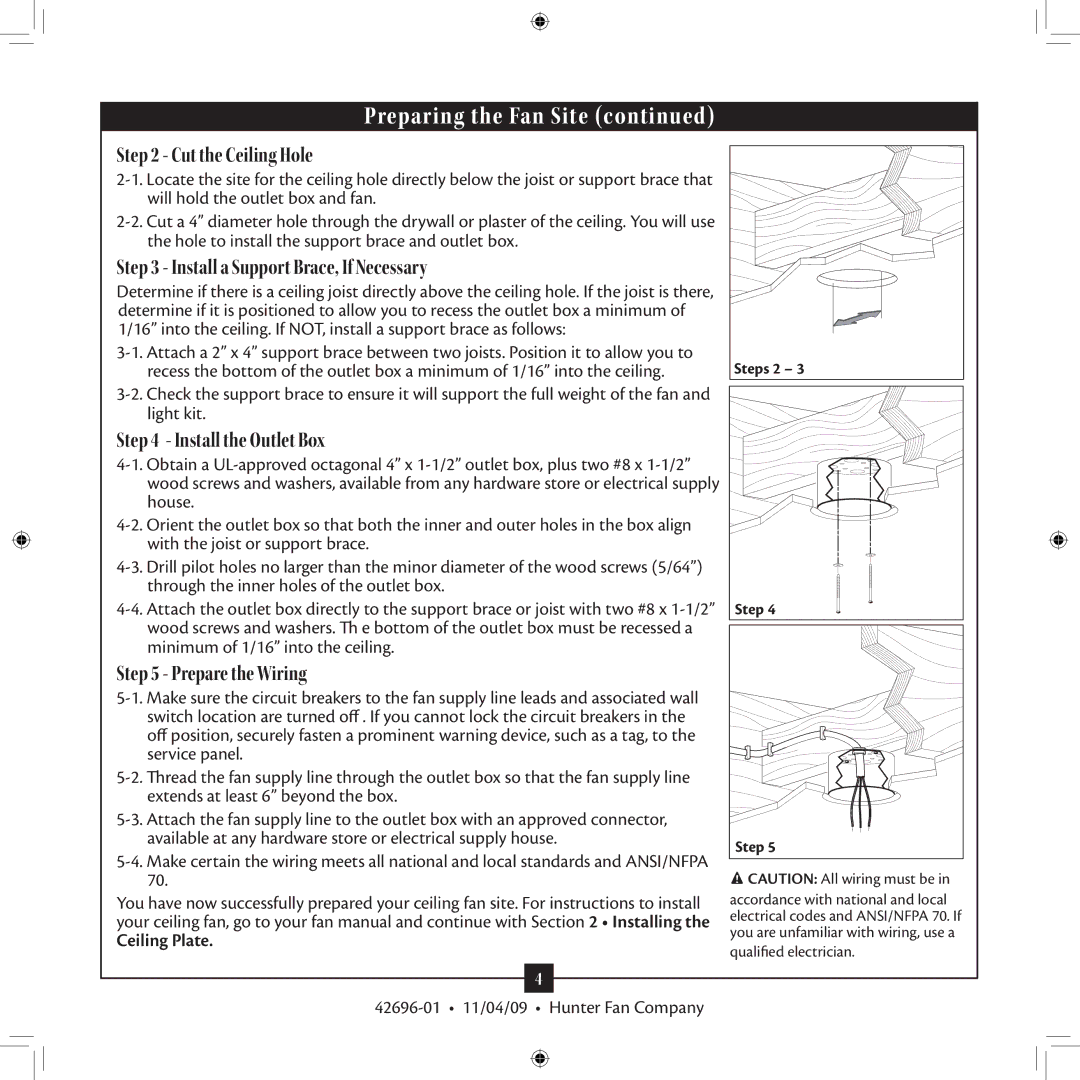
Step 2 - Cut the Ceiling Hole

2-1. Locate the site for the ceiling hole directly below the joist or support brace that will hold the outlet box and fan.

2-2. Cut a 4” diameter hole through the drywall or plaster of the ceiling. You will use the hole to install the support brace and outlet box.

Step 3 - Install a Support Brace, If Necessary

Determine if there is a ceiling joist directly above the ceiling hole. If the joist is there, determine if it is positioned to allow you to recess the outlet box a minimum of 1/16” into the ceiling. If NOT, install a support brace as follows:

3-1. Attach a 2” x 4” support brace between two joists. Position it to allow you to recess the bottom of the outlet box a minimum of 1/16” into the ceiling.

3-2. Check the support brace to ensure it will support the full weight of the fan and light kit.

Step 4 - Install the Outlet Box

4-1. Obtain a UL-approved octagonal 4” x 1-1/2” outlet box, plus two #8 x 1-1/2” wood screws and washers, available from any hardware store or electrical supply house.

4-2. Orient the outlet box so that both the inner and outer holes in the box align with the joist or support brace.

4-3. Drill pilot holes no larger than the minor diameter of the wood screws (5/64”) through the inner holes of the outlet box.

4-4. Attach the outlet box directly to the support brace or joist with two #8 x 1-1/2” wood screws and washers. h e bottom of the outlet box must be recessed a minimum of 1/16” into the ceiling.

Step 5 - Prepare the Wiring

5-1. Make sure the circuit breakers to the fan supply line leads and associated wall switch location are turned off . If you cannot lock the circuit breakers in the off position, securely fasten a prominent warning device, such as a tag, to the service panel.

5-2. hread the fan supply line through the outlet box so that the fan supply line extends at least 6” beyond the box.

5-3. Attach the fan supply line to the outlet box with an approved connector, available at any hardware store or electrical supply house.

5-4. Make certain the wiring meets all national and local standards and ANSI/NFPA 70..

You have now successfully prepared your ceiling fan site. For instructions to install your ceiling fan, go to your fan manual and continue with Section 2 • Installing the

Ceiling Plate.

4

Steps 2 – 3

Step 4

Step 5

CAUTION: All wiring must be in

accordance with national and local electrical codes and ANSI/NFPA 70. If you are unfamiliar with wiring, use a

qualified electrician.

42696-01 • 11/04/09 • Hunter Fan Company

Page 4
Image 4
Hunter Fan 42696-01 Cut the Ceiling Hole, Install a Support Brace, If Necessary, Install the Outlet Box, Ceiling Plate

42696-01 specifications

The Hunter Fan 42696-01 is a striking ceiling fan that combines modern design with exceptional functionality, making it a popular choice for homeowners seeking both style and performance. This model features a sleek, minimalist aesthetic that's perfect for various decor styles, from contemporary to traditional.

One of the most notable features of the Hunter Fan 42696-01 is its WhisperWind motor technology. This innovative motor design ensures that the fan operates quietly, allowing users to enjoy a comfortable environment without the distraction of noise. With powerful air movement, this fan can efficiently circulate air throughout the room, leading to improved comfort levels during warm or chilly seasons.

Equipped with a versatile three-speed motor, the Hunter Fan 42696-01 allows you to customize airflow according to your preference. Whether you need a gentle breeze for relaxation or stronger airflow for cooling, this fan can cater to your needs. Additionally, the reversible motor feature means you can switch the direction of the fan blades, enabling airflow either downwards during summer or upwards during winter. This versatility can help save on energy costs by improving the effectiveness of heating and cooling systems.

Another standout characteristic of this fan is its high-quality materials and craftsmanship. The fan blades are made from durable wood that not only adds elegance but also contributes to its overall stability and longevity. The blades are designed to provide maximum efficiency without compromising on aesthetics, ensuring that the fan looks great while performing admirably.

Installation is also made easy with the Hunter Fan 42696-01. It comes with a comprehensive instruction manual, and its adaptable mounting system allows for both standard and angled ceiling installation. This ensures that it can fit seamlessly into various room configurations, making it an excellent option for living rooms, bedrooms, or even large, open spaces.

For added convenience, the Hunter Fan 42696-01 can be paired with compatible smart home devices, providing users the ability to control the fan remotely. This feature enhances user experience by enabling operation via smartphone applications or voice commands, allowing for effortless adjustment without needing to get up.

In conclusion, the Hunter Fan 42696-01 stands out for its combination of innovative technology, elegant design, and user-friendly features. Its WhisperWind motor, customizable speed settings, reversible airflow, and smart compatibility make it a top choice for anyone looking to enhance their indoor environment while enjoying the comforts of modern technology.