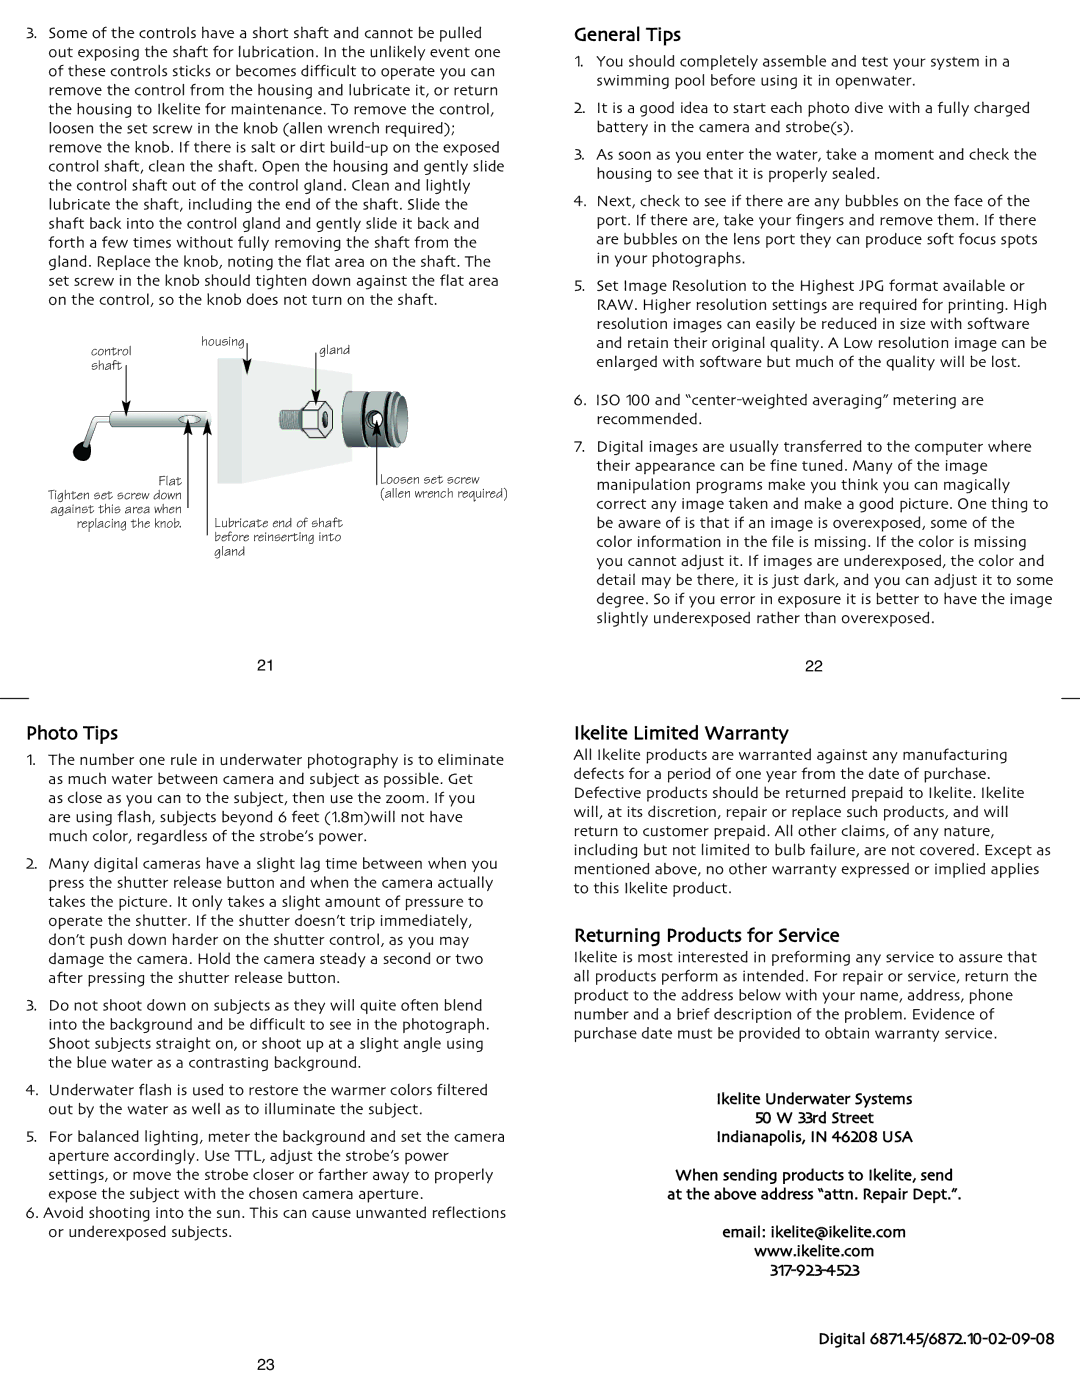
3.Some of the controls have a short shaft and cannot be pulled out exposing the shaft for lubrication. In the unlikely event one of these controls sticks or becomes difficult to operate you can remove the control from the housing and lubricate it, or return the housing to Ikelite for maintenance. To remove the control, loosen the set screw in the knob (allen wrench required); remove the knob. If there is salt or dirt
General Tips
1. You should completely assemble and test your system in a swimming pool before using it in openwater.
2. It is a good idea to start each photo dive with a fully charged battery in the camera and strobe(s).
3. As soon as you enter the water, take a moment and check the housing to see that it is properly sealed.
4. Next, check to see if there are any bubbles on the face of the port. If there are, take your fingers and remove them. If there are bubbles on the lens port they can produce soft focus spots in your photographs.
5. Set Image Resolution to the Highest JPG format available or RAW. Higher resolution settings are required for printing. High resolution images can easily be reduced in size with software and retain their original quality. A Low resolution image can be
control | housing |
|
| gland | |
| |||||
shaft |
|
|
|
|
|
|
|
|
|
|
|
|
|
|
|
|
|
Flat Tighten set screw down against this area when
replacing the knob. Lubricate end of shaft before reinserting into gland
Loosen set screw (allen wrench required)
enlarged with software but much of the quality will be lost.
6. ISO 100 and
7. Digital images are usually transferred to the computer where their appearance can be fine tuned. Many of the image manipulation programs make you think you can magically correct any image taken and make a good picture. One thing to be aware of is that if an image is overexposed, some of the color information in the file is missing. If the color is missing you cannot adjust it. If images are underexposed, the color and detail may be there, it is just dark, and you can adjust it to some degree. So if you error in exposure it is better to have the image slightly underexposed rather than overexposed.
21
Photo Tips
1. The number one rule in underwater photography is to eliminate as much water between camera and subject as possible. Get
as close as you can to the subject, then use the zoom. If you are using flash, subjects beyond 6 feet (1.8m)willnot have much color, regardless of the strobe’s power.
2. Many digital cameras have a slight lag time between when you press the shutter release button and when the camera actually takes the picture. It only takes a slight amount of pressure to operate the shutter. If the shutter doesn’t trip immediately, don’t push down harder on the shutter control, as you may damage the camera. Hold the camera steady a second or two after pressing the shutter release button.
3. Do not shoot down on subjects as they will quite often blend into the background and be difficult to see in the photograph. Shoot subjects straight on, or shoot up at a slight angle using the blue water as a contrasting background.
4. Underwater flash is used to restore the warmer colors filtered out by the water as well as to illuminate the subject.
5. For balanced lighting, meter the background and set the camera aperture accordingly. Use TTL, adjust the strobe’s power settings, or move the strobe closer or farther away to properly expose the subject with the chosen camera aperture.
6. Avoid shooting into the sun. This can cause unwanted reflections or underexposed subjects.
23
22
Ikelite Limited Warranty
All Ikelite products are warranted against any manufacturing defects for a period of one year from the date of purchase. Defective products should be returned prepaid to Ikelite. Ikelite will, at its discretion, repair or replace such products, and will return to customer prepaid. All other claims, of any nature, including but not limited to bulb failure, are not covered. Except as mentioned above, no other warranty expressed or implied applies to this Ikelite product.
Returning Products for Service
Ikelite is most interested in preforming any service to assure that all products perform as intended. For repair or service, return the product to the address below with your name, address, phone number and a brief description of the problem. Evidence of purchase date must be provided to obtain warranty service.
Ikelite Underwater Systems
50 W 33rd Street
Indianapolis, IN 46208 USA
When sending products to Ikelite, send at the above address “attn. Repair Dept.”. email: ikelite@ikelite.com www.ikelite.com
Digital
