IKELITE VIDEO CASE
SUPPLEMENTAL INSTRUCTIONS FOR
#6038.92 Sony HDR SR7, SR8
Thissupplementalsetofinstructionsdescribesadditionalfeaturesspecific toyourhousingmodel.Priortotestingthesysteminthewater,pleaseread thissupplementalongwiththegeneralinstructionmanualtobecomefamiliar withitsfeaturesandfunctions.
IkeliteVideoCasesareslightlynegativeinsaltwaterforstability.This housinghasbeenwaterpressuretestedatthefactoryandhasaworking depthof60m(200').
P R E P A R A T IO N |
|
|
PACKAGED WITH HOUSING__________________________________________________ | ||
• External UR/Pro Color Filter |
|
|
• Internal Lens Shade |
|
|
• Silicone Lubricant |
|
|
COLOR FILTER_____________________________________ |
|
|
The installation and usage of the external UR/Pro |
|
|
color filter is described in the general instruction manual. |
|
|
LENS SHADE_______________________________________ |
|
|
The internal lens shade helps block light reflection/ |
|
|
refraction caused by the interaction of the external color |
|
|
filter and the port. | External | Internal |
Carefully thread the lens shade on the front of the | Color Filter | Lens Shade |
camera lens. The lens threads are very fine; DO NOT cross thread. It should screw on very easily. If it is difficult to turn, you are cross th reading.
Completely thread the lens shade into the camera to av oid any potential clearance or sealing problems when the camera is in stalled and the housing is sea led.
See exactly what the camera sees underwater using the camera's electronic viewfinder in conjunction with the Ikelite
LCD MONITOR / EXTERNAL MIRROR_________________________________________
The camera's LCD monitor can be viewed from the rear of the housing, using the external mirror featured on the side of th e housing.
Open the LCD monitor on the camera, rotate 180°,and then press it back against
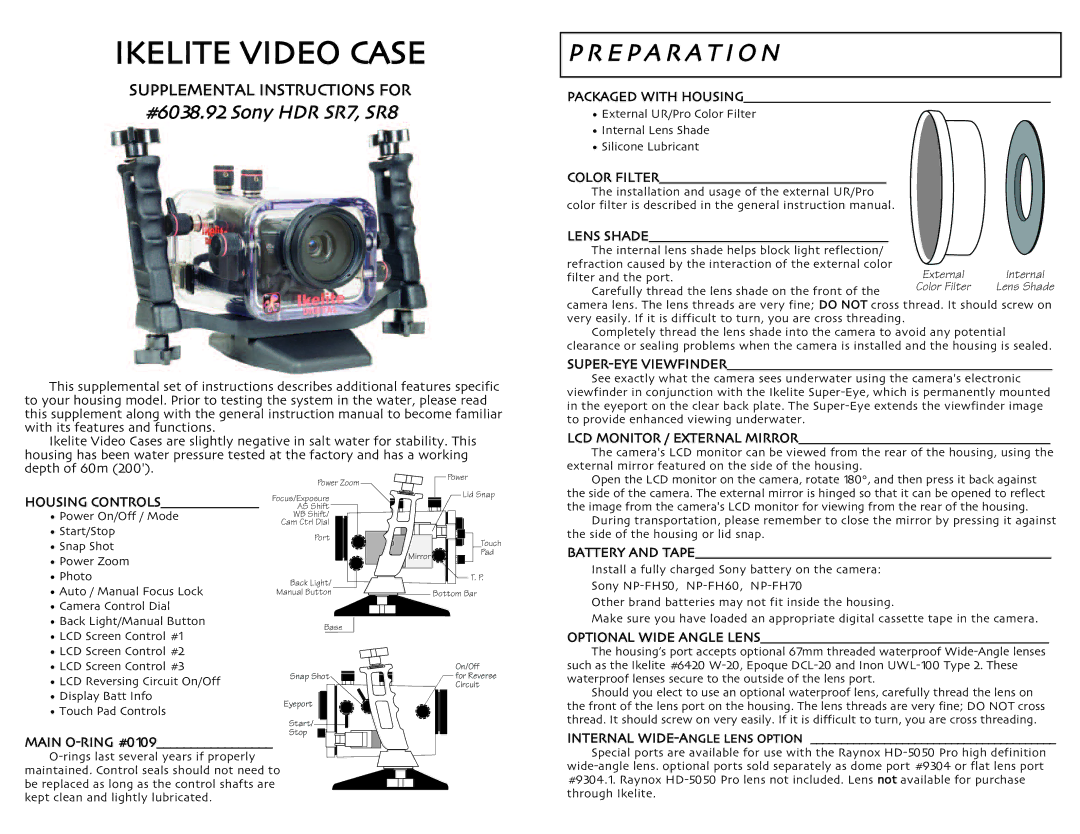
HOUSING CONTROLS________________ |
|
| Power Zoom | ||||||||||
| AS Shift | ||||||||||||
• Power On/Off / Mode |
| Focus/Exposure |
|
| |||||||||
|
| Cam Ctrl Dial |
| ||||||||||
• Start/Stop |
|
| WB Shift/ |
|
|
|
|
| |||||
|
|
|
|
|
|
|
|
|
|
|
|
| |
• Snap Shot |
|
|
| Port |
|
|
|
|
| ||||
• Power Zoom |
|
|
|
|
|
|
|
|
|
|
|
|
|
|
|
|
|
|
|
|
|
|
|
|
|
| |
• Photo |
|
| Back Light/ |
| |||||||||
• Auto / Manual Focus Lock |
| Manual Button |
|
|
|
|
| ||||||
|
|
|
|
| |||||||||
• Camera Control Dial | Button |
|
|
|
|
|
|
|
|
|
|
|
|
• Back Light/Manual |
|
|
| Base | |||||||||
• LCD Screen Control #1 |
|
|
|
|
|
|
|
|
|
|
|
|
|
• LCD Screen Control #2 |
|
|
|
|
|
|
|
|
|
|
|
|
|
• LCD Screen Control #3 |
|
|
|
|
|
|
|
|
|
|
|
|
|
• LCD Reversing Circuit On/Off |
| Snap Shot | |||||||||||
• Display Batt Info |
|
| Eyeport |
|
|
|
|
|
|
|
|
| |
|
|
|
|
|
|
| |||||||
• Touch Pad Controls |
|
| Start/ |
|
|
|
|
|
|
|
|
|
|
MAIN |
|
|
|
|
|
|
|
|
|
| |||
|
|
|
|
|
|
|
|
|
| ||||
Stop |
|
|
|
|
|
|
|
| |||||
|
|
|
|
|
|
|
|
|
|
|
| ||
|
|
|
|
|
|
|
|
|
|
|
| ||
|
|
|
|
|
|
|
|
|
|
|
| ||
|
|
|
|
|
|
|
|
|
|
|
| ||
maintained. Contr ol seals sh ould not need to | |||||||||||||
be repl aced as long as t he con trol shafts are |
|
|
|
|
|
|
|
|
|
|
| ||
kept clean and lightly lubricated. |
|
|
|
|
|
|
|
|
|
|
|
| |
| Power |
| Lid Snap |
| Touch |
Mirror | Pad |
| |
| T. P. |
![]()
![]()
![]()
![]() Bottom Bar
Bottom Bar
On/Off
for Reverse Circuit
the side of the camera. The external mirror is hinged so that it can be opened to reflect the image from the camera's LCD monitor for viewing from the rear of the housing.
During transportation, please remember to cl ose the mirror by p ressing it against the side of the housing or lid snap.
BATTERY AND TAPE__________________________________________________________
Install a fully charged Sony battery on the camera:
Sony
Other brand batteries may not fit inside the housing.
Make sure you have loaded an appropriate digital cassette tape in the camera. OPTIONAL WIDE ANGLE LENS_______________________________________________
The housing’s port accepts optional 67mm threaded waterproof
Should you elect to use an optional waterproof lens, carefully thread the lens on the front of the lens port on the housing. The lens threads are very fine; DO NOT cross thread. It should screw on very easily. If it is difficult to turn, you are cross threading. INTERNAL
Special ports are available for use with the Raynox HD- 5050 Pro high definition