Installation

Replacement fuse covers:


GB

If a replacement fuse cover is fitted, it must be of the correct colour


as indicated by the coloured marking or the colour that is


! Before placing your new appliance into operation please read

embossed in words on the base of the plug.


Changing the plug:


these operating instructions carefully. They contain important


information for safe use, for installation and for care of the

Removing the plug


appliance.

If your appliance has a non-rewireable moulded plug and you should


! Please keep these operating instructions for future reference.

wish to remove it to add a longer cable or to re-route the mains cable


Pass them on to possible new owners of the appliance.

through partitions, units etc. please ensure that either:


Positioning and connection

- The plug is replaced by a fused 13amp re-wireable plug


bearing the BSI mark of approval.


Positioning

or


- The mains cable is wired directly into a 13amp cable outlet,


1. Place the appliance in a well-ventilated humidity-free room.


controlled by a switch (in compliance with BS 5733) which is


2. Do not obstruct the rear fan grills. The compressor and


accessible without moving the appliance.


condenser give off heat and require good ventilation to operate


correctly and save energy.

Disposing of the plug


3. Leave a space of at least 10 cm between the top part of the


Cut off and dispose of the supplied plug if it does not fit your socket.


appliance and any furniture above it, and at least 5 cm between


The cable should be cut as close as possible to the moulded plug.


the sides and any furniture/side walls.


Remove the fuse.


4. Ensure the appliance is away from any sources of heat (direct


WARNING:


sunlight, electric stove, etc.).


To avoid a shock hazard do not insert the discarded plug


5. In order to maintain the correct distance between the appliance


into a socket anywhere else.


and the wall behind it, fit the spacers supplied in the installation


Fitting a new plug


kit, following the instructions provided.


IMPORTANT:


Levelling

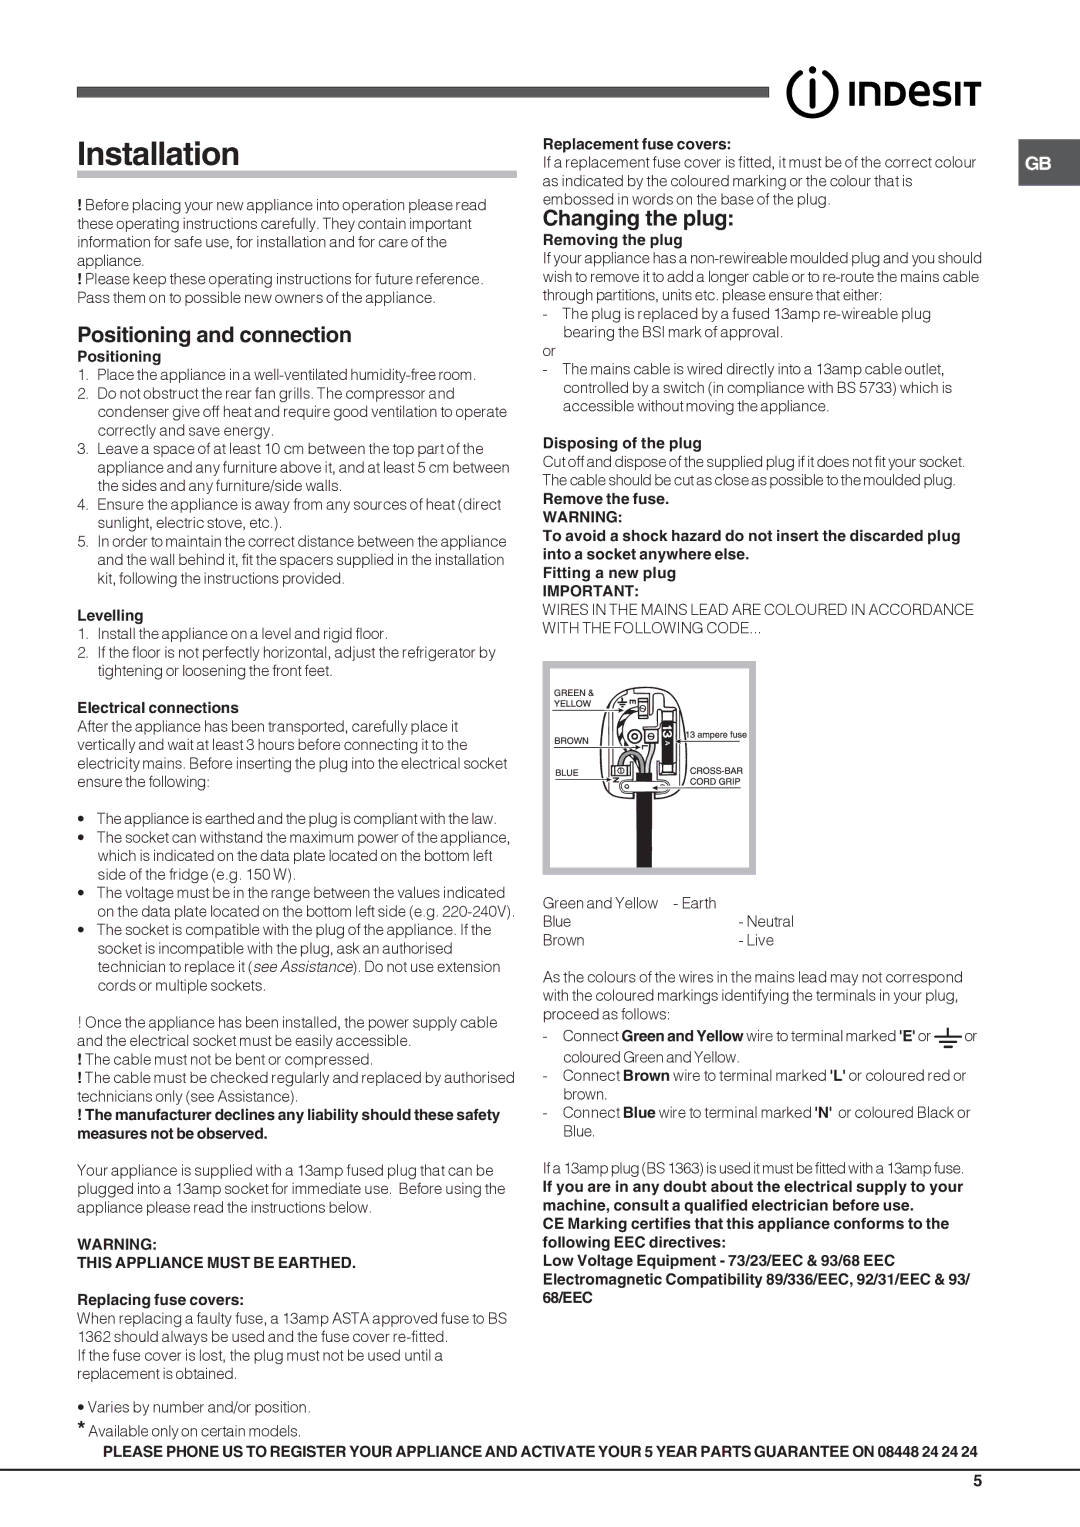
WIRES IN THE MAINS LEAD ARE COLOURED IN ACCORDANCE


WITH THE FOLLOWING CODE...


1. Install the appliance on a level and rigid floor.


2. If the floor is not perfectly horizontal, adjust the refrigerator by


tightening or loosening the front feet.


Electrical connections


After the appliance has been transported, carefully place it


vertically and wait at least 3 hours before connecting it to the


electricity mains. Before inserting the plug into the electrical socket


ensure the following:


• The appliance is earthed and the plug is compliant with the law.


• The socket can withstand the maximum power of the appliance,


which is indicated on the data plate located on the bottom left


side of the fridge (e.g. 150 W).


• The voltage must be in the range between the values indicated

Green and Yellow

- Earth

on the data plate located on the bottom left side (e.g. 220-240V).

Blue

- Neutral

• The socket is compatible with the plug of the appliance. If the

Brown

- Live

socket is incompatible with the plug, ask an authorised


technician to replace it (see Assistance). Do not use extension

As the colours of the wires in the mains lead may not correspond


cords or multiple sockets.


with the coloured markings identifying the terminals in your plug,


! Once the appliance has been installed, the power supply cable

proceed as follows:


-

Connect Green and Yellow wire to terminal marked 'E' or

or

and the electrical socket must be easily accessible.


coloured Green and Yellow.


! The cable must not be bent or compressed.


! The cable must be checked regularly and replaced by authorised

- Connect Brown wire to terminal marked 'L' or coloured red or

technicians only (see Assistance).


brown.


! The manufacturer declines any liability should these safety

-

Connect Blue wire to terminal marked 'N' or coloured Black or

measures not be observed.


Blue.


Your appliance is supplied with a 13amp fused plug that can be

If a 13amp plug (BS 1363) is used it must be fitted with a 13amp fuse.

plugged into a 13amp socket for immediate use. Before using the

If you are in any doubt about the electrical supply to your


appliance please read the instructions below.

machine, consult a qualified electrician before use.


CE Marking certifies that this appliance conforms to the


WARNING:

following EEC directives:


THIS APPLIANCE MUST BE EARTHED.

Low Voltage Equipment - 73/23/EEC & 93/68 EEC


Electromagnetic Compatibility 89/336/EEC, 92/31/EEC & 93/

Replacing fuse covers:

68/EEC


When replacing a faulty fuse, a 13amp ASTA approved fuse to BS


1362 should always be used and the fuse cover re-fitted.


If the fuse cover is lost, the plug must not be used until a


replacement is obtained.


Varies by number and/or position. *Available only on certain models.

PLEASE PHONE US TO REGISTER YOUR APPLIANCE AND ACTIVATE YOUR 5 YEAR PARTS GUARANTEE ON 08448 24 24 24

5

Page 5
Image 5
Indesit BAN 40 manual Installation, Changing the plug, Positioning and connection, This Appliance Must be Earthed

BAN 40 specifications

The Indesit BAN 40 is a highly efficient and versatile refrigerator that caters to the needs of modern households. With its sleek design and user-friendly features, it stands out as a reliable appliance in any kitchen setup. This model is tailored to optimize food storage and energy efficiency, making it a popular choice among consumers looking for functionality and style.

One of the key features of the Indesit BAN 40 is its generous capacity. With ample storage space, it provides enough room for all your groceries, whether you’re stocking up for a family gathering or weekly shopping. The refrigerator's layout is thoughtfully designed, with adjustable shelves that allow users to customize the internal space according to their needs. This flexibility makes it easy to store large items like pizza boxes or bulkier groceries without fuss.

The Indesit BAN 40 also incorporates the latest cooling technologies to ensure that your food stays fresh for longer. The No Frost technology is a standout feature, as it prevents the build-up of frost and ice inside the appliance. This means you won’t have to defrost the freezer compartment manually, saving you time and effort. Instead, the continuous air circulation ensures an even temperature throughout the refrigerator, maintaining an ideal environment for your perishables.

Energy efficiency is another crucial characteristic of the Indesit BAN 40. It boasts a high energy rating, helping you save on electricity bills while reducing your environmental footprint. This is an essential consideration for anyone looking to make more sustainable choices in their home.

Additional technologies such as MultiFlow contribute to the overall performance of the refrigerator. MultiFlow uses a series of vents to circulate cool air throughout the fridge and freezer compartments, ensuring consistent temperatures. This not only enhances the freshness of food but also helps to prevent spoilage.

Furthermore, this model is designed with user comfort in mind. The reversible door feature allows you to install the fridge in a way that best suits your kitchen's layout. Simple control mechanisms make adjusting settings straightforward, and bright LED lighting inside the fridge enhances visibility and showcases your food beautifully.

In summary, the Indesit BAN 40 represents a blend of modern design, superior technology, and practical features. Its spacious interior, energy-saving capabilities, and user-friendly design make it an excellent addition to any kitchen. Whether you’re a culinary enthusiast or just need reliable storage, the Indesit BAN 40 meets the demands of everyday life effortlessly.