Model : IS-HTIB101071
DVD Home Theatre System
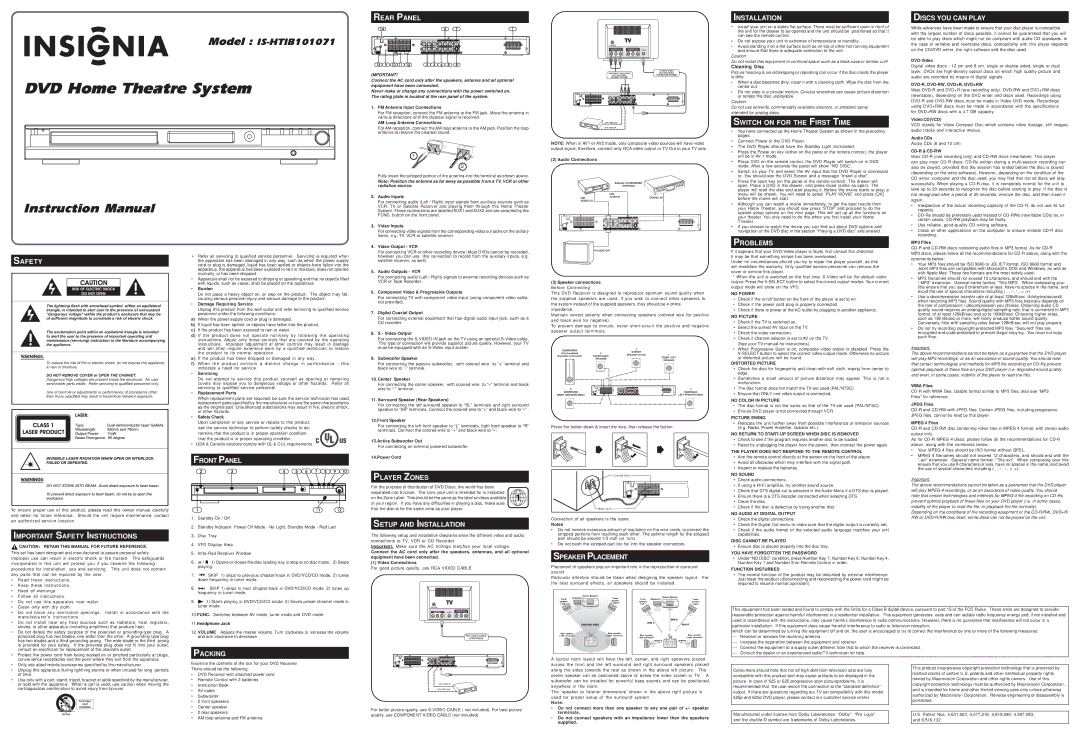
REAR PANEL
IMPORTANT!
Connect the AC cord only after the speakers, antenna and all optional equipment have been connected.
Never make or change any connections with the power switched on. The rating plate is located at the rear panel of the system.
1.FM Antenna Input Connections
For FM reception, connect the FM antenna to the FM jack. Move the antenna in various directions until the clearest signal is received.
AM Loop Antenna Connections
For AM reception, connect the AM loop antenna to the AM jack. Position the loop antenna to receive the clearest sound.
1
 2
2
Fully insert the stripped portion of the antenna into the terminal as shown above.
Note: Position the antenna as far away as possible from a TV, VCR or other radiation source.
NOTE: When in AV1 or AV2 mode, only composite video sources will have video output signal, therefore, connect only RCA video output or TV Out to your TV sets.
(2) Audio Connections
Example: CD RECORDER | |
(OPTIONAL) | |
VCR | |
AUDIO IN | COAXIAL IN |
INSTALLATION
•Install your unit on a stable flat surface. There must be sufficient room in front of the unit for the drawer to be opened and the unit should be positioned so that it can see the remote control.
•Do not expose your unit to extremes of temperature or humidity.
•Avoid standing it on a hot surface such as on top of other hot running equipment and ensure that there is adequate ventilation to the unit.
Caution:
Do not install this equipment in confined space such as a book case or similar unit!
Cleaning Disc
Picture freezing & sound skipping or repeating can occur if the disc inside the player is dirty.
•When a disc becomes dirty, clean it with a cleaning cloth. Wipe the disc from the center out.
•Do not wipe in a circular motion. Circular scratches can cause picture distortion or render the disc unplayable.
Caution:
Do not use solvents, commercially available cleaners, or antistatic spray intended for analog discs.
SWITCH ON FOR THE FIRST TIME
• You have connected up the Home Theater System as shown in the preceding |
pages. |
• Connect Power to the DVD Player. |
• The DVD Player should have the Standby Light illuminated. |
• Press the Power on key (either on the panel or the remote control); the player |
will be in AV 1 mode. |
• Press DVD on the remote control; the DVD Player will switch on in DVD |
mode. After a few seconds the panel will show “NO DISC”. |
• Switch on your TV and select the AV input that the DVD Player is connected |
to. You should see the DVD Screen and a message “Insert a disc”. |
• Press the open key (on the panel or the remote control). The drawer will |
open. Place a DVD in the drawer, and press close (same as open). The |
player will read the disc and start playing it. Before the movie starts to play, a |
menu will be shown. You will need to select ‘PLAY MOVIE’ and press [OK] |
DISCS YOU CAN PLAY
While advances have been made to ensure that your disc player is compatible with the largest number of discs possible, it cannot be guaranteed that you will be able to play discs which might not be compliant with audio CD standards. In the case of writable and rewritable discs, compatibility with this player depends on the CD/DVD writer, the right software and the disc used.
DVD-Video
Digital video discs - 12 cm and 8 cm, single or double sided, single or dual layer. DVDs are high-density optical discs on which high quality picture and audio are recorded by means of digital signals.
DVD-R, DVD-RW, DVD+R, DVD+RW
Most DVD-R and DVD+R (one recording only), DVD-RW and DVD+RW discs (rewritable), depending on the DVD writer and discs used. Recordings using DVD-R and DVD-RW discs must be made in Video DVD mode. Recordings using DVD+RW discs must be made in accordance with the specifications for DVD+RW discs with a 4.7 GB capacity.
Video CD(VCD)
VCD stands for Video Compact Disc which contains video footage, still images, audio tracks and interactive menus.
Audio CDs
Audio CDs (8 and 12 cm).
CD-R & CD-RW
Most CD-R (one recording only) and CD-RW discs (rewritable). This player
can play most CD-R discs. CD-Rs written during a multi-session recording can also be played, provided that the session has ended before the disc is played (depending on the write software). However, depending on the condition of the CD writer, computer and the disc used, you may find that not all discs will play successfully. When playing a CD-R disc, it is completely normal for the unit to take up to 20 seconds to recognize the disc before starting to play. If the disc is not recognized after a period of 20 seconds, remove the disc, and then insert it
Instruction Manual
SAFETY
CAUTION
RISK OF ELECTRIC SHOCK
DO NOT OPEN
The lightning flash with arrowhead symbol, within an equilateral triangle, is intended to alert user to the presence of uninsulated "dangerous voltage" within the product’s enclosure that may be of sufficient magnitude to constitute a risk of electric shock.
The exclamation point within an equilateral triangle is intended to alert the user to the presence of important operating and maintenance (servicing) instruction in the literature accompanying the appliance.
WARNINGS:
To reduce the risk of fire or electric shock, do not expose this appliance to rain or moisture.
DO NOT REMOVE COVER or OPEN THE CABINET.
Dangerous high voltages are present inside the enclosure. No user serviceable parts inside. Refer servicing to qualified personnel only.
Use of controls or adjustments or performance of procedures other than those specified may result in hazardous radiation exposure.
•Refer all servicing to qualified service personnel. Servicing is required when the apparatus has been damaged in any way, such as when the power supply cord or plug is damaged, liquid has been spilled or objects have fallen into the apparatus, the apparatus has been exposed to rain or moisture, does not operate normally, or has been dropped.
•Apparatus shall not be exposed to dripping or splashing and that no objects filled with liquids, such as vases, shall be placed on the apparatus.
•Burden
Do not place a heavy object on, or step on the product. The object may fall, causing serious personal injury and serious damage to the product.
•Damage Requiring Service
Unplug this product from the wall outlet and refer servicing to qualified service personnel under the following conditions:
a)When the power-supply cord or plug is damaged.
b)If liquid has been spilled, or objects have fallen into the product.
c)If the product has been exposed to rain or water.
d)If the product does not operate normally by following the operating instructions. Adjust only those controls that are covered by the operating instructions. Improper adjustment of other controls may result in damage and will often require extensive work by a qualified technician to restore the product to its normal operation.
e)If the product has been dropped or damaged in any way.
f)When the product exhibits a distinct change in performance - this indicates a need for service.
•Servicing
Do not attempt to service this product yourself as opening or removing covers may expose you to dangerous voltage or other hazards. Refer all servicing to qualified service personnel.
•Replacement Parts
When replacement parts are required, be sure the service technician has used replacement parts specified by the manufacturer or have the same characteristics as the original part. Unauthorized substitutions may result in fire, electric shock, or other hazards.
•Safety Check
Upon completion of any service or repairs to this product, ask the service technician to perform safety checks to de- termine that the product is in proper operation condition.
that the product is in proper operating condition.
• USA & Canada versions comply with UL & CUL requirements.
| For connecting audio (Left / Right) input signals from auxiliary sources such as |
| VCR, TV or Satellite Receiver and playing them through this Home Theater |
| System. These connections are labelled AUX1 and AUX2 and are selected by the |
| FUNC. button on the front panel. |
3. | Video Inputs |
| For connecting video signals from the corresponding video out jacks on the axillary |
| items, e.g. TV, VCR or satellite receiver. |
4. | Video Output - VCR |
| For connecting VCR or other recording device (Most DVDs cannot be recorded, |
| however you can use this connection to record from the auxiliary inputs, e.g. |
| satellite receiver, as well). |
5. | Audio Outputs - VCR |
| For connecting audio (Left / Right) signals to external recording devices such as |
| VCR or Tape Recorder. |
6. | Component Video & Progressive Outputs |
| For connecting TV with component video input (using component video cable, |
| not provided). |
7. | Digital Coaxial Output |
| For connecting external equipment that has digital audio input jack, such as a |
| CD recorder. |
8. | S - Video Output |
| For connecting the S-VIDEO IN jack on the TV using an optional S-Video cable. |
| This type of connection will provide superior picture quality. However, your TV |
| must be equipped with an S-Video input socket. |
9. | Subwoofer Speaker |
| For connecting the passive subwoofer, with colored wire to “+” terminal and |
| black wire to “-” terminal. |
10. Center Speaker |
| For connecting the center speaker, with colored wire to “+” terminal and black |
| wire to “-” terminal. |
11. Surround Speaker (Rear Speakers) |
| For connecting the left surround speaker to “SL” terminals and right surround |
| speaker to “SR” terminals. Connect the colored wire to “+” and black wire to “-” . |
12.Front Speaker
For connecting the left front speaker to “L” terminals, right front speaker to “R” terminals. Connect the colored wire to “+” and black wire to “-”.
13.Active Subwoofer Out
For connecting an external powered subwoofer.
TV AUDIO OUT
(3)Speaker connections Before Connecting
This DVD Receiver is designed to reproduce optimum sound quality when the supplied speakers are used. If you wish to connect other speakers to the system instead of the supplied speakers, they should be 4 ohms impedance.
Maintain correct polarity when connecting speakers (colored wire for positive and black wire for negative).
To prevent damage to circuits, never short-circuit the positive and negative speaker output terminals.
| SUBWOOFER | | 3 | |
| | CENTER | |
| (Can be placed | 2 | |
| SPEAKER (Front) | 1 |
| anywhere in the room) | FRONT RIGHT |
| | FRONT LEFT |
| | SPEAKER | |
| | | SPEAKER |
| | | |
5 | 4 |
SURROUND | SURROUND |
RIGHT SPEAKER (Rear) | LEFT SPEAKER (Rear) |
Press the button down & insert the wire, then release the button.
before the movie will start. |
• Although you can watch a movie immediately, to get the best results from |
your Home Theater, you should now press ‘STOP’ and proceed to do the |
system setup options on the next page. This will set up all the functions on |
your theater. You only need to do this when you first install your Home |
Theater. |
• If you choose to watch the movie you can find out about DVD options and |
navigation of the DVD disc in the section “Playing a DVD disc” and onward. |
PROBLEMS
If it appears that your DVD-Video player is faulty, first consult this checklist. It may be that something simple has been overlooked.
Under no circumstances should you try to repair the player yourself, as this will invalidate the warranty. Only qualified service personnel can remove the cover or service this player.
*When the unit is switched on the first time, S-Video will be the default video output. Press the V-SELECT button to select the correct output modes. Your current output mode will show on the VFD.
NO POWER
•Check if the on/off button on the front of the player is set to on.
•Check if the power cord plug is properly connected.
•Check if there is power at the AC outlet by plugging in another appliance.
NO PICTURE
•Check if the TV is switched on.
•Select the correct AV input on the TV.
•Check the video connection.
•Check if channel selector is set to AV on the TV. (See your TV manual for instructions).
•When Progressive Scan is on, composite video output is disabled. Press the V-SELECT button to select the correct video output mode. Otherwise no picture or distorted picture will be found.
DISTORTED PICTURE
•Check the disc for fingerprints and clean with soft cloth, wiping from center to edge.
•Sometimes a small amount of picture distortion may appear. This is not a malfunction.
•The disc format does not match the TV-set used (PAL/NTSC).
•Ensure that ONLY one video output is connected.
NO COLOR IN PICTURE
•The disc format is not the same as that of the TV-set used (PAL/NTSC).
•Ensure DVD player is not connected through VCR.
PICTURE SWING
•Relocate the unit further away from possible interference or emission sources (e.g. Radio, Power Amplifier, radiator etc.).
NO RETURN TO START-UP SCREEN WHEN DISC IS REMOVED
•Check to see if the program requires another disc to be loaded.
•Reset by unplugging the player from the power, then connect the power again.
THE PLAYER DOES NOT RESPOND TO THE REMOTE CONTROL
again.
•Irrespective of the actual recording capacity of the CD-R, do not use its full capacity.
•CD-Rs should be preferably used instead of CD-RWs (rewritable CDs) as, in certain cases, CD-RW playback may be faulty.
•Use reliable, good-quality CD writing software.
•Close all other applications on the computer to ensure reliable CD-R disc recording.
MP3 Files
CD-R and CD-RW discs containing audio files in MP3 format. As for CD-R
MP3 discs, please follow all the recommendations for CD-R above, along with the comments below:
•Your MP3 files should be ISO 9660 or JOLIET format. ISO 9660 format and Joliet MP3 files are compatible with Microsoft’s DOS and Windows, as well as with Apple Mac. These two formats are the most widely used.
•MP3 filenames should not exceed 12 characters, and should end with the “.MP3” extension. General name format: “Title.MP3”. When composing your title ensure that you use 8 characters or less, have no spaces in the name, and avoid the use of special characters including ( . , / , \ , = ,+).
•Use a decompression transfer rate of at least 128kB/sec (kilobytes/second) when recording MP3 files. Sound quality with MP3 files basically depends on the rate of compression / decompression you choose. Obtaining audio CD quality sound requires an analog/digital sampling rate, that is converted to MP3 format, of at least 128kB/sec and up to 160kB/sec. Choosing higher rates, such as 192 kB/sec or more, will rarely produce better sound quality. Conversely, files with sampling rates below 128kB/sec will not play properly.
•Do not try recording copyright-protected MP3 files. “Secured” files are encrypted and code-protected to prevent illegal copying. You must not copy such files.
Important:
The above recommendations cannot be taken as a guarantee that the DVD player will play MP3 recordings, or as an assurance of sound quality. You should note that certain technologies and methods for MP3 file recording on CD-Rs prevent optimal playback of these files on your DVD player (i.e. degraded sound quality and even, in some cases, inability of the player to read the file).
WMA Files
CD-R with WMA files. Usable format similar to MP3 files; also see “MP3 Files” for reference.
JPEG Files
CD-R and CD-RW with JPEG files. Certain JPEG files, including progressive JPEG files, cannot be read by this player.
MPEG 4 Files
CD-R and CD-RW disc containing video files in MPEG 4 format, with stereo audio output only.
As for CD-R MPEG 4 discs, please follow all the recommendations for CD-R above, along with the comments below:
• Your MPEG 4 files should be ISO format without QPEL. |
To ensure proper use of this product, please read this owner manual carefully and retain for future reference. Should the unit require maintenance, contact an authorized service location.
IMPORTANT SAFETY INSTRUCTIONS
 CAUTION: RETAIN THIS MANUAL FOR FUTURE REFERENCE.
This set has been designed and manufactured to assure personal safety. Improper use can result in electric shock or fire hazard. The safeguards incorporated in this unit will protect you if you observe the following procedures for installation, use and servicing. This unit does not contain
FRONT PANEL
1. | Standby On / Off |
2. | Standby Indicator: Power Off Mode - No Light; Standby Mode - Red Led |
3. | Disc Tray |
4. | VFD Display Area |
5. | Infra-Red Receiver Window |
6. | / | | 1) Opens or closes the disc loading tray in stop or no disc mode, 2) Stops |
|
| playing. |
14.Power Cord
PLAYER ZONES
For the purpose of distribution of DVD Discs, the world has been separated into 6 zones. The zone your unit is intended for is indicated on the Zone Label. This should be the same as the label on discs available in your region. If you have any difficulties in playing a disc, make sure that the disc is for the same zone as your player.
SETUP AND INSTALLATION
The following setup and installation diagrams show the different video and audio connections to TV, VCR or CD Recorder.
Important: Make sure the AC Voltage matches your local voltage.
Connect the AC cord only after the speakers, antennas, and all optional equipment have been connected.
(1) Video Connections
For good picture quality, use RCA VIDEO CABLE
Connection of all speakers is the same.
Notes
•Do not remove excessive amount of insulation on the wire cords, to prevent the stripped portions from touching each other. The optimal length for the stripped part should be around 1/3 inch (or 1cm).
•Do not push the stripped part too far into the speaker connectors.
SPEAKER PLACEMENT
Placement of speakers play an important role in the reproduction of surround sound.
•Aim the remote control directly at the sensor on the front of the player.
•Avoid all obstacles which may interfere with the signal path.
•Inspect or replace the batteries.
NO SOUND
•Check audio connections.
•If using a Hi-Fi amplifier, try another sound source.
•Check that DTS digital out is selected in the Audio Menu if a DTS disc is played.
•Ensure there is a DTS decoder connected when selecting DTS.
•Clean the disc.
•Check if the disc is defective by trying another disc
NO AUDIO AT DIGITAL OUTPUT
•Check the digital connections
•Check the Digital Out menu to make sure that the digital output is correctly set.
•Check if the audio format of the selected audio language matches your unit capabilities.
DISC CANNOT BE PLAYED
• Ensure disc is placed properly into the disc tray.
YOU HAVE FORGOTTEN THE PASSWORD
•Under “NO DISC” condition, press Number Key 7, Number Key 6, Number Key 4, Number Key 1 and Number 8 on Remote Control in order.
FUNCTION DISTURBED
• MPEG 4 filenames should not exceed 12 characters, and should end with the |
“.avi” extension. General name format: “Title.avi”. When composing your title |
ensure that you use 8 characters or less, have no spaces in the name, and avoid |
the use of special characters including ( . , / , \ , = ,+). |
Important:
The above recommendations cannot be taken as a guarantee that the DVD player will play MPEG 4 recordings, or as an assurance of video quality. You should note that certain technologies and methods for MPEG 4 file recording on CD-Rs prevent optimal playback of these files on your DVD player (i.e. In some cases, inability of the player to read the file, or playback the file normally).
Depending on the conditions of the recording equipment or the CD-R/RW, DVD+R/ RW or DVD-R/RW disc itself, some discs can not be played on the unit.
any parts that can be repaired by the user.
•Read these instructions.
•Keep these instructions.
•Heed all warnings.
•Follow all instructions.
•Do not use this apparatus near water.
•Clean only with dry cloth.
•Do not block any ventilation openings. Install in accordance with the manufacturer’s instructions.
•Do not install near any heat sources such as radiators, heat registers, stoves, or other apparatus (including amplifiers) that produce heat.
•Do not defeat the safety purpose of the polarized or grounding-type plug. A polarized plug has two blades, one wider than the other. A grounding type plug has two blades and a third grounding prong. The wide blade or the third prong is provided for your safety. If the provided plug does not fit into your outlet, consult an electrician for replacement of the obsolete outlet.
•Protect the power cord from being walked on or pinched particularly at plugs, convenience receptacles and the point where they exit from the apparatus.
•Only use attachments/accessories specified by the manufacturer.
•Unplug this apparatus during lightning storms or when unused for long periods of time.
•Use only with a cart, stand, tripod, bracket or table specified by the manufacturer, or sold with the apparatus. When a cart is used, use caution when moving the cart/apparatus combination to avoid injury from tip-over.
7. | | SKIP 1) skips to previous chapter/track in DVD/VCD/CD mode, 2) tunes |
| down frequency in tuner mode. |
8. | | SKIP 1) skips to next chapter/track in DVD/VCD/CD mode, 2) tunes up |
| frequency in tuner mode. |
9. | | 1) Starts playing in DVD/VCD/CD mode, 2) Saves preset channel mode in |
| tuner mode. |
10.FUNC. Switches between AV mode, tuner mode and DVD mode.
11.Headphone Jack
12.VOLUME Adjusts the master volume. Turn clockwise to increase the volume and anti-clockwise to decrease
PACKING
Examine the contents of the box for your DVD Receiver.
There should be the following:
•DVD Receiver with attached power cord
•Remote Control with 2 batteries
•Instruction Book
•AV cable
•Subwoofer
•2 front speakers
•Center speaker
•2 rear speakers
•AM loop antenna and FM antenna
For better picture quality, use S-VIDEO CABLE ( not included). For best picture quality, use COMPONENT VIDEO CABLE (not included)
Particular attention should be taken when designing the speaker layout. For the best surround effects, all speakers should be installed.
| | Center Speaker | | | Center Speaker | |
| | Subwoofer | Front | | |
| Front | Front | Subwoofer | Front |
| | speaker |
| speaker | TV | speaker | | speaker |
| ( right ) | TV |
| ( left ) | ( left ) | ( right ) |
| | |
| | | DIM C |
| VIEWING AREA | DIM L | DIM R |
| |
Rear speaker | Rear speaker | Rear speaker | Rear speaker |
( left surround ) | ( right surround ) |
| | ( left surround ) | ( right surround ) |
| | DIM LS | DIM RS |
A typical room layout will have the left, center, and right speakers placed across the front and the left surround and right surround speakers placed along the sides towards the rear as shown in the above left picture. The center speaker can be positioned above or below the video screen or TV. A subwoofer can be installed for powerful bass sounds and can be positioned anywhere in the room.
The ‘speaker to listener dimensions’ shown in the above right picture is used for proper setup of the surround system
Note:
•Do not connect more than one speaker to any one pair of +/- speaker terminals.
•Do not connect speakers with an impedance lower than the speakers supplied.
•The normal function of the product may be disturbed by external interference. Just reset the product (disconnecting and reconnecting the power cord might be required to resume normal operation).
This equipment has been tested and found to comply with the limits for a Class B digital device, pursuant to part 15 of the FCC Rules. These limits are designed to provide reasonable protection against harmful interference in a residential installation. This equipment generates, uses and can radiate radio frequency energy and, if not installed and used in accordance with the instructions, may cause harmful interference to radio communications. However, there is no guarantee that interference will not occur in a particular installation. If this equipment does cause harmful interference to radio or television reception,
which can be determined by turning the equipment off and on, the user is encouraged to try to correct the interference by one or more of the following measures:
--- Reorient or relocate the receiving antenna.
--- Increase the separation between the equipment and receiver.
--- Connect the equipment to a supply outlet different from that to which the receiver is connected.
--- Consult the dealer or an experienced radio/TV technician for help.
Consumers should note that not all high definition television sets are fully | | This product incorporates copyright protection technology that is protected by |
| method claims of certain U.S. patents and other intellectual property rights |
compatible with this product and may cause artifacts to be displayed in the | |
| owned by Macrovision Corporation and other rights owners. Use of this |
picture. In case of 525 or 625 progressive scan pictureproblems, it is | |
| copyright protection technology must be authorized by Macrovision Corporation, |
recommended that the user switch the connection to the “standard definition” | |
| and is intended for home and other limited viewing uses only unless otherwise |
output. If there are questions regarding our TV set compatibility with this model | |
| authorized by Macrovision Corporation. Reverse engineering or disassembly is |
525p and 625p DVD player, please contact our customer service center. | |
| prohibited. |
| |
| | |
| |
Manufactured under license from Dolby Laboratories. “Dolby”, “Pro Logic” | | U.S. Patent Nos. 4,631,603; 4,577,216; 4,819,098; 4,907,093; |
and the double-D symbol are trademarks of Dolby Laboratories. | | and 6,516,132 |