Intel GA-8N775 user manual Exploring the Q-FlashTMutility screen, English

Models: GA-8N775

1 88
Download 88 pages 16.67 Kb
Page 62
Image 62

Exploring the Q-FlashTMutility screen

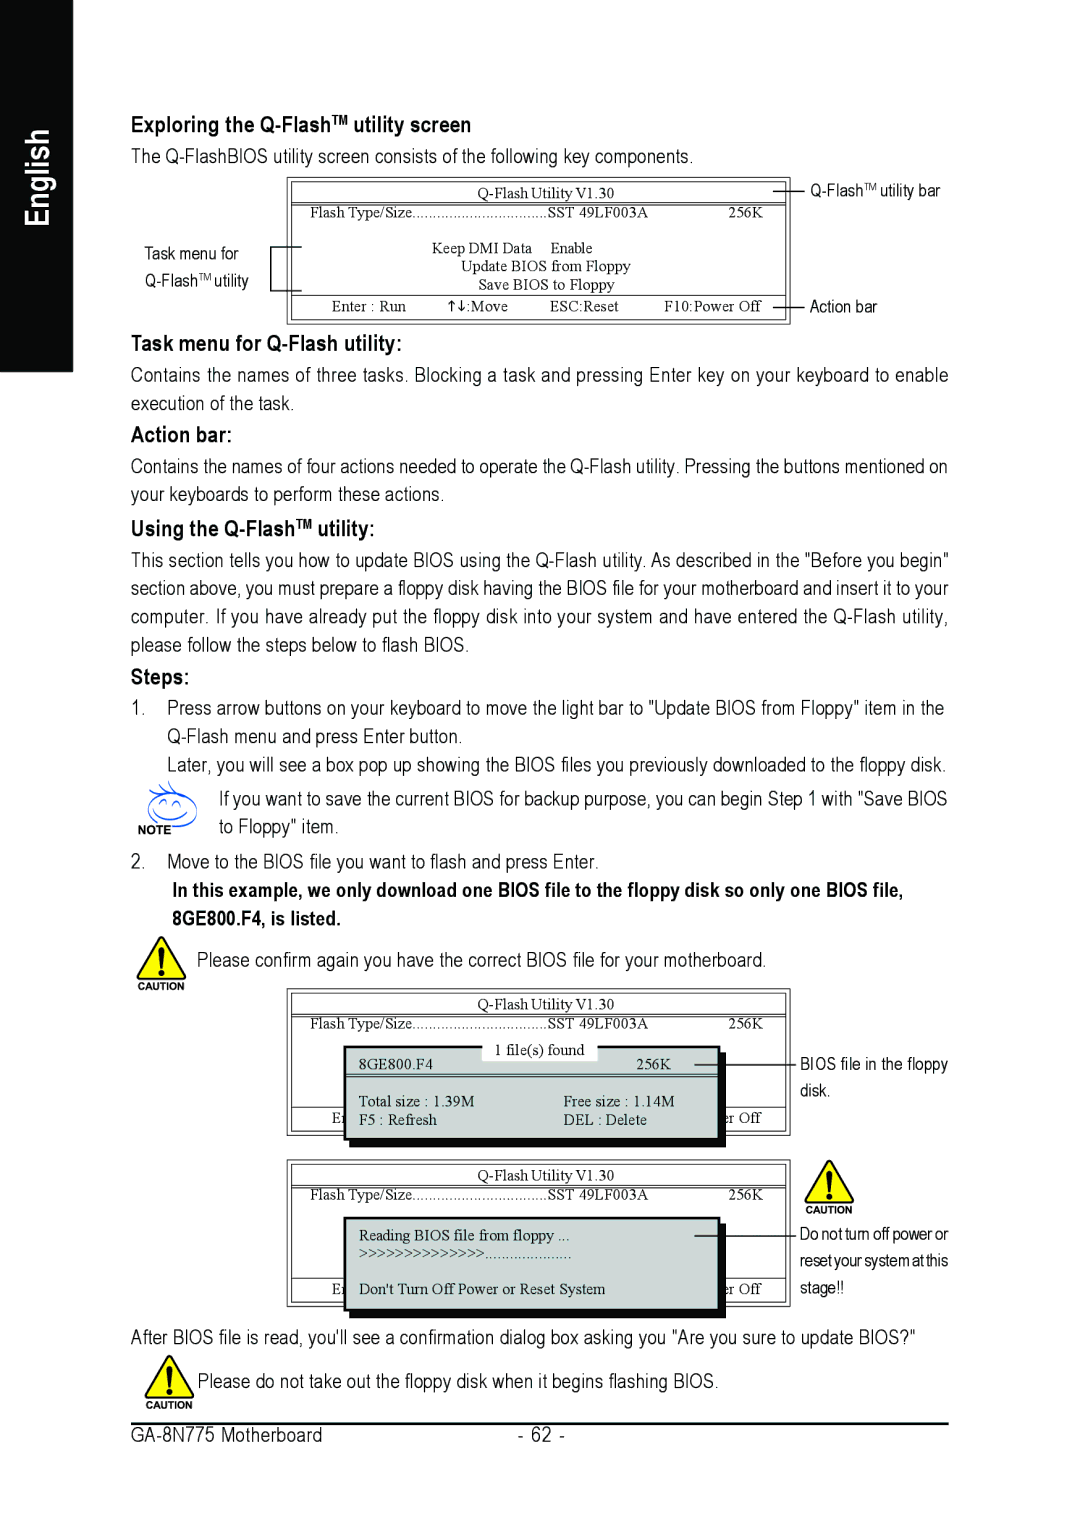
The Q-FlashBIOS utility screen consists of the following key components.

English

Task menu for Q-FlashTMutility


Q-FlashTMutility bar


Q-Flash Utility V1.30


Flash Type/Size

.................................

SST 49LF003A

256K


Keep DMI Data

Enable


Update BIOS from Floppy


Save BIOS to Floppy


Action bar


Enter : Run

:Move

ESC:Reset

F10:Power Off


Task menu for Q-Flash utility:

Contains the names of three tasks. Blocking a task and pressing Enter key on your keyboard to enable execution of the task.

Action bar:

Contains the names of four actions needed to operate the Q-Flash utility. Pressing the buttons mentioned on your keyboards to perform these actions.

Using the Q-FlashTMutility:

This section tells you how to update BIOS using the Q-Flash utility. As described in the "Before you begin" section above, you must prepare a floppy disk having the BIOS file for your motherboard and insert it to your computer. If you have already put the floppy disk into your system and have entered the Q-Flash utility, please follow the steps below to flash BIOS.

Steps:

1.Press arrow buttons on your keyboard to move the light bar to "Update BIOS from Floppy" item in the Q-Flash menu and press Enter button.

Later, you will see a box pop up showing the BIOS files you previously downloaded to the floppy disk.

If you want to save the current BIOS for backup purpose, you can begin Step 1 with "Save BIOS to Floppy" item.

2.Move to the BIOS file you want to flash and press Enter.

In this example, we only download one BIOS file to the floppy disk so only one BIOS file, 8GE800.F4, is listed.

Please confirm again you have the correct BIOS file for your motherboard.


Q-Flash Utility V1.30


Flash Type/Size


SST 49LF003A


256K


1 file(s) found


8GE800.F4Keep DMI


256K


BIOS file in the floppy


Update BIOS from Floppy


disk.


Total size : 1.39M

Save BIOS to Floppy


Free size : 1.14M


EnterF5: Run: Refresh

:Move

ESC:ResetDELDelete

F10:Power


Off


Q-Flash Utility V1.30


Flash Type/Size


SST 49LF003A


256K


Keep DMI Data

Enable


Do not turn off power or


Reading BIOS file from floppy ...


Update BIOS from Floppy


>>>>>>>>>>>>>>


reset your system at this


Save BIOS to Floppy


EnterDon't: RunTurn Off Power:Moveor ResetESystemC:Reset

F10:Power


Off

stage!!


After BIOS file is read, you'll see a confirmation dialog box asking you "Are you sure to update BIOS?" Please do not take out the floppy disk when it begins flashing BIOS.

GA-8N775 Motherboard

- 62 -

Page 62
Image 62
Intel GA-8N775 user manual Exploring the Q-FlashTMutility screen, English

GA-8N775 specifications

The Intel GA-8N775 is a motherboard that serves as an excellent platform for enthusiasts and gamers looking to build a high-performance PC. Designed to support Intel processors, this motherboard is specifically engineered to enhance performance through a range of innovative features and technologies.

One of the standout characteristics of the GA-8N775 is its support for the Intel LGA 775 socket, accommodating a variety of Pentium 4, Pentium D, and Celeron series processors. This flexibility allows users to choose from a spectrum of CPUs, facilitating upgrades and customization according to their needs.

The GA-8N775 is built on the NVIDIA nForce4 chipset, recognized for its robust performance capabilities. This chipset enhances the overall system stability and processing power, crucial for demanding applications and intensive gaming sessions. The motherboard supports dual-channel DDR2 memory, offering increased bandwidth and improved system performance. With multiple memory slots available, users can expand their memory to meet the requirements of modern applications, playing a vital role in multitasking and overall system responsiveness.

Another notable feature is the integrated NVIDIA graphics support, which allows users to enjoy decent graphics performance without the need for a dedicated GPU. However, the motherboard also includes PCI Express x16 slots, providing the flexibility for users who wish to install high-end graphics cards for superior gaming and graphical capabilities.

For storage, the GA-8N775 supports a variety of SATA connections, allowing users to connect multiple hard drives and SSDs for increased storage capacity and faster data transfer speeds. The board also features RAID support, giving users options for data redundancy and performance optimization.

In terms of connectivity, the motherboard is equipped with several USB ports, ensuring compatibility with various peripherals. Additionally, integrated audio capabilities provide satisfactory sound quality for most users, making it suitable for both gaming and multimedia applications.

The GA-8N775 is designed with upgradeability and durability in mind. Its robust PCB and numerous expansion slots ensure longevity and adaptability as technology progresses. Overall, the Intel GA-8N775 motherboard is an ideal choice for building a versatile and powerful computing system, suitable for a wide range of users, from gamers to professionals in need of reliable performance.