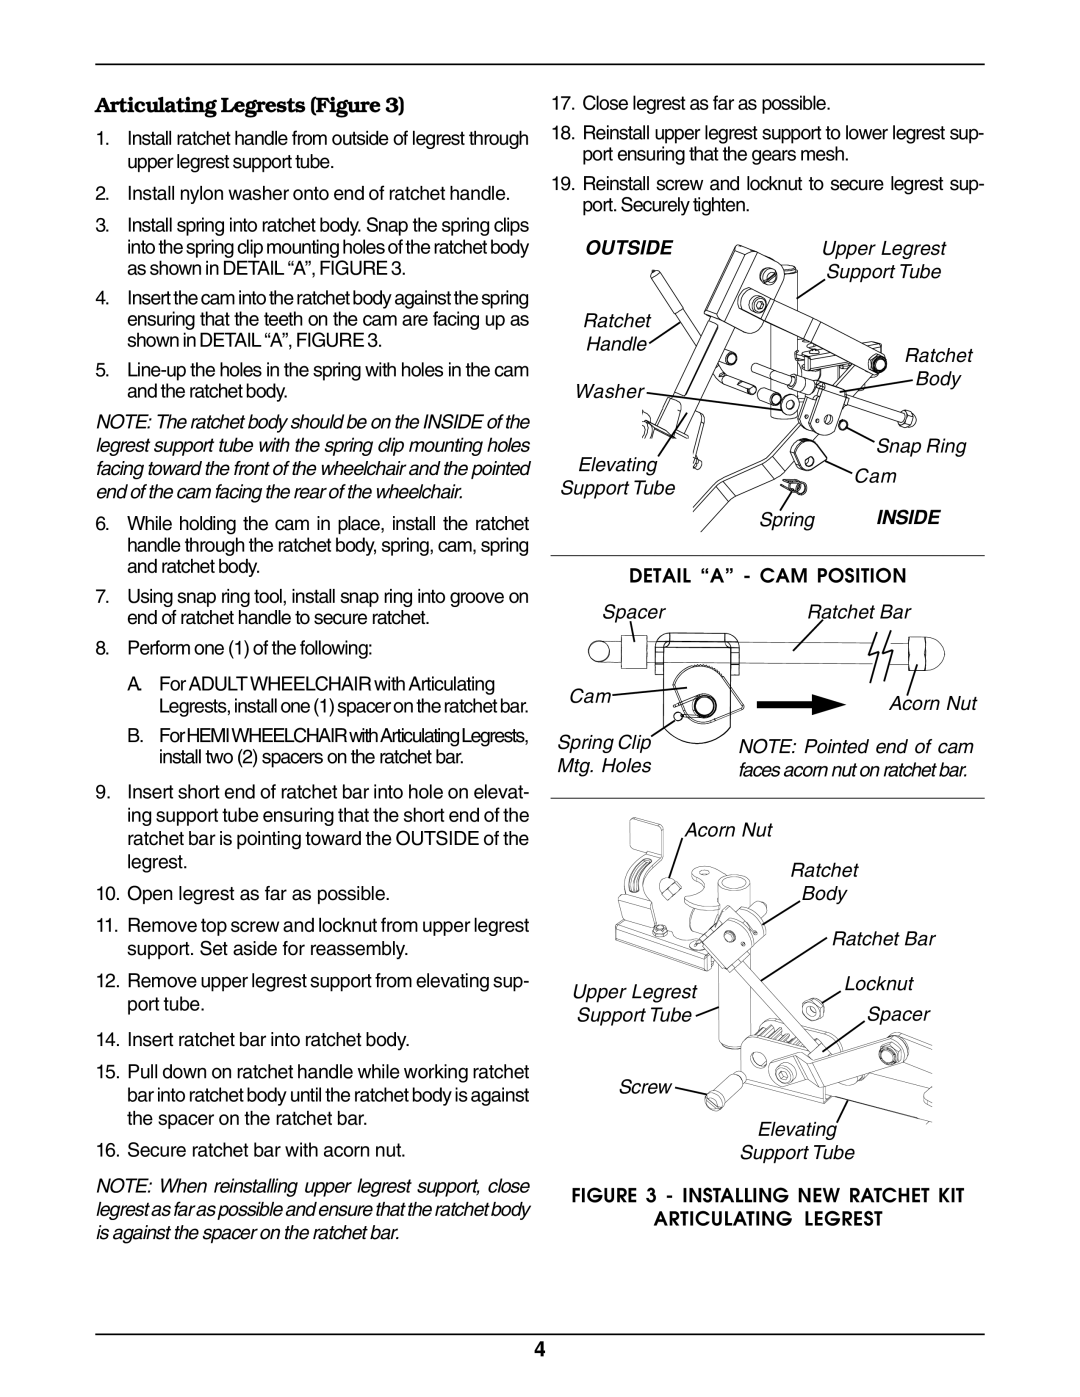
Articulating Legrests (Figure 3)
1. | Install ratchet handle from outside of legrest through |
| upper legrest support tube. |
2. | Install nylon washer onto end of ratchet handle. |
3. | Install spring into ratchet body. Snap the spring clips |
17.Close legrest as far as possible.
18.Reinstall upper legrest support to lower legrest sup- port ensuring that the gears mesh.
19.Reinstall screw and locknut to secure legrest sup- port. Securely tighten.
| into the spring clip mounting holes of the ratchet body |
| as shown in DETAIL “A”, FIGURE 3. |
4. | Insert the cam into the ratchet body against the spring |
| ensuring that the teeth on the cam are facing up as |
| shown in DETAIL “A”, FIGURE 3. |
5. | |
| and the ratchet body. |
NOTE: The ratchet body should be on the INSIDE of the legrest support tube with the spring clip mounting holes facing toward the front of the wheelchair and the pointed end of the cam facing the rear of the wheelchair.
6. While holding the cam in place, install the ratchet |
handle through the ratchet body, spring, cam, spring |
and ratchet body. |
OUTSIDE
Ratchet
Handle
Washer
Elevating |
Support Tube |
Upper Legrest
Support Tube
Ratchet
Body
Snap Ring
Cam
Spring INSIDE
7. | Using snap ring tool, install snap ring into groove on |
| end of ratchet handle to secure ratchet. |
8. | Perform one (1) of the following: |
| A. For ADULT WHEELCHAIR with Articulating |
| Legrests, install one (1) spacer on the ratchet bar. |
| B. ForHEMIWHEELCHAIRwithArticulatingLegrests, |
| install two (2) spacers on the ratchet bar. |
9. | Insert short end of ratchet bar into hole on elevat- |
| ing support tube ensuring that the short end of the |
| ratchet bar is pointing toward the OUTSIDE of the |
| legrest. |
10. | Open legrest as far as possible. |
11. | Remove top screw and locknut from upper legrest |
| support. Set aside for reassembly. |
12. | Remove upper legrest support from elevating sup- |
| port tube. |
14.Insert ratchet bar into ratchet body.
15.Pull down on ratchet handle while working ratchet bar into ratchet body until the ratchet body is against the spacer on the ratchet bar.
16.Secure ratchet bar with acorn nut.
NOTE: When reinstalling upper legrest support, close legrest as far as possible and ensure that the ratchet body is against the spacer on the ratchet bar.
DETAIL “A” - CAM POSITION
Spacer | Ratchet Bar |
Cam | Acorn Nut |
| |
Spring Clip | NOTE: Pointed end of cam |
Mtg. Holes | faces acorn nut on ratchet bar. |
Acorn Nut | |
| Ratchet |
| Body |
| Ratchet Bar |
Upper Legrest | Locknut |
| |
Support Tube | Spacer |
Screw
Elevating
Support Tube
FIGURE 3 - INSTALLING NEW RATCHET KIT
ARTICULATING LEGREST
4
