Phaser
Wireless Track Ball Mouse
GME322R USER'S MANUAL
Read this guide thoroughly and follow the installation and operation procedures carefully to prevent any damage to the unit and/or any of devices it connects to.
© 2003 IOGEAR® All Rights Reserved.
All brand names and trademarks are the registered property of their respective owners.
Overview
Congratulations on your new IOGEAR purchase!
The Phaser Wireless Trackball Mouse is of the latest in computer peripheral technology. With the advent of wireless technology in computer mice, the days of
Presentations have never been simpler. With an integrated laser pointer, the Phaser Wireless Trackball Mouse can make your next presentation a snap. Standing in front of a blinding projector is now a thing of the past. The freedom to move around, without being
Once again, IOGEAR lays the standard for connectivity!
With a growing number of the general population with Internet access, we encourage our customers to check out our web site http://www.iogear.com/support for general troubleshooting information, FAQ, and other related documents in our T.I.L. (Technical Information Library).
Contact Information: |
|
23 Hubble Drive | Irvine, CA 92618 |
(P) 949.453.8782 | (F) 949.453.8785 |
www.iogear.com |
|
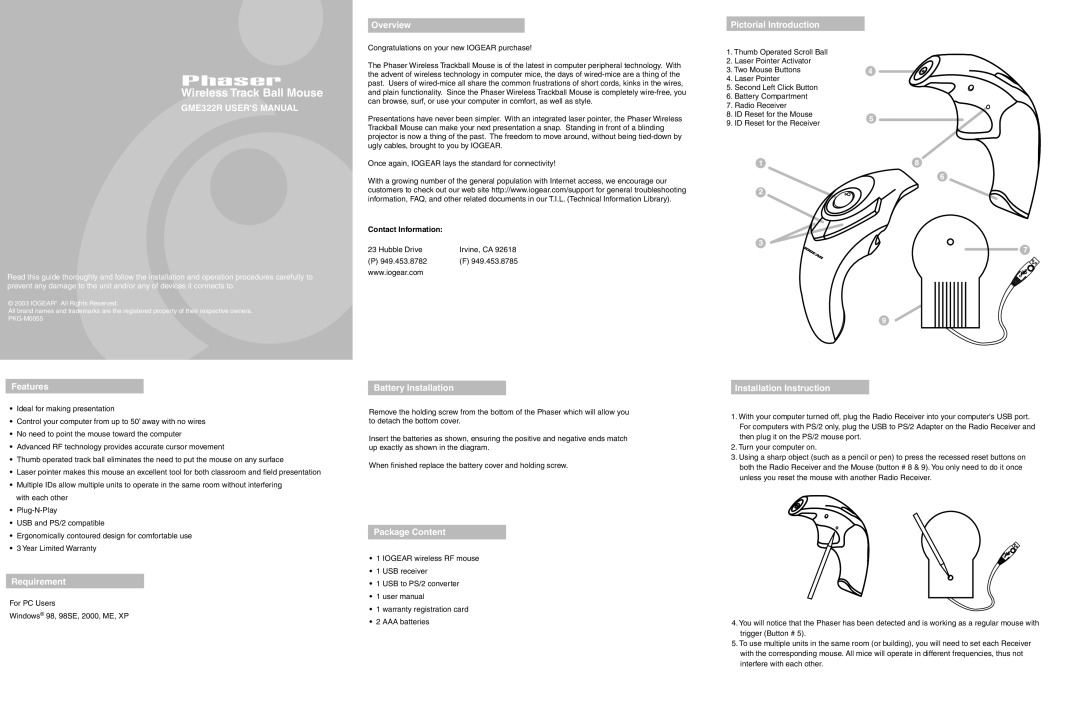
Pictorial Introduction
1.Thumb Operated Scroll Ball
2.Laser Pointer Activator
3. Two Mouse Buttons | 4 | |
4. Laser Pointer |
| |
5. Second Left Click Button |
| |
6. Battery Compartment |
| |
7. Radio Receiver |
| |
8. ID Reset for the Mouse | 5 | |
9. ID Reset for the Receiver | ||
| ||
1 | 8 | |
| 6 | |
2 |
| |
3 | 7 | |
|
9
Features
•Ideal for making presentation
•Control your computer from up to 50’ away with no wires
•No need to point the mouse toward the computer
•Advanced RF technology provides accurate cursor movement
•Thumb operated track ball eliminates the need to put the mouse on any surface
•Laser pointer makes this mouse an excellent tool for both classroom and field presentation
•Multiple IDs allow multiple units to operate in the same room without interfering with each other
•
•USB and PS/2 compatible
•Ergonomically contoured design for comfortable use
•3 Year Limited Warranty
Requirement
For PC Users
Windows® 98, 98SE, 2000, ME, XP
Battery Installation
Remove the holding screw from the bottom of the Phaser which will allow you to detach the bottom cover.
Insert the batteries as shown, ensuring the positive and negative ends match up exactly as shown in the diagram.
When finished replace the battery cover and holding screw.
Package Content
•1 IOGEAR wireless RF mouse
•1 USB receiver
•1 USB to PS/2 converter
•1 user manual
•1 warranty registration card
•2 AAA batteries
Installation Instruction
1.With your computer turned off, plug the Radio Receiver into your computer's USB port. For computers with PS/2 only, plug the USB to PS/2 Adapter on the Radio Receiver and then plug it on the PS/2 mouse port.
2.Turn your computer on.
3.Using a sharp object (such as a pencil or pen) to press the recessed reset buttons on both the Radio Receiver and the Mouse (button # 8 & 9). You only need to do it once unless you reset the mouse with another Radio Receiver.
4.You will notice that the Phaser has been detected and is working as a regular mouse with trigger (Button # 5).
5.To use multiple units in the same room (or building), you will need to set each Receiver with the corresponding mouse. All mice will operate in different frequencies, thus not interfere with each other.