USB PDA/SERIAL ADAPTER
INSTALLATION MANUAL FOR GUC232A
Overview
Universal Serial Bus (USB) technology has emerged in response to the proliferation of external peripheral devices (i.e. scanners, digital cameras, removable drives, and etc.), that are increasingly being connected to the latest generation of computers. USB behaves in a similar fashion to conventional bus ports (i.e., serial, parallel, and PS/2), except, it does not require any IRQ's. This allows for multiple devices to be connected to the system thus eliminating any IRQ conflicts.
The USB PDA/Serial Adapter (GUC232A) provides you with an external serial (DB-9 male) Plug-N-Play connection for use with computers, notebooks, and hand held computing devices that support USB. The PDA/USB Serial Adapter has a standard type A USB plug.
This USB PDA/Serial Adapter provides PDAs, digital cameras, modems, and ISDN terminal adapters with high quality serial connections at a data transfer rate of over 230Kbps. This makes the USB interface transparent to serial peripherals, allowing them to easily interface with USB computers. This eliminates the setup hassle found with traditional serial port. This device also supports energy saving suspend and resume operations.
Note: This adapter installs as a virtual port driver on Com3. As such it does not support devices, such as serial mice that require an IRQ number or IO address.
Features:
•USB Plug-N-Play connectivity
•Full Compliance with USB specification v1.1
•Works with cellular phones, PDAs, digital cameras, modems and ISDN terminal adapters
•Easy Installation
•Support the RS 232 Serial interface
•Provides a 96 byte buffer for each upstream and downstream data transfer
•Supports automatic handshake mode
•Supports Remote wakeup and power management
•Frees your RS-232 ports for other uses
•No IRQ required
System Requirements
•Mac OS 8.6 or greater
•Windows 98, 2000, ME
•Available USB port on system or USB hub
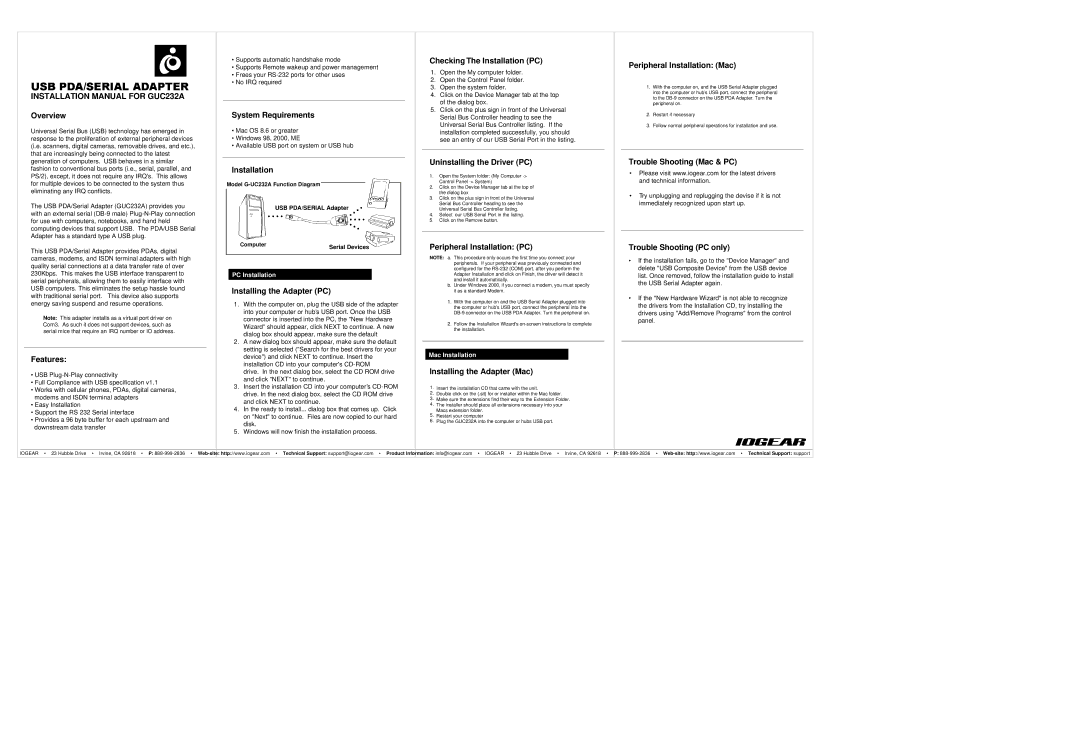
Installation
Model G-UC232A Function Diagram
USB PDA/SERIAL Adapter
PC Installation
Installing the Adapter (PC)
1.With the computer on, plug the USB side of the adapter into your computer or hub’s USB port. Once the USB connector is inserted into the PC, the "New Hardware Wizard" should appear, click NEXT to continue. A new dialog box should appear, make sure the default
2.A new dialog box should appear, make sure the default setting is selected ("Search for the best drivers for your device") and click NEXT to continue. Insert the installation CD into your computer's CD-ROM
drive. In the next dialog box, select the CD ROM drive and click "NEXT" to continue.
3.Insert the installation CD into your computer’s CD-ROM drive. In the next dialog box, select the CD ROM drive and click NEXT to continue.
4.In the ready to install... dialog box that comes up. Click on "Next" to continue. Files are now copied to our hard disk.
5.Windows will now finish the installation process.
Checking The Installation (PC)
1.Open the My computer folder.
2.Open the Control Panel folder.
3.Open the system folder.
4.Click on the Device Manager tab at the top of the dialog box.
5.Click on the plus sign in front of the Universal Serial Bus Controller heading to see the Universal Serial Bus Controller listing. If the installation completed successfully, you should see an entry of our USB Serial Port in the listing.
Uninstalling the Driver (PC)
1.Open the System folder: (My Computer -> Control Panel -> System)
2.Click on the Device Manager tab at the top of the dialog box
3.Click on the plus sign in front of the Universal Serial Bus Controller heading to see the Universal Serial Bus Controller listing.
4.Select our USB Serial Port in the listing.
5.Click on the Remove button.
Peripheral Installation: (PC)
NOTE: a. This procedure only occurs the first time you connect your peripherals. If your peripheral was previously connected and configured for the RS-232 (COM) port, after you perform the Adapter Installation and click on Finish, the driver will detect it and install it automatically.
b.Under Windows 2000, if you connect a modem, you must specify it as a standard Modem.
1.With the computer on and the USB Serial Adapter plugged into the computer or hub’s USB port, connect the peripheral into the DB-9 connector on the USB PDA Adapter. Turn the peripheral on.
2.Follow the Installation Wizard's on-screen instructions to complete the installation.
Mac Installation
Installing the Adapter (Mac)
1.Insert the installation CD that came with the unit.
2.Double click on the (.sit) for or installer within the Mac folder.
3.Make sure the extensions find their way to the Extension Folder.
4.The installer should place all extensions necessary into your Macs extension folder.
5.Restart your computer
6.Plug the GUC232A into the computer or hubs USB port.
Peripheral Installation: (Mac)
1.With the computer on, and the USB Serial Adapter plugged into the computer or hub’s USB port, connect the peripheral to the DB-9 connector on the USB PDA Adapter. Turn the peripheral on.
2.Restart if necessary
3.Follow normal peripheral operations for installation and use.
Trouble Shooting (Mac & PC)
•Please visit www.iogear.com for the latest drivers and technical information.
•Try unplugging and replugging the devise if it is not immediately recognized upon start up.
Trouble Shooting (PC only)
•If the installation fails, go to the "Device Manager" and delete "USB Composite Device" from the USB device list. Once removed, follow the installation guide to install the USB Serial Adapter again.
•If the "New Hardware Wizard" is not able to recognize the drivers from the Installation CD, try installing the drivers using "Add/Remove Programs" from the control panel.