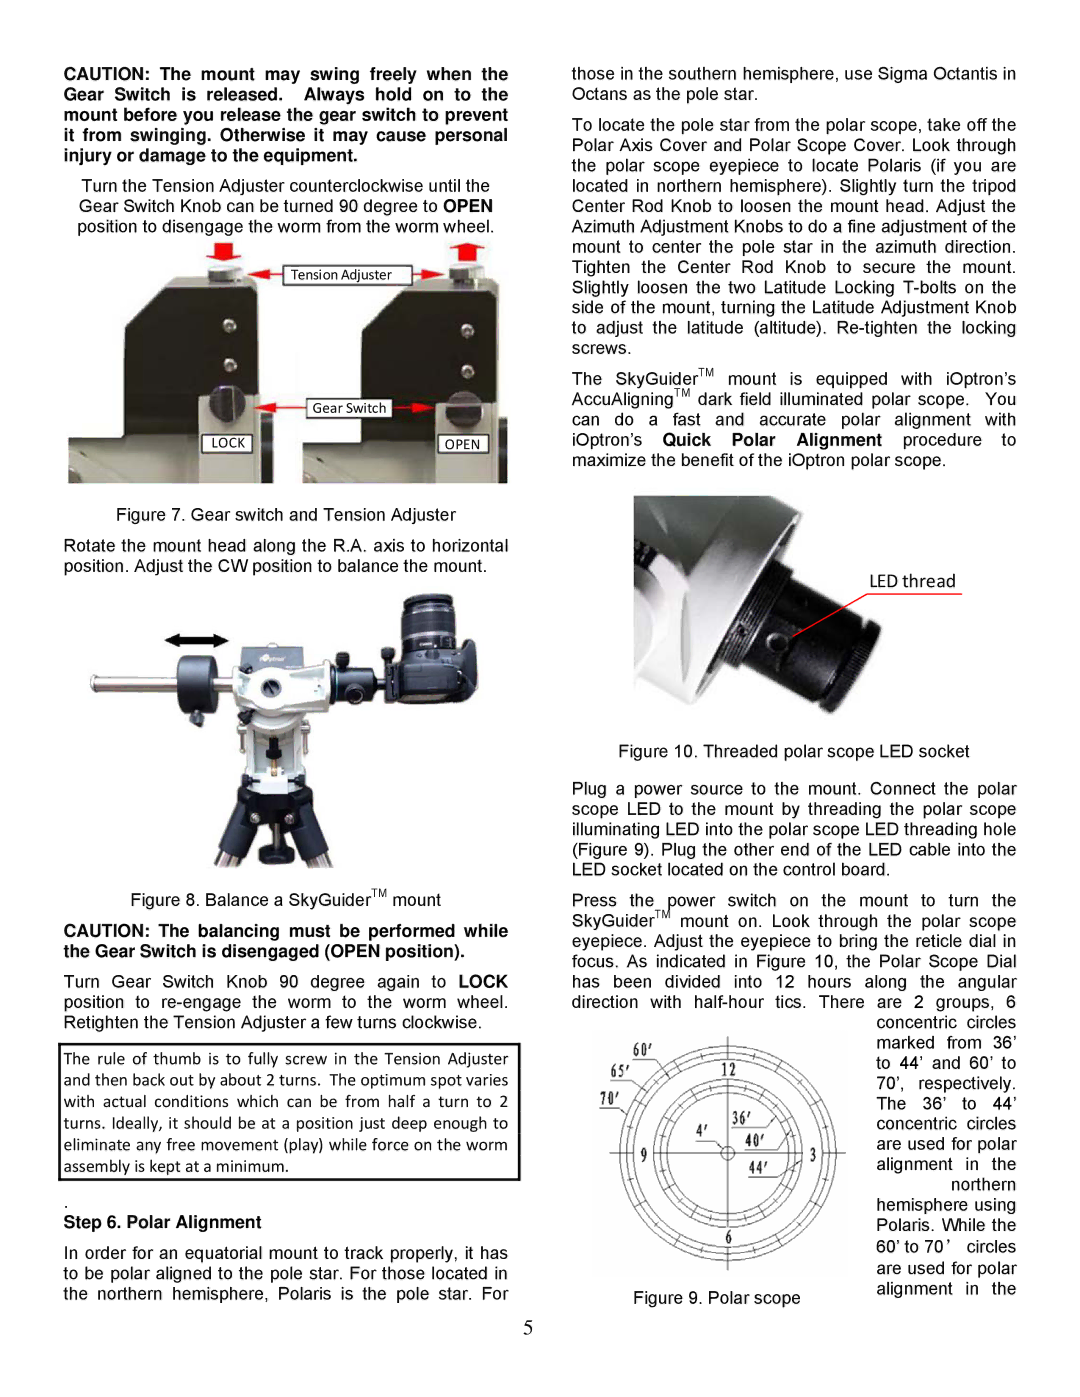
Figure 9. Polar scope

CAUTION: The mount may swing freely when the Gear Switch is released. Always hold on to the mount before you release the gear switch to prevent it from swinging. Otherwise it may cause personal injury or damage to the equipment.

Turn the Tension Adjuster counterclockwise until the Gear Switch Knob can be turned 90 degree to OPEN position to disengage the worm from the worm wheel.

Tension Adjuster

Gear Switch

LOCK

OPEN

Figure 7. Gear switch and Tension Adjuster

Rotate the mount head along the R.A. axis to horizontal position. Adjust the CW position to balance the mount.

Figure 8. Balance a SkyGuiderTM mount

CAUTION: The balancing must be performed while the Gear Switch is disengaged (OPEN position).

Turn Gear Switch Knob 90 degree again to LOCK position to re-engage the worm to the worm wheel. Retighten the Tension Adjuster a few turns clockwise.

The rule of thumb is to fully screw in the Tension Adjuster and then back out by about 2 turns. The optimum spot varies with actual conditions which can be from half a turn to 2 turns. Ideally, it should be at a position just deep enough to eliminate any free movement (play) while force on the worm assembly is kept at a minimum.

.

Step 6. Polar Alignment

In order for an equatorial mount to track properly, it has to be polar aligned to the pole star. For those located in the northern hemisphere, Polaris is the pole star. For

5

those in the southern hemisphere, use Sigma Octantis in Octans as the pole star.

To locate the pole star from the polar scope, take off the Polar Axis Cover and Polar Scope Cover. Look through the polar scope eyepiece to locate Polaris (if you are located in northern hemisphere). Slightly turn the tripod Center Rod Knob to loosen the mount head. Adjust the Azimuth Adjustment Knobs to do a fine adjustment of the mount to center the pole star in the azimuth direction. Tighten the Center Rod Knob to secure the mount. Slightly loosen the two Latitude Locking T-bolts on the side of the mount, turning the Latitude Adjustment Knob to adjust the latitude (altitude). Re-tighten the locking screws.

The SkyGuiderTM mount is equipped with iOptron’s AccuAligningTM dark field illuminated polar scope. You can do a fast and accurate polar alignment with iOptron’s Quick Polar Alignment procedure to maximize the benefit of the iOptron polar scope.

LED thread

Figure 10. Threaded polar scope LED socket

Plug a power source to the mount. Connect the polar scope LED to the mount by threading the polar scope illuminating LED into the polar scope LED threading hole (Figure 9). Plug the other end of the LED cable into the LED socket located on the control board.

Press the power switch on the mount to turn the SkyGuiderTM mount on. Look through the polar scope eyepiece. Adjust the eyepiece to bring the reticle dial in focus. As indicated in Figure 10, the Polar Scope Dial has been divided into 12 hours along the angular direction with half-hour tics. There are 2 groups, 6

concentric circles marked from 36’ to 44’ and 60’ to 70’, respectively. The 36’ to 44’ concentric circles are used for polar alignment in the

northern hemisphere using Polaris. While the 60’ to 70circles are used for polar alignment in the

Page 5
Image 5
iOptron #3500, #3520 instruction manual LED thread, Polar Alignment

#3500, #3520 specifications

iOptron, a prominent manufacturer in the field of astronomy, has consistently pushed the boundaries of telescope technology. Two standout products from their extensive lineup are the iOptron #3520 and #3500 telescope models. These telescopes are designed for both amateur astronomers and more serious enthusiasts, providing a mix of advanced features, reliability, and exceptional performance.

The iOptron #3520 boasts a lightweight design, making it highly portable for users who wish to observe celestial bodies from various locations. This model features a 5-inch refractor optical system that delivers clear and crisp images, allowing users to explore planets, star clusters, and galaxies with ease. The inclusion of high-quality glass optics is essential for minimizing chromatic aberration, ensuring that images are sharp and vivid even at high magnifications.

One of the standout technologies utilized in the #3520 is the Intelligent GoTo Technology. This feature enables the telescope to automatically locate and track celestial objects using an intuitive handheld controller. The user-friendly interface simplifies the stargazing experience, allowing users to spend more time observing and less time searching for objects. Furthermore, the #3520 is compatible with various accessories, making it customizable according to different preferences and requirements.

The iOptron #3500 model, on the other hand, is designed with advanced tracking capabilities. Equipped with a high-torque motor drive system, the #3500 ensures smooth and precise tracking of objects across the night sky. This telescope is particularly suitable for astrophotography, as it provides a stable platform for capturing long-exposure images of deep-sky objects.

An important feature of the #3500 is its robust mounting system, which enhances stability during observations. The mount is easy to set up and can accommodate heavier optical tubes, making it versatile for various configurations. Additionally, its built-in leveling system ensures that the telescope is perfectly aligned, further enhancing image quality.

Both models prioritize ease of use and accessibility, demonstrating iOptron's commitment to fostering a love for astronomy among enthusiasts of all levels. With quick setup times, user-friendly controls, and exceptional optical performance, the iOptron #3520 and #3500 are indispensable tools for anyone who wishes to explore the wonders of the universe. Whether observing the rings of Saturn or capturing the beauty of a distant galaxy, these telescopes deliver unparalleled experiences that inspire curiosity and discovery.