Jacuzzi Countertop Lavatories manual Clean the countertop surface around

Models: Countertop Lavatories

1 5
Download 5 pages 10.81 Kb
Page 3
Image 3

5.A template has been provided with your lavatory. This will help you cut an accurate opening. Place the template on the countertop.

Normally you will want your lavatory to be centered between the front edge of the counter and the backsplash. If your counter is more than 24" front to back, you may place the lavatory 2" to 3" from the front counter edge. The minimum distance from the lavatory to the front of the counter should be 1-1/2". Be sure to take the lavatory rim into account when making your measurements.

6.If your template is paper, fold it in half to create a centerline. If your template is card- board, measure the length and width of the template to locate the center and draw a line. Move the template to the desired position and mark the location of the centerline. Measure the distance from the centerline to the nearest side wall or the end of the counter. Then measure the same distance from the side wall to locate the centerline at the back of the lavatory template. Now trace the outline of the

Figure 2

template accurately onto the countertop.

7.Measure across the metal mounting frame from side to side to locate its center. Mark this on the front of the frame. Move the frame to the desired position and mark the location of the centerline on the countertop. Measure the distance from the centerline to the nearest side wall or the end of the counter. Then measure the same distance from the side wall to locate the centerline at the back of the counter.

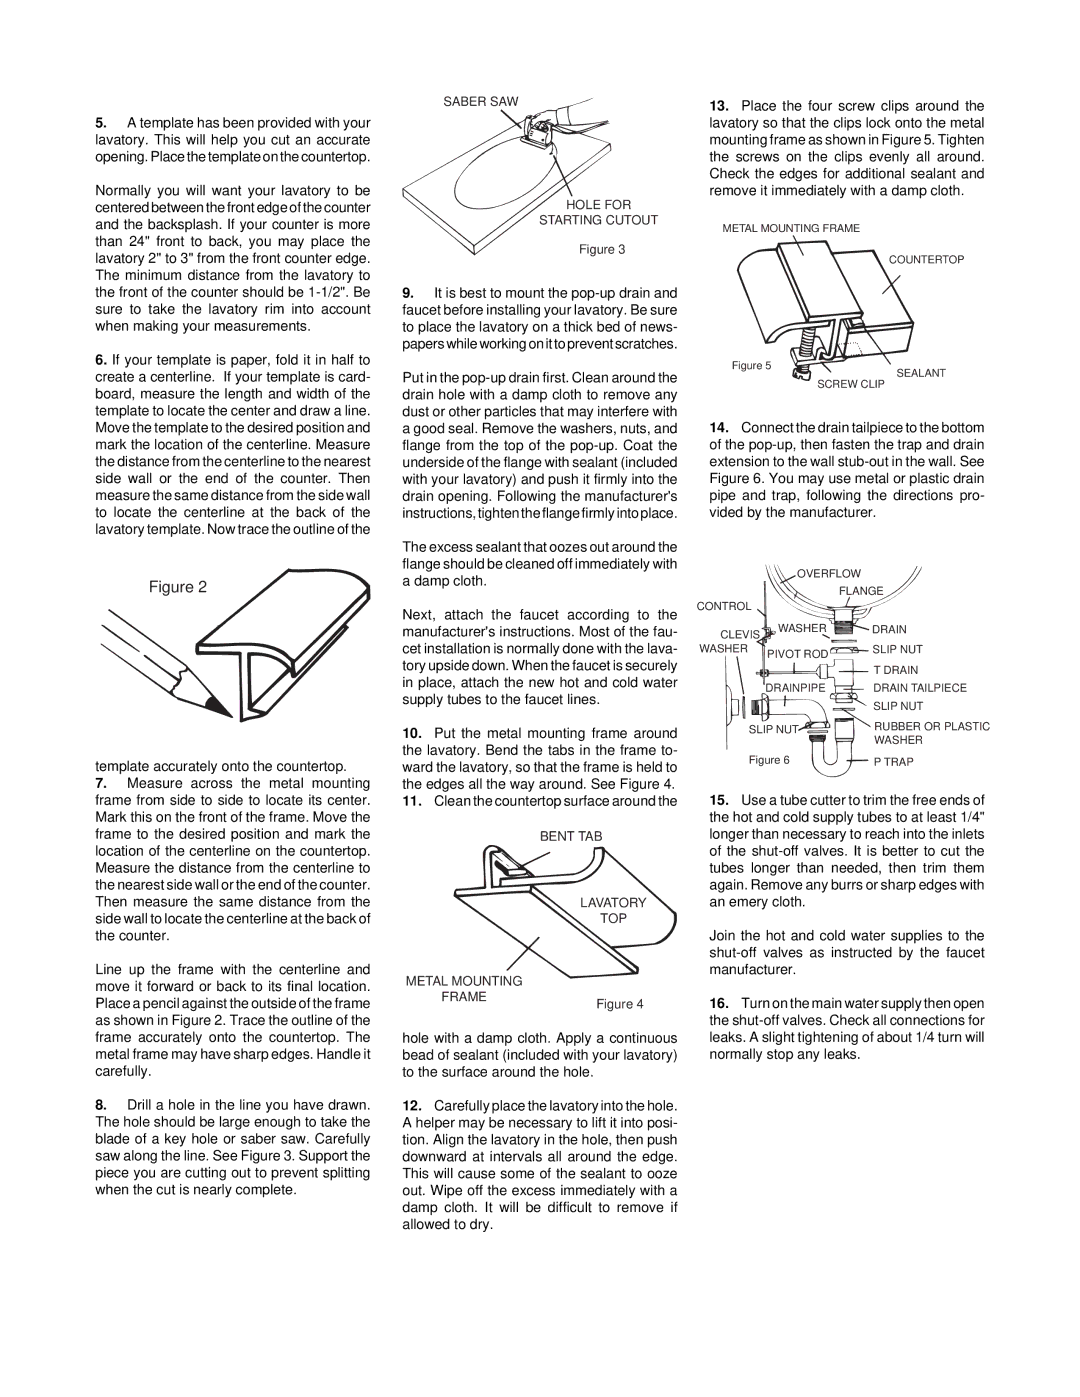
Line up the frame with the centerline and move it forward or back to its final location. Place a pencil against the outside of the frame as shown in Figure 2. Trace the outline of the frame accurately onto the countertop. The metal frame may have sharp edges. Handle it carefully.

8.Drill a hole in the line you have drawn. The hole should be large enough to take the blade of a key hole or saber saw. Carefully saw along the line. See Figure 3. Support the piece you are cutting out to prevent splitting when the cut is nearly complete.

SABER SAW

HOLE FOR

STARTING CUTOUT

Figure 3

9.It is best to mount the pop-up drain and faucet before installing your lavatory. Be sure to place the lavatory on a thick bed of news- paperswhileworkingonittopreventscratches.

Put in the pop-up drain first. Clean around the drain hole with a damp cloth to remove any dust or other particles that may interfere with a good seal. Remove the washers, nuts, and flange from the top of the pop-up. Coat the underside of the flange with sealant (included with your lavatory) and push it firmly into the drain opening. Following the manufacturer's instructions, tighten the flange firmly into place.

The excess sealant that oozes out around the flange should be cleaned off immediately with a damp cloth.

Next, attach the faucet according to the manufacturer's instructions. Most of the fau- cet installation is normally done with the lava- tory upside down. When the faucet is securely in place, attach the new hot and cold water supply tubes to the faucet lines.

10.Put the metal mounting frame around the lavatory. Bend the tabs in the frame to- ward the lavatory, so that the frame is held to the edges all the way around. See Figure 4.

11.Clean the countertop surface around the

BENT TAB

LAVATORY

TOP

METAL MOUNTING


FRAME

Figure 4


hole with a damp cloth. Apply a continuous bead of sealant (included with your lavatory) to the surface around the hole.

12.Carefully place the lavatory into the hole. A helper may be necessary to lift it into posi- tion. Align the lavatory in the hole, then push downward at intervals all around the edge. This will cause some of the sealant to ooze out. Wipe off the excess immediately with a damp cloth. It will be difficult to remove if allowed to dry.

13.Place the four screw clips around the lavatory so that the clips lock onto the metal mounting frame as shown in Figure 5. Tighten the screws on the clips evenly all around. Check the edges for additional sealant and remove it immediately with a damp cloth.

METAL MOUNTING FRAME

COUNTERTOP

Figure 5

SEALANT

SCREW CLIP

14.Connect the drain tailpiece to the bottom of the pop-up, then fasten the trap and drain extension to the wall stub-out in the wall. See Figure 6. You may use metal or plastic drain pipe and trap, following the directions pro- vided by the manufacturer.

OVERFLOW


FLANGE

CONTROL


CLEVIS

WASHER

DRAIN


WASHER


PIVOT ROD

SLIP NUT


T DRAIN


DRAINPIPE

DRAIN TAILPIECE


SLIP NUT


SLIP NUT

RUBBER OR PLASTIC


WASHER


Figure 6

P TRAP

15.Use a tube cutter to trim the free ends of the hot and cold supply tubes to at least 1/4" longer than necessary to reach into the inlets of the shut-off valves. It is better to cut the tubes longer than needed, then trim them again. Remove any burrs or sharp edges with an emery cloth.

Join the hot and cold water supplies to the shut-off valves as instructed by the faucet manufacturer.

16.Turn on the main water supply then open the shut-off valves. Check all connections for leaks. A slight tightening of about 1/4 turn will normally stop any leaks.

Page 3
Image 3
Jacuzzi Countertop Lavatories manual Clean the countertop surface around

Countertop Lavatories specifications

Jacuzzi Countertop Lavatories have become a staple in modern bathrooms, seamlessly blending style with functionality. These lavatories, manufactured by the renowned Jacuzzi brand, are designed to enhance the aesthetic appeal of any bathroom while providing a highly durable and efficient washing solution.

One of the primary features of Jacuzzi Countertop Lavatories is their variety of styles and finishes. From sleek, minimalist designs to classic, ornate styles, there is a lavatory to suit every taste and décor. Materials used in their construction often include high-quality porcelain, vitreous china, and sometimes even natural stone, offering both resilience and beauty. The available finishes range from glossy white to matte blacks or even vibrant colors, allowing homeowners to create a unique look that complements their overall bathroom design.

In terms of technology, Jacuzzi lavatories are engineered for optimal performance. They often include features such as quick-drain designs that minimize standing water, allowing for a cleaner, more hygienic space. Additionally, many models come equipped with a sanitary glazing that helps resist stains and bacterial growth, making maintenance a breeze.

Jacuzzi also pays attention to the ergonomics of their lavatories. Their designs often focus on comfort and usability, ensuring that the height and depth of the sink are appropriate for various users. Many models are designed for easy installation on various countertop types, allowing for versatile home improvements or renovation projects.

Another notable characteristic of Jacuzzi Countertop Lavatories is their sustainability. Many products are created with eco-friendly materials and are designed for water efficiency, reducing unnecessary water use without sacrificing performance.

Furthermore, many models are compatible with smart home systems, integrating seamlessly with modern bathroom technology. This allows users to personalize their experience, from adjusting water temperature to incorporating ambient lighting.

In conclusion, Jacuzzi Countertop Lavatories represent a harmonious blend of style, technology, and sustainability. With diverse designs that cater to individual preferences and advanced features that enhance usability and maintenance, these lavatories stand out as an excellent choice for any contemporary bathroom. Whether renovating or building new, they add an element of luxury while maintaining practicality and efficiency.