JBL Control® 1X/1Xtreme/One
JBL Loudspeaker Troubleshooting/Repair Tips
Most customers prefer to do simple loudspeaker repairs themselves. By following the steps below, a majority of loudspeakers can be returned to their original factory performance with minimum effort. Choose the example that best describes the problem you are experiencing.
Problem 1: No sound or distorted sound from one loudspeaker in a pair (or set)
Connect the dead/distorting loudspeaker to a different amplifier channel (one that had a functioning loudspeaker connected to it). If it functions normally, the problem is not
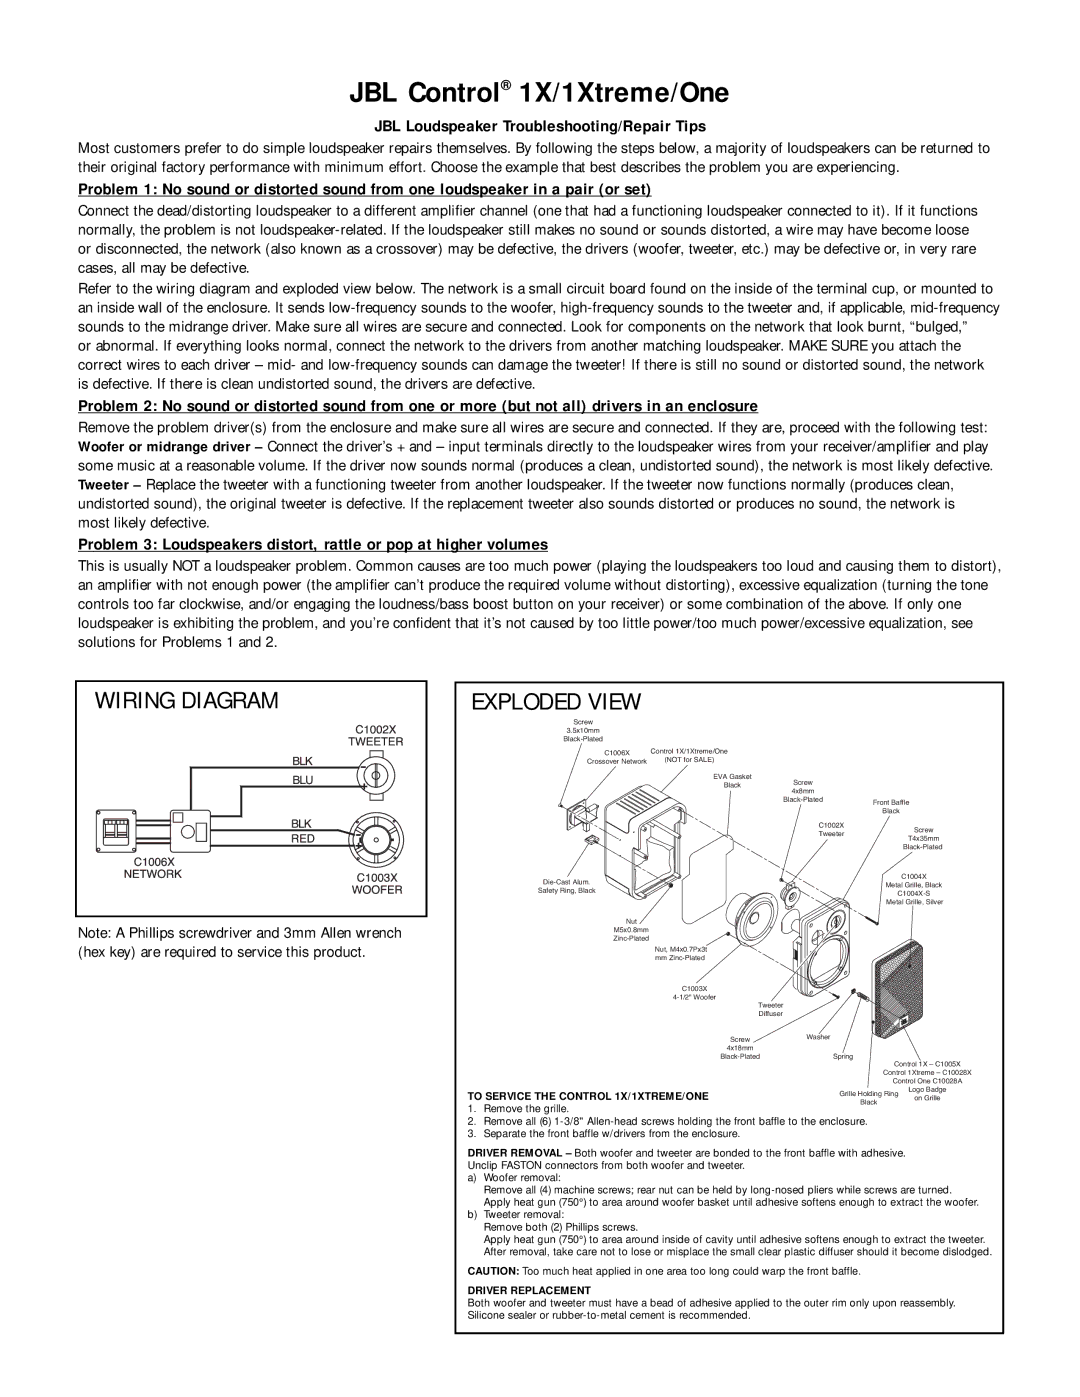
Refer to the wiring diagram and exploded view below. The network is a small circuit board found on the inside of the terminal cup, or mounted to an inside wall of the enclosure. It sends
or abnormal. If everything looks normal, connect the network to the drivers from another matching loudspeaker. MAKE SURE you attach the correct wires to each driver – mid- and
Problem 2: No sound or distorted sound from one or more (but not all) drivers in an enclosure
Remove the problem driver(s) from the enclosure and make sure all wires are secure and connected. If they are, proceed with the following test: Woofer or midrange driver – Connect the driver’s + and – input terminals directly to the loudspeaker wires from your receiver/amplifier and play some music at a reasonable volume. If the driver now sounds normal (produces a clean, undistorted sound), the network is most likely defective. Tweeter – Replace the tweeter with a functioning tweeter from another loudspeaker. If the tweeter now functions normally (produces clean, undistorted sound), the original tweeter is defective. If the replacement tweeter also sounds distorted or produces no sound, the network is most likely defective.
Problem 3: Loudspeakers distort, rattle or pop at higher volumes
This is usually NOT a loudspeaker problem. Common causes are too much power (playing the loudspeakers too loud and causing them to distort), an amplifier with not enough power (the amplifier can’t produce the required volume without distorting), excessive equalization (turning the tone controls too far clockwise, and/or engaging the loudness/bass boost button on your receiver) or some combination of the above. If only one loudspeaker is exhibiting the problem, and you’re confident that it’s not caused by too little power/too much power/excessive equalization, see solutions for Problems 1 and 2.
WIRING DIAGRAM |
Note: A Phillips screwdriver and 3mm Allen wrench (hex key) are required to service this product.
EXPLODED VIEW
Screw
3.5x10mm
C1006X | Control 1X/1Xtreme/One |
|
|
Crossover Network | (NOT for SALE) |
|
|
| EVA Gasket | Screw |
|
| Black |
| |
| 4x8mm |
| |
|
|
| |
|
| Front Baffle | |
|
|
| |
|
|
| Black |
|
| C1002X | Screw |
|
| Tweeter | |
|
| T4x35mm | |
|
|
| |
|
|
|
C1004X
Metal Grille, Black | ||
Safety Ring, Black | ||
| ||
| Metal Grille, Silver |
Nut
M5x0.8mm
Nut, M4x0.7Px3t mm
C1003X
Tweeter
Diffuser
ScrewWasher 4x18mm
Control 1X – C1005X
Control 1Xtreme – C10028X
Control One C10028A
Logo Badge
TO SERVICE THE CONTROL 1X/1XTREME/ONEGrille Holding Ring on Grille Black
1.Remove the grille.
2.Remove all (6)
3.Separate the front baffle w/drivers from the enclosure.
DRIVER REMOVAL – Both woofer and tweeter are bonded to the front baffle with adhesive. Unclip FASTON connectors from both woofer and tweeter.
a)Woofer removal:
Remove all (4) machine screws; rear nut can be held by
b)Tweeter removal:
Remove both (2) Phillips screws.
Apply heat gun (750°) to area around inside of cavity until adhesive softens enough to extract the tweeter. After removal, take care not to lose or misplace the small clear plastic diffuser should it become dislodged.
CAUTION: Too much heat applied in one area too long could warp the front baffle.
DRIVER REPLACEMENT
Both woofer and tweeter must have a bead of adhesive applied to the outer rim only upon reassembly. Silicone sealer or