VR209TP Quick Reference Guide
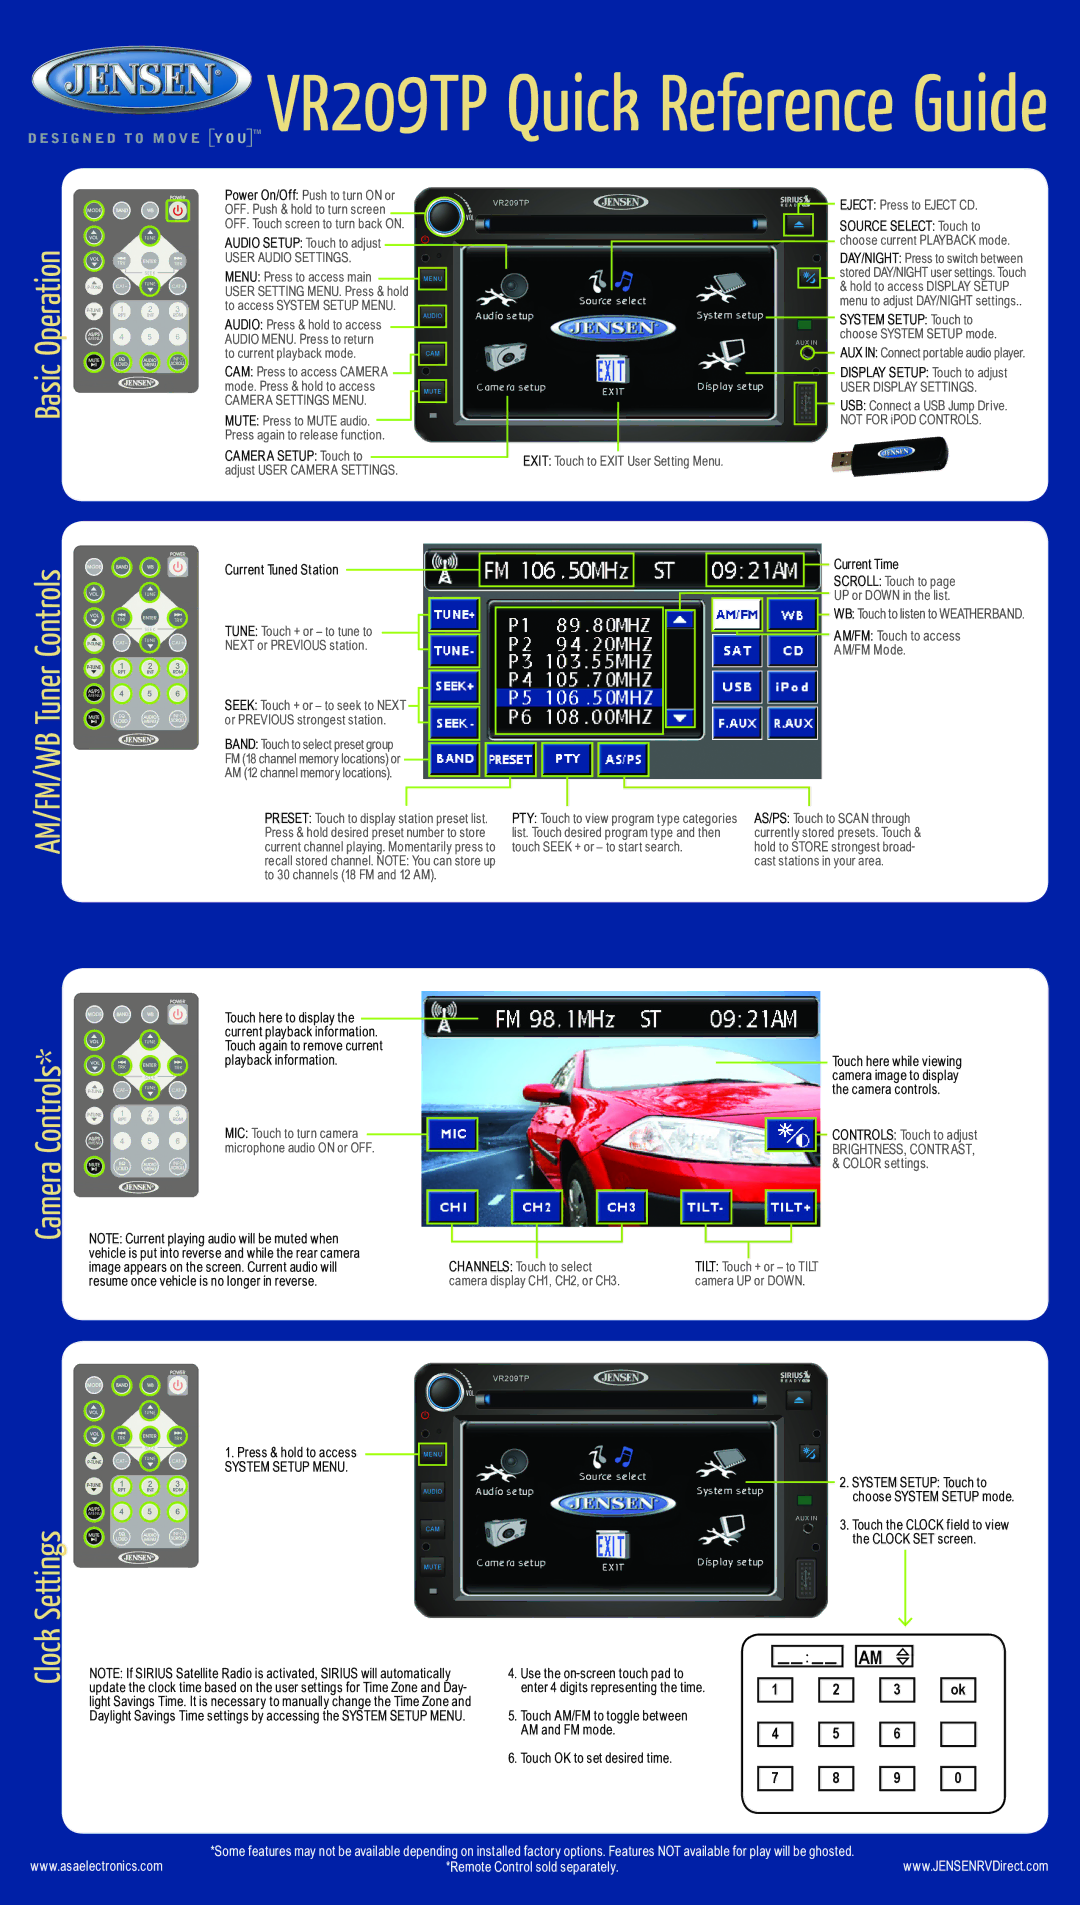
Basic Operation
Power On/Off: Push to turn ON or OFF. Push & hold to turn screen OFF. Touch screen to turn back ON.
AUDIO SETUP: Touch to adjust
USER AUDIO SETTINGS.
MENU: Press to access main
USER SETTING MENU. Press & hold to access SYSTEM SETUP MENU.
AUDIO: Press & hold to access AUDIO MENU. Press to return to current playback mode.
CAM: Press to access CAMERA mode. Press & hold to access
CAMERA SETTINGS MENU.
MUTE: Press to MUTE audio. Press again to release function.
CAMERA SETUP: Touch to adjust USER CAMERA SETTINGS.
 EJECT: Press to EJECT CD.
SOURCE SELECT: Touch to choose current PLAYBACK mode.
DAY/NIGHT: Press to switch between stored DAY/NIGHT user settings. Touch & hold to access DISPLAY SETUP menu to adjust DAY/NIGHT settings..
SYSTEM SETUP: Touch to choose SYSTEM SETUP mode.
![]() AUX IN: Connect portable audio player.
AUX IN: Connect portable audio player.
DISPLAY SETUP: Touch to adjust
USER DISPLAY SETTINGS.
USB: Connect a USB Jump Drive. NOT FOR iPOD CONTROLS.
EXIT: Touch to EXIT User Setting Menu.
AM/FM/WB Tuner Controls
Current Tuned Station
TUNE: Touch + or – to tune to
NEXT or PREVIOUS station.
SEEK: Touch + or – to seek to NEXT ![]()
![]() or PREVIOUS strongest station.
or PREVIOUS strongest station.
BAND: Touch to select preset group ![]() FM (18 channel memory locations) or
FM (18 channel memory locations) or
AM (12 channel memory locations).
PRESET: Touch to display station preset list. Press & hold desired preset number to store current channel playing. Momentarily press to recall stored channel. NOTE: You can store up to 30 channels (18 FM and 12 AM).
Current Time
SCROLL: Touch to page
UP or DOWN in the list.
WB: Touch to listen to WEATHERBAND.
![]()
![]() AM/FM: Touch to access
AM/FM: Touch to access
AM/FM Mode.
PTY: Touch to view program type categories | AS/PS: Touch to SCAN through |
list. Touch desired program type and then | currently stored presets. Touch & |
touch SEEK + or – to start search. | hold to STORE strongest broad- |
| cast stations in your area. |
Camera Controls*
Settings
Touch here to display the current playback information. Touch again to remove current playback information.
MIC: Touch to turn camera microphone audio ON or OFF.
NOTE: Current playing audio will be muted when vehicle is put into reverse and while the rear camera image appears on the screen. Current audio will resume once vehicle is no longer in reverse.
1.Press & hold to access
SYSTEM SETUP MENU.
Touch here while viewing camera image to display the camera controls.
CONTROLS: Touch to adjust
BRIGHTNESS, CONTRAST, & COLOR settings.
|
|
|
|
|
|
|
|
|
|
|
|
|
|
|
|
|
|
|
|
|
|
|
|
|
|
|
|
|
|
|
|
|
|
|
|
|
|
|
|
|
|
|
|
|
CHANNELS: Touch to select |
|
| TILT: Touch | + or – to TILT | ||||||||||
camera display CH1, CH2, or CH3. |
|
| camera UP or DOWN. | |||||||||||
2. SYSTEM SETUP: Touch to choose SYSTEM SETUP mode.
3. Touch the CLOCK field to view the CLOCK SET screen.
Clock
NOTE: If SIRIUS Satellite Radio is activated, SIRIUS will automatically | 4. | Use the |
|
|
|
|
| : |
|
|
|
|
|
| AM |
|
| |
|
|
|
|
|
|
|
|
|
|
| ||||||||
|
|
|
|
|
|
|
|
|
|
|
|
|
|
|
| |||
update the clock time based on the user settings for Time Zone and Day- |
| enter 4 digits representing the time. | 1 |
|
|
|
| 2 |
|
| 3 |
| ok | |||||
light Savings Time. It is necessary to manually change the Time Zone and |
|
|
|
|
|
|
|
|
|
|
|
|
|
|
|
|
|
|
|
|
|
|
|
|
|
|
|
|
|
|
|
|
|
|
|
| |
Daylight Savings Time settings by accessing the SYSTEM SETUP MENU. | 5. | Touch AM/FM to toggle between |
|
|
|
|
|
|
|
|
|
|
|
|
|
|
|
|
|
| AM and FM mode. | 4 |
|
|
|
| 5 |
|
| 6 |
|
| |||||
| 6. | Touch OK to set desired time. |
|
|
|
|
|
|
|
|
|
|
|
|
|
|
|
|
7
8 | 9 | 0 |
www.asaelectronics.com | *Some features may not be available depending on installed factory options. Features NOT available for play will be ghosted. | www.JENSENRVDirect.com |
*Remote Control sold separately. |