46 EN

USING THE REMOTE CONTROL UNIT (cont.)

Program 1

I N


OUT MODE

1 – – – – : – –

~

2~

3~

4~

5~

6~

7~

8~


T I ME CODE

– : – –


TOTAL

0 0

: 00


SYNCHRO

O . 1


Remote sensor

Random Assemble Editing Menu

VIDEO Menu

For More Accurate Editing

Some VCRs make the transition from Record-Pause to Record mode faster than others. Even if you begin editing for the camcorder and the VCR at exactly the same time, you may lose scenes you wanted, or find that you have recorded scenes you did not want. For a cleanly edited tape, confirm and adjust the timing of the camcorder against your VCR.

DIAGNOSING VCR/CAMCORDER TIMING

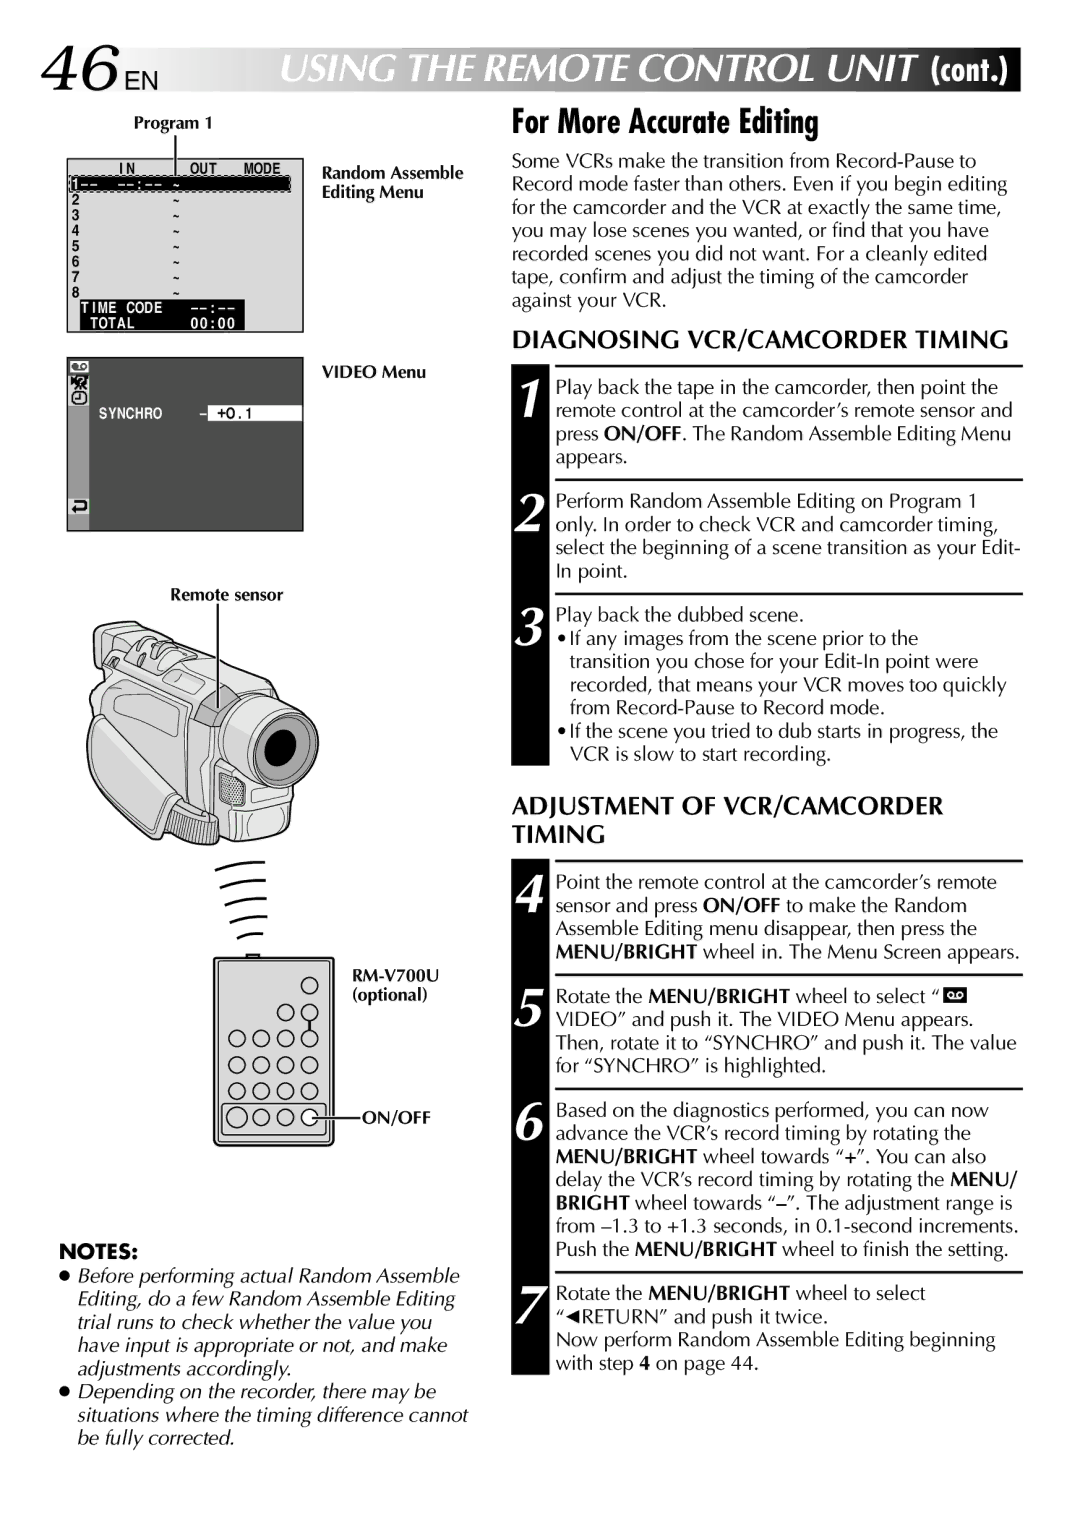
1 Play back the tape in the camcorder, then point the remote control at the camcorder’s remote sensor and press ON/OFF. The Random Assemble Editing Menu appears.

2 Perform Random Assemble Editing on Program 1 only. In order to check VCR and camcorder timing, select the beginning of a scene transition as your Edit- In point.

3 Play back the dubbed scene.

•If any images from the scene prior to the transition you chose for your Edit-In point were recorded, that means your VCR moves too quickly from Record-Pause to Record mode.

•If the scene you tried to dub starts in progress, the VCR is slow to start recording.

ADJUSTMENT OF VCR/CAMCORDER TIMING

4 Point the remote control at the camcorder’s remote sensor and press ON/OFF to make the Random Assemble Editing menu disappear, then press the MENU/BRIGHT wheel in. The Menu Screen appears.

RM-V700U (optional)

ON/OFF

NOTES:

Before performing actual Random Assemble Editing, do a few Random Assemble Editing trial runs to check whether the value you have input is appropriate or not, and make adjustments accordingly.

Depending on the recorder, there may be situations where the timing difference cannot be fully corrected.

5 Rotate the MENU/BRIGHT wheel to select “ VIDEO” and push it. The VIDEO Menu appears. Then, rotate it to “SYNCHRO” and push it. The value for “SYNCHRO” is highlighted.

6 Based on the diagnostics performed, you can now advance the VCR’s record timing by rotating the MENU/BRIGHT wheel towards “+”. You can also delay the VCR’s record timing by rotating the MENU/ BRIGHT wheel towards ”. The adjustment range is from –1.3 to +1.3 seconds, in 0.1-second increments. Push the MENU/BRIGHT wheel to finish the setting.

7 Rotate the MENU/BRIGHT wheel to select “1RETURN” and push it twice.

Now perform Random Assemble Editing beginning with step 4 on page 44.

Page 46
Image 46
JVC GR-DVL315 46 EN, For More Accurate Editing, Diagnosing VCR/CAMCORDER Timing, Adjustment of VCR/CAMCORDER Timing

GR-DVL315 specifications

The JVC GR-DVL315 is a compact digital video camcorder that gained popularity in the early 2000s for its combination of portability and advanced features, catering to amateur filmmakers and casual users alike. This camcorder is part of JVC's D-Serie and exemplifies the brand's commitment to quality and innovation in video capture technology.

One of the standout features of the GR-DVL315 is its ability to record in high-quality digital video. It utilizes MiniDV tapes, which were considered a standard in the industry, allowing users to capture video at a resolution of up to 500 lines of horizontal resolution. This results in clear, sharp images suitable for a variety of viewing formats. Furthermore, the cassette-based format offers the advantage of non-linear editing, making it easier to manipulate and organize footage after recording.

The GR-DVL315 boasts a 680,000-pixel CCD (Charge-Coupled Device) sensor, which significantly enhances the image quality by providing better low-light performance and increased detail. This camcorder is equipped with a powerful 10x optical zoom lens, allowing for versatile shooting options, from wide angles to close-ups, making it perfect for different shooting environments. The digital zoom feature can further enhance capabilities, though using excessive digital zoom may impact the quality of the footage.

Another notable innovation in the GR-DVL315 is its built-in digital effects and transitions, which enable users to add creative touches to their videos. Features like fades, wipes, and even titles enhance the storytelling aspect of the recorded footage. The camcorder also includes a 2.5-inch LCD screen, providing a clear viewfinder for framing shots while facilitating easy navigation of menu options.

The camcorder comes with a FireWire (IEEE 1394) port for quick and easy connection to a computer, upping the ante for post-production work. This connectivity feature allows for fast data transfers and real-time video editing, which is crucial for users looking to produce polished videos efficiently.

Additionally, the GR-DVL315 is designed with ease of use in mind. Its lightweight body and ergonomic grip make it comfortable to hold for extended periods. The intuitive button layout simplifies operation, allowing even novice users to start shooting with minimal learning curve.

In summary, the JVC GR-DVL315 is a remarkable example of early 2000s camcorder technology, blending performance, portability, and user-friendly features. Its combination of impressive imaging capabilities, creative editing options, and connectivity makes it a versatile tool for budding videographers and casual users capturing life's moments on tape.