| | | | | | | | | | | INDEX | | | | | | | GETTING STARTED | | | | | | USING THE BATTERY PACK | | • During charging or discharging, the camcorder | | Date/Time Settings | | Grip Adjustment | | | Tripod Mounting | | | |
A | | | | | | | | | | | | | P | | | | | | | | Hook on. | | | | | | Perform step 1) of “CHARGING THE BATTERY | cannot be operated. | | | 1) Set the Power Switch @to “ | ”. | 1) Separate the Velcro strip. | | Align the screw and camera direction stud on the |
| | | | | | | | | | | | | | | | | | | | | | | | PACK”. | | | | | • Charging and discharging is not possible if the | | 2) Pass your right hand through the loop and grasp | tripod with the tripod mounting socket W. Then |
AC Adapter | | | | | | | | pg. 6 | | Picture Stabiliser | | | | | pg. 12 | | | | | | | Approximate recording time (unit: min.) | | wrong type of battery is used. | | | 2) Press the MENU Wheel 1in. The Menu | | the grip. | | | tighten the screw. | | | |
| | | | | | | | | | | | | | | | | | | | | Screen appears. | | | | | | | | |
Animation Recording | | | | | | | | pg. 21 | | Playback | | | | | | pg. 11 | | | | | | | | • When charging the battery pack for the first time | | | | | | | | | |
................................................ | | | | | | | | | | | | | | | | | | | | | | | | | • You can select the language (ENGLISH or | 3) Adjust so that your thumb and fingers can easily | | CAUTION | | |
Auto Date Record | | | | | | | | pg. 19 | | Playback Special Effects | .......................................... | | pg. 14 | | | | | | | Battery pack | Viewfinder on | LCD monitor on | * | | | | operate the Recording Start/Stop Button !and | | | |
Auto Focus | | | | | | | | | pg. 18 | | Programme AE with Special Effects | | pg. 24 | | | | | | | or after a long storage period, the CHARGE lamp | RUSSIAN) of messages in menu screens | | | | | | |
| | | | | | | | ........................ | | | | | Push in. | | | | 1 | 2 | | 1 | may not light. Remove the battery pack from | | Power Zoom Lever 3. Refasten the Velcro strip. | When using a tripod, be | | | |
Auto Shut Off | ........................................................... | | | | | | | | pg. 11 | | Provided Accessories | | | pg. 2 | | | | | | | | | the camcorder, then try charging again. | | (� pg. 18, 22 “MENU LANG.” in SYSTEM | | | | |
B | | | | | | | | | | | | | Q | | | | | | | | | | | | | BN-V11U | 95 | 100 | | 80 | | MENU). | | | | | | | | 3 | sure to open and extend | | | |
| | | | | | | | | | | | | | | | | | | | | | | | | • If a fully-charged battery’s operation time remains | | | | | | | | | | |
Battery Pack | | | | | | | pg. 6, 26 | | Quick Review | | | | pg. 13 | | | | | | | | | | (50) | (50) | | (45) | extremely short, the battery is worn out. Please | 3) Rotate the MENU Wheel 1to select | | | | its legs fully to stabilise | | | |
Blue Filter Effect | | | | | | | | pg. 24 | | R | | | | | | | | | | | | | | BN-V12U | 95 | 100 | | 80 | purchase a new one. | | | | “4TO SYSTEM MENU” and press it to display | | | | ! | the camcorder. To | | | |
Brighten The Image | | | | | | | | pg. 18 | | | | | | | | | | | | | | | (optional) | (50) | (50) | | (45) | | | | SYSTEM MENU. Rotate the MENU Wheel 1to | | | | prevent damage to the | | | |
| | | | | | | | Recording, Advanced Features | .......................... | pg. 23, 24 | BATTERY RELEASE Switch | | | • Perform charging where the temperature is | | | | | | | | |
Brighten The LCD Monitor | | | | | pg. 11 | | | | BN-V20U | 150 | 165 | | 135 | | | select “4NEXT” and press it to display the next | | | | unit caused by falling | | | |
C | | | | | | | | | | | | | Recording, Start/Stop | | | pg. 11 | | | | | | | (optional) | (85) | (90) | | (75) | between 10°C and 35°C. 20°C to 25°C is the ideal | | page. | | | | | | | | | over, do not use a | | | |
| | | | | | | | | | | | Recording Format (S-VHS/S-VHS ET) | pg. 20 | | | | | | | | temperature range for charging. If the environment | | | | | | | | | | | | |
| | | | | | | | | | | | | | | | | | | | | | | | | | | | | | | | | | | | |
Cassette Adapter | | | | | | | | pg. 16 | | Recording Mode | | | | pg. 20 | | | | | | | BN-V400U | 360 | 385 | | 315 | is too cold, charging may be incomplete. | | 4) Rotate the MENU Wheel 1to select “DATE/ | | | | | small-sized tripod. | | | |
Charge Marker | | | | | | | | pg. 6 | | Record-Standby | | | | | pg. 11 | Battery pack | | | | | | (optional) | (205) | (210) | | (190) | | | TIME” and press it. The DATE/TIME Menu | | | | | | | | | |
| | | | | | | | | | | | | | | | | • Charging time varies according to the ambient | | | | | | | | | | | |
Charging The Battery Pack | | | | | pg. 6 | | Red Filter Effect | | | | | pg. 24 | | | | | | | | | | | | | | | appears. | | | | | | | | | | | | |
| | | | | | | | | | | | | | 1 When using models equipped with LCD monitor | temperature and the status of the battery pack. | | | | | | | | | | | | | | |
Classic Film Effect | | | | | | | | pg. 24 | | Retake | | | | | | pg. 13 | | | | | | | | 5) To set “YEAR”, “MONTH”, “DAY” or “TIME” | | | | | | | | | |
| | | | | | | | | | | | | | | | | | 2 When using GR-SX24/FX14 | | | | • Since the AC Adapter processes electricity | | | | | | | | | | |
Clean The Camcorder | | | | | | | pg. 27 | | Rewind The Tape | | | | | pg. 11 | | | | | | | | | | | | (hour/minute), rotate the MENU Wheel 1to | | | | | | | | | |
| | | | | | | | | | | | | | | ( ):when the video light is on | | | | internally, it becomes warm during use. Be sure to | | | | | | | | | | |
Connection To a VCR/TV | | | | | | pg. 15 | | S | | | | | | | | | | | | | | | | | | Viewfinder Adjustment | | Loading/Unloading A Cassette | |
| | | | | | | | | | | | Power Switch | | | | | | | (GR-SXM58/SXM48/SX24 only) | | | | select the desired item, and press it. When the | | |
Connection To A PC | | | | | | | | pg. 16 | | | | | | | | | | | | | | | | | use it only in well-ventilated areas. | | | | |
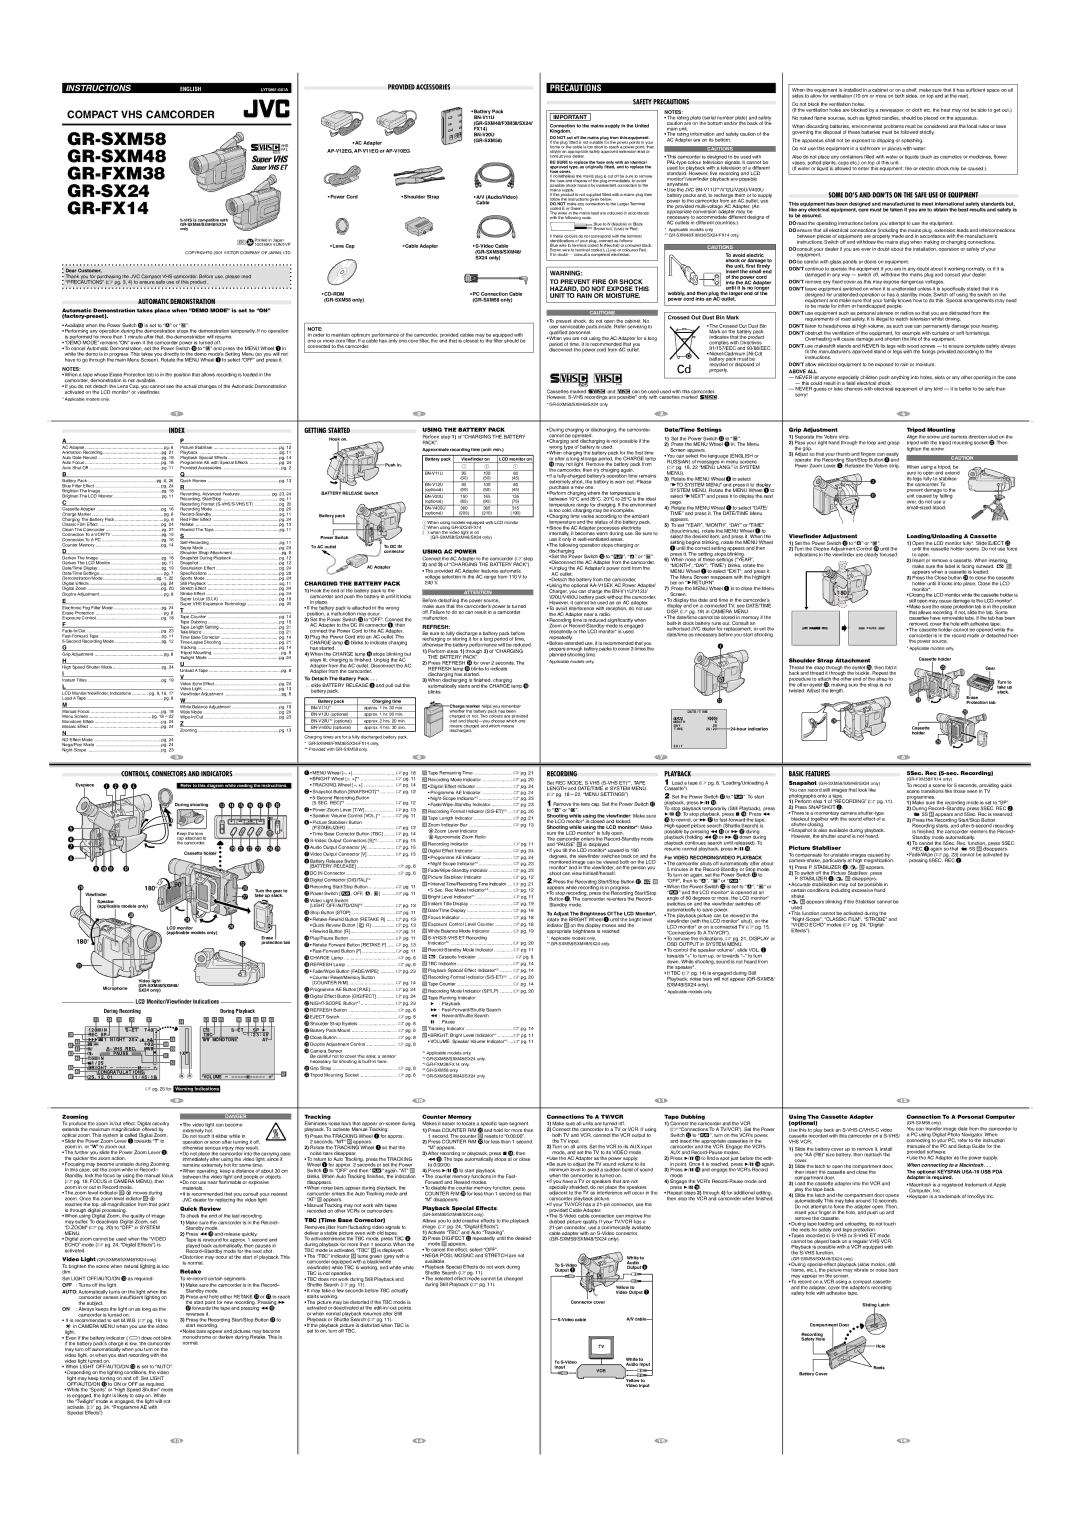
| | | | | | | | Self-Recording | | | | | pg. 11 | | | | | | | | | | | | | | | | setting1 | begins blinking, rotate the MENU Wheel | 1) Set the Power Switch @to “ | ” or “ ”. | 1) Open the LCD monitor fully*. Slide EJECT t |
Counter Memory | | | | | | | | pg. 14 | | | | | To AC outlet | | | | To DC IN | | | | | | | | • The following operation stops charging or | | |
D | | | | | | | | | | | | | Sepia Mode | .............................................................. | | | | pg. 24 | | | | USING AC POWER | | | | discharging: | | | | until the correct setting appears and then | 2) Turn the Dioptre Adjustment Control ountil the | until the cassette holder opens. Do not use force |
| | | | | | | | | | | | Shoulder Strap Attachment | | pg. 8 | | | | | connector | | | | | | | press it. The setting stops blinking. | | indications in the viewfinder are clearly focused. | to open. | | | | |
Darken The Image | | | | | | | | pg. 18 | | Snapshot During Playback | | | pg. 12 | | | | | | | Connect the AC Adapter to the camcorder (� step | • Set the Power Switch @to “ | ”, “ ” or “ | ”. | | | | | | |
| | | | | | | | | | | | | | | 6) When none of these settings (“YEAR”, | | | | | 2) Insert or remove a cassette. When inserting, |
Darken The LCD Monitor | | | | | pg. 11 | | Snapshot | | | | | pg. 12 | | | | AC Adapter | 2) and 3) of “CHARGING THE BATTERY PACK”). | • Disconnect the AC Adapter from the camcorder. | | “MONTH”, “DAY”, “TIME”) blinks, rotate the | | | | | make sure the label is facing outward. | D |
Date/Time Display | | | | | | | | pg. 19 | | Solarisation Effect | | | | | pg. 24 | | | | • Unplug the AC Adapter’s power cord from the | | | | | | |
| | | | | | | | | | | | | | | | | • The provided AC Adapter features automatic | | | MENU Wheel 1to select “EXIT”, and press it. | | | | | appears when a cassette is loaded. | |
Date/Time Settings | | | | | | | | pg. 7 | | Specifications | | | | pg. 28 | | | | | | | voltage selection in the AC range from 110 V to | AC outlet. | | | | The Menu Screen reappears with the highlight | | | | | 3) Press the Close button ito close the cassette |
Demonstration Mode | ............................................ | | | | | | pg. 1, 22 | | Sports Mode | | | | pg. 24 | | | | | | | • Detach the battery from the camcorder. | | | | | | |
Digital Effects | | | | | | | | pg. 24 | | Still Playback | | | | | pg. 11 | CHARGING THE BATTERY PACK | 240 V. | | | | | | | bar on “4RETURN”. | | | | | | | holder until it locks into place. Close the LCD |
| | | | | | | | | | | | | | | • Using the optional AA-V15EK AC Power Adapter/ | | | | | | | |
Digital Zoom | | | | | | | | pg. 20 | | Stretch Effect | | | | pg. 24 | 1) Hook the end of the battery pack to the | | | | ATTENTION | | | 7) Press the MENU Wheel 1in to close the Menu | | 180° | | monitor*. | | | | |
Dioptre Adjustment | | | | | | | | pg. 8 | | Strobe Effect | | | | pg. 24 | | | | | | Charger, you can charge the BN-V11U/V12U/ | | | Screen. | | | | | | • Closing the LCD monitor while the cassette holder is |
| | | | | | | | Super LoLux (S.LX) | | | | | pg. 19 | camcorder and push the battery in until it locks | | | | | | | | V20U/V400U battery pack without the camcorder. | | | | | | | | |
E | | | | | | | | | | | | | ................................................. | | | in place. | | | | | | Before detaching the power source, | | However, it cannot be used as an AC adapter. | | • To display the date and time in the camcorder’s | | | | | still open may cause damage to the LCD monitor*. |
| | | | | | | | | | | | Super VHS Expansion Technology | pg. 20 | | | | | | | | display and on a connected TV, see DATE/TIME | | | | |
Electronic Fog Filter Mode | | | | | | pg. 24 | | T | | | | | | | | • If the battery pack is attached in the wrong | make sure that the camcorder’s power is turned | • To avoid interference with reception, do not use | | | | | • Make sure the erase protection tab is in the position |
| | | | | | | | | | | | off. Failure to do so can result in a camcorder | DISP. (� pg. 19) in CAMERA MENU. | | | | | that allows recording. If not, slide the tab. Some |
Erase Protection | | | | | | | | pg. 8 | | | | | | | | | position, a malfunction may occur. | | the AC Adapter near a radio. | | | | | | |
Exposure Control | | | | | | | | pg. 18 | | Tape Counter | | | | | pg. 14 | | malfunction. | | | | | | | • The date/time cannot be stored in memory if the | | | | | cassettes have removable tabs. If the tab has been |
| | | | | | | | | | | 2) Set the Power Switch @to “OFF”. Connect the | | | | | • Recording time is reduced significantly when | | | | | |
F | | | | | | | | | | | | | Tape Dubbing | | | | pg. 15 | AC Adapter to the DC IN connector | 9, then | REFRESH: | | | | | Zoom or Record-Standby mode is engaged | | built-in clock battery runs out. Consult an | | | | | removed, cover the hole with adhesive tape. |
| | | | | | | | | | | | Tape Length Setting | ................................................. | | | pg. 21 | | | | | | authorised JVC dealer for replacement, or set the | | | | PAUSE | • The cassette holder cannot be opened while the |
Fade-In/Out | | | | | | | | | pg. 23 | | Tele Macro | | | | | | pg. 21 | connect the Power Cord to the AC Adapter. | Be sure to fully discha ge a battery pack before | repeatedly or the LCD monitor* is used | | | | | |
| | | | | | | | | | | | | date/time as necessary before you start shooting. | | | | | camcorder is in the record mode or detached from |
Fast-Forward Tape | | | | | | | | pg. 11 | | Time Base Corrector | | | | pg. 14 | 3) Plug the Power Cord into an AC outlet. The | repeatedly. | | | | | | |
| | | | | | | | | | recharging or storing it for a long period of time, | | | | | | |
5-Second Recording Mode | | | | | | pg. 12 | | Time-Lapse Shooting | | | | pg. 21 | CHARGE lamp *blinks to indicate charging | • Before extended use, it is recommended that you | | | | | | | | | | | the power source. | | | |
| | | | | | | | otherwise the battery performance will be reduced. | | | | | | | | | | | | | |
G | | | | | | | | | | | | | Tracking | | | | | pg. 14 | has started. | | | | | | 1) Perform steps 1) th ough 3) of “CHARGING | prepare enough battery packs to cover 3 times the | | | | | | | | | | | * Applicable models only. | | | |
Grip Adjustment | | | | | | | | pg. 8 | | Tripod Mounting | | | | pg. 8 | 4) When the CHARGE lamp *stops blinking but | planned shooting time. | | | | | | | | | | | | | | | | | |
H | | | | | | | | | | | | | Twilight Mode | | | | pg. 24 | stays lit, charging is finished. Unplug the AC | | THE BATTERY PACK”. | | | | * Applicable models only. | | | | | | | | | Shoulder Strap Attachment | Cassette holder | | | |
| | | | | | | | | | | | U | | | | | | | | 2) Press REFRESH rfor over 2 seconds. The | | | | | | | | | | | |
High Speed Shutter Mode | | | | | pg. 24 | | Unload A Tape | | | | pg. 8 | Adapter from the AC outlet. Disconnect the AC | | REFRESH lamp (blinks to indicate | | | | | | | | | @ | | Thread the strap through the eyelet , then fold it | i | t | | Gear | |
I | | | | | | | | | | | | | | | | Adapter from the camcorder. | | | | discharging has started. | | | | | | | | | | | | back and thread it through the buckle. Repeat the | | | | |
| | | | | | | | | | | | V | | | | | | | | To Detach The Battery Pack | | | | | | | | | | | | | | | | | | |
Instant Titles | | | | | | | | | pg. 19 | | | | | | | | | | | 3) When discharging is finished, charging | | | | | | | | | procedure to attach the other end of the strap to | | | | Turn to |
| | | | | | | | Video Echo Effect | | | | | pg. 24 | . | | | | | | | | | | | | |
L | | | | | | | | | | | | | | | | | ... slide BATTERY RELEASE 8and pull out the | | automatically starts and the CHARGE lamp * | | | | | | | | | the other eyelet y, making sure the strap is not | | | |
| | | | | | | | | | | | | | | | | | | | | | | | | | | take up |
| | | | | | | | | | | | Video Light | | | | | pg. 13 | | | | | | | | | | | | |
LCD Monitor/Viewfinder, Indications | | pg. 9, 10, 17 | | Viewfinder Adjustment | | | pg. 8 | battery pack. | | | | | | | blinks. | | | | | | | | | | | | | twisted. Adjust the lengthy. | | | | | | slack. |
Load A Tape | | | | | | | | pg. 8 | | W | | | | | | | Battery pack | | | Charging time | | | | | | | | | | | | | | | | | | | | | Erase | | |
M | | | | | | | | | | | | | | | | | | | | | | | | | | | | | | | | | | | | | | | | | Protection tab | |
| | | | | | | | | | | | White Balance Adjustment | | pg. 19 | BN-V11U* | | | approx. 1 hr. 30 min. | | | Charge marker helps you remember | | | | | | | | | | | | | | | | t | | |
Manual Focus | | | | | | | | pg. 18 | | Wide Mode | | | | | pg. 20 | BN-V12U (optional) | | | approx. 1 hr. 30 min. | | | whether the battery pack has been | | | | | | DATE / T I ME | | | | | | | | | | |
Menu Screen | .................................................... | | | | | | pg. 18 – 22 | | Wipe-In/Out | | | | | | pg. 23 | | | | | charged or not. Two colours are provided | | | | | YEAR | | 2 0 0 2 | | | | | | | | | | | |
| | | | | | | .............................................................. | | | | BN-V20U** (optional) | | approx. 2 hrs. 20 min. | | | | | | | | | | | | | | | | | | |
Monotone Effect | | | | | | | | pg. 24 | | Z | | | | | | | | | | | (red and black)—you choose which one | | | | | MONTH | | 6 | | | | | | | | | | | |
Mosaic Effect | | | | | | | | | pg. 24 | | | | | | | | | BN-V400U (optional) | | | approx. 4 hrs. 30 min. | | | means charged and which means | | | | | DAY | | 2 8 | 24-hour indication | | | | | Cassette i | | | |
........................................................... | | | | | | | | | Zooming | | | | | | pg. 13 | | | | | discharged. | | | | | | | | T I ME | | 2 0 : 2 0 | | | | | | | |
N | | | | | | | | | | | | | | | | | | | | | | | | | | | | | | | | | | | | | | | | | holder | | | | |
| | | | | | | | | | | | | | | | | | | | Charging times are for a fully discharged battery pack. | | | | | | | | | | | | | | | | | | | | | | | | |
ND Effect Mode | | | | | | | | pg. 24 | | | | | | | | | | | | | | | | | | | | | | | | | | | | | | | | | | |
| | | | | | | | | | | | | | | | * GR-SXM48/FXM38/SX24/FX14 only. | | | | | | | | | | | | | | | | | | | | | | | | | | |
Nega/Posi Mode | | | | | | | | pg. 24 | | | | | | | | | | | | | | | | | | | | | | EX I T | | | | | | | | | | | | | |
| | | | | | | | | | | | | | | | ** Provided with GR-SXM58 only. | | | | | | | | | | | | | | | | | | | | | | | | | | |
Night-Scope | | | | | | | | pg. 23 | | | | | | | | | | | | | | | | | | | | | | | | | | | | | | | | | | | | |
| | | | | | | | | | | 5 | | | | | | | | | | | | | | 6 | | | | | | | | | | 7 | | | | | | | | | | | 8 | | | | |
| | | | | CONTROLS, CONNECTORS AND INDICATORS | | | | 1• MENU Wheel [–, +] | 1 | | | � pg. 18 | RETape Remaining Time | | � pg. 21 | RECORDING | | | PLAYBACK | | | | BASIC FEATURES | | | 5Sec. Rec (5-sec. Recording) | |
| | | 1234 | | | | | | | | | | | | | | | • BRIGHT Wheel [–, +]* | ........................... | | � pg. 11 | TRecording Mode Indicator | ....................... | � pg. 20 | Set REC MODE, S-VHS (S-VHS ET)**, TAPE | | 1 Load a tape (� pg. 8, “Loading/Unloading A | Snapshot (GR-SXM58/SXM48/SX24 only) | (GR-FXM38/FX14 only) | | | |
| Eyepiece | | | | | | | Refer to this diagram while reading the instructions. | 2• TRACKING Wheel [–, +] | | � pg. 14 | | • Digital Effect Indicator | | � pg. 24 | | To record a scene for 5 seconds, providing quick |
5 | | | | | | | | | | | | | | | | #$%^&*( | • Snapshot Button [SNAPSHOT]*2 | � pg. 12 | | • Programme AE Indicator | ....................... | � pg. 24 | LENGTH and DATE/TIME in SYSTEM MENU. | | Cassette”). | | | | You can record still images that look like | scene transitions like those seen in TV | |
| | | | | | | | | | | | | | | • 5-Second Recording Button | | | | • Night-Scope Indicator*2 | | � pg. 23 | (� pg. 18 – 22, “MENU SETTINGS”) | | 2 Set the Power Switch @to “ | ”. To start | photographs onto a tape. | | | programmes. | | | | |
| | | | | | | | | | During shooting | 3[5 SEC. REC]*3 | | | | � pg. 12 | Y• Fade/Wipe-Standby Indicator | � pg. 23 | 1 Remove the lens cap. Set the Power Switch @ | playback, press 4/6 ^. | | 1) Perform step 1 of “RECORDING” (� pg. 11). | 1) Make sure the recording mode is set to “SP”. |
| | | | | | | | | | | | | | | | | | | | • Power Zoom Lever [T/W] | ....................... | � pg. 13 | URecording Format Indicator (S/S-ET)*2 | � pg. 20 | to “ ” or “ ”. | | | To stop playback temporarily (Still Playback), press | 2) Press SNAPSHOT 2. | | | 2) During Record–Standby, press 5SEC. REC 2. |
| | | | | | | | | | | | | | | | | | | | | | | | 4%/6 ^. To stop playback, press 5 $. Press 2 | • There is a momentary camera shutter-type | 5S fappears and 5Sec. Rec is reserved. |
| | | | | | | | | | | | | | | | | | | | 4• Speaker Volume Control [VOL.]*1 | � pg. 11 | ITape Length Indicator | | � pg. 21 | Shooting while using the viewfinder: Make sure |
| | | | | | | | | | | | | | | | | | | | • Picture Stabiliser Button | | | | | | | | | | | the LCD monitor* is closed and locked. | | | to rewind, or 3 &to fast-forward the tape. | | blackout together with the sound effect of a | 3) Press the Recording Start/Stop Button. | |
| | | | | | | | | | | | | | | | | | | | [P.STABILIZER] | | | | � pg. 12 | | Zoom Indicator Bar | | � pg. 13 | Shooting while using the LCD monitor*: Make | High-speed picture search (Shuttle Search) is | | shutter closing. | | | Recording starts, and after 5-second recording |
6 | | | | | | | | | | | | Keep the lens | | | | | | | 5• Time Base Corrector Button [TBC] | � pg. 14 | | | Zoom Level Indicator | | | | sure the LCD monitor* is fully open. | | possible by pressing 2 %or 3 &during | • Snapshot is also available during playback. | is finished, the camcorder reenters the Record– |
| | | | | | | | | | | cap attached to | | | | | | 6S-Video Output Connectors [S]* | 2 | � pg. 15 | O | | Approximate Zoom Ratio | | | The camcorder enters the Record-Standby mode | playback (holding 2 %or 3 &down during | | However, the shutter sound is not heard. | Standby mode automatically. | | |
7 | | | | | | | | | | | | the camcorder. | | )qwert | | PRecording Indicator | | � pg. 11 | and “PAUSE” Sis displayed. | | | playback continues search until released). To | | | | | 4) To cancel the 5Sec. Rec. function, press 5SEC. |
| | | | | | | | | | | | 7Audio Output Connector [A] | � pg. 15 | | | | Picture Stabiliser | | |
| | | | | | | | | | | | | | | | | | | | | | | | | | resume normal playback, press 4/6 ^. | | | REC 2again so that | 5S fdisappears. |
8 | o | 90! | @ | | | | | | | | | Cassette holder | | | y | | | 8Video Output Connector [V] | � pg. 15 | aDigital Effect Indicator | | � pg. 24 | • If you tilt the LCD monitor* upward to 180 | | For VIDEO RECORDING/VIDEO PLAYBACK | To compensate for unstable images caused by | • Fade/Wipe (� pg. 23) cannot be activated by |
| | | | | | | | | | | | | | | | | | | | | • Programme AE Indicator | ....................... | � pg. 24 | degrees, the viewfinder switches back on and the |
| | | | | | | | | | | | | | | Battery Release Switch | | | | | s• Night-Scope Indicator*2 | | � pg. 23 | monitored image can be viewed both on the LCD | • The camcorder shuts off automatically after about | camera-shake, particularly at high magnification. | pressing 5SEC. REC 2. | | | |
| | | | | | | | | | | | | | | 9[BATTERY RELEASE] | | | | � pg. 6 | dFade/Wipe-Standby Indicator | � pg. 23 | monitor* and in the viewfinder, so the person you | 5 minutes in the Record-Standby or Stop mode. | 1) Press P. STABILIZER 4. | dappears. | | | | | |
| | | | | | | | | | | | | | | | | | | 0DC IN Connector | | | | � pg. 6 | fPicture Stabiliser Indicator | ....................... | � pg. 12 | shoot can view himself/herself. | | | To turn on again, set the Power Switch @to | 2) To switch off the Picture Stabiliser, press | | | | | |
| | | | | | | | | | | | | | | | | | | !Digital Connector [DIGITAL]*4 | | | | | | ! | O | “OFF”, then to “ | ”, “ | ” or “ | ”. | | P. STABILIZER 4. | ddisappears. | | | | | |
| | | | | | | 180° | | 90° | | | | | | | @Recording Start/Stop Button | � pg. 11 | | • Interval Time/Recording Time Indicator .... | � pg. 21 | 2 Press the Recording Start/Stop Button . | | • When the Power Switch @is set to “ ”, “ ” or | • Accurate stabilisation may not be possible in | | | | | |
| | | | | | | | | | | | | | | appears while recording is in progress. | | | | | | |
| | | | | | | | | | | | | | | | | g | | | | 3 | | | | | | | | | | | | |
| Viewfinder | | | | | | | | | | | | | | | u | Turn the gear to | #Power Switch [ | , OFF, | , ] | � pg. 11 | | • 5 Sec. Rec Mode Indicator* | � pg. 12 | • To stop recording, press the Recording Start/Stop | “ | ” and the LCD monitor* is opened at an | | certain conditions including excessive hand | | | | | |
| | | | | | | | | | | | | | | take up slack. | Video Light Switch | | | | | | hBright Level Indicator*1 | | � pg. 11 | Button !. The camcorder re-enters the Record- | angle of 60 degrees or more, the LCD monitor* | • | shake. | | | | | | | |
| | Speaker | | | | | | | | | | | | | | | | | | ........................ | | � pg. 13 | jInstant Title Display | | � pg. 19 | Standby mode. | | | switches on and the viewfinder switches off | dappears blinking if the Stabiliser cannot be | | | | | |
| | (applicable models only) | | | | | | | | | | | | | $[LIGHT OFF/AUTO/ON]*5 | | | | | | | used. | | | | | | | |
| | | | | p | | | | | | | | | i | | | y | W | | | %Stop Button [STOP] | .................................. | | | � pg. 11 | kDate/Time Display | | � pg. 19 | | | | automatically to save power. | | | | | | | | | |
| | | | | | | | | | | | | | | | | | | | | | To Adjust The Brightness Of The LCD Monitor*, | | • This function cannot be activated during the | | | | | |
| | | | | | | | | | | | | | | | | • Retake Rewind Button [RETAKE R] | � pg. 13 | lFocus Indicator | | � pg. 18 | rotate the BRIGHT Wheel 1until the bright level | • The playback picture can be viewed in the | | “Night-Scope”, “CLASSIC FILM”, “STROBE” and | | | | | |
| | | | | | | | | | | | | | | | | | | • Quick Review Button [ | | R] | � pg. 13 | ;Exposure Control Level Counter | � pg. 18 | indiator gon the display moves and the | | viewfinder (with the LCD monitor* shut), on the | | “VIDEO ECHO” modes (� pg. 24, “Digital | | | | | |
| | | | | | | | | | LCD monitor | | | | | | | LCD monitor* or on a connected TV (� pg. 15, | | | | | | |
| | | | | | | | | | (applicable models only) | | | Erase | | ^• Rewind Button [R] | | | | � pg. 11 | AWhite Balance Mode Indicator | � pg. 19 | appropriate brightness is reached. | | | “Connections To A TV/VCR”). | | | Effects”). | | | | | | | |
| 180° | | | | | | | | | | | | | | | | | &Play/Pause Button | | | | � pg. 11 | | S-VHS/S-VHS ET Recording | | | * Applicable models only. | | | • To remove the indications, � pg. 21, DISPLAY or | | | | | | | | | |
| | | | | | | | | | | | | | | | protection tab | • Retake Forward Button [RETAKE F] | ..... � pg. 13 | SIndicator*2 | | | � pg. 20 | ** GR-SXM58/SXM48/SX24 only. | | | OSD OUTPUT in SYSTEM MENU. | | | | | | | | | |
| Q | | | | | | | | | | | | | | | | | | | | *• Fast-Forward Button [F] | | � pg. 11 | DRecord-Standby Mode Indicator | � pg. 11 | | | | • To control the speaker volume*, slide VOL. 3 | | | | | | | | | |
| | | | | | | | | | | | | | | | | | | | (CHARGE Lamp | | | | � pg. 6 | F | | : Cassette Indicator | | � pg. 8 | | | | towards “+” to turn up, or towards “–” to turn | | | | | | | | | |
| | | | | | | | | | | | | | | | | | | | )REFRESH Lamp | | | | � pg. 6 | GTBC Indicator | | | � pg. 14 | | | | down. While shooting, sound is not heard from | | | | | | | | | |
| | | | | | | | | | | | | | | | | | | | | | | | | | | | the speaker*. | | | | | | | | | | | | |
| | | | | | | | | | | | | | | | | | | | | • Fade/Wipe Button [FADE/WIPE] | � pg. 23 | HPlayback Special Effect Indicator*2 | .......... | � pg. 14 | | | | | | | | | | | | | | | |
| | | | | | | | | | | | | | | | | | | | | • Counter Reset/Memory...................................Button | | JRecording Format Indicator (S/S-ET)*2 ... | � pg. 20 | | | | • If TBC (� pg. 14) is engaged during Still | | | | | | | | | |
| | | | | | | Video light | | | | | | | | | | | | � pg. 14 | | | | Playback, noise bars will not appear (GR-SXM58/ | | | | | | | | | |
| | | | | | | | | | | | | | | | | | q[COUNTER R/M] | | | | | KTape Counter | | | � pg. 14 | | | | SXM48/SX24 only). | | | | | | | | | | | |
| | | Microphone | | (GR-SXM58/SXM48/ | | | | | | | | | | | | | | | | | | | | | | | | | | | | |
| | | | SX24 only) | | | | | | | | | | | | wProgramme AE Button [P.AE] | � pg. 24 | LRecording Mode Indicator (SP/LP) | .......... | � pg. 20 | | | | * Applicable models only. | | | | | | | | | | | |
| | | | | | LCD Monitor/Viewfinder Indications | | | | | | eDigital Effect Button [DIGIFECT] | � pg. 24 | | Tape Running Indicator | | | | | | | | | | | | | | | | | | | | | |
| | | | | | | | | | | rNIGHT-SCOPE Button*2 | | � pg. 23 | | 4 | : Playback | | | | | | | | | | | | | | | | | | | | | |
| | | During Recording | | | | | | | | | During Playback | | tREFRESH Button | | | | � pg. 6 | | 3 : Fast-Forward/Shuttle Search | | | | | | | | | | | | | | | | | | | |
O | | E | | RTY | | | U | | lk | | I | | DFG | HJKL: | | yEJECT Switch | | | | � pg. 8 | | 2 : Rewind/Shuttle Search | | | | | | | | | | | | | | | | | | | | |
| | | | | | | | uShoulder Strap Eyelets | .............................. | | � pg. 8 | :6 : Pause | .................................... | | � pg. 14 | | | | | | | | | | | | | | | | | | |
| 1 2 0M I N | | S – ET | | T 4 0 | | | | | | | S–ET | SP 4 | | iBattery Pack Mount | ................................... | | | � pg. 6 | zTracking Indicator | | | | | | | | | | | | | | | | | | | | |
| REC SP | | | | | | | | | | TBC | | | – 1 : 2 3 : 4 5 | | oClose Button | | | | � pg. 8 | | • BRIGHT: Bright Level Indicator*1 | � pg. 11 | | | | | | | | | | | | | | | | | | |
aP | 444 | 1 | N I GHT 2 0 x | | +0 2 | | | | | MONOTONE | | AT | | pDioptre Adjustment Control | � pg. 8 | | • VOLUME: Speaker Volume Indicator*1 .... | � pg. 11 | | | | | | | | | | | | | | | | | | |
| s | | | S – VHS REC | | | MWB | | A | ; | | | | | | | | | | Camera Sensor | | | | | | | | | | | | | | | | | | | | | | | | | | | | | | |
gjdhf | | | PAUSE | | | | | S | | 1 X | | | | | | z | | | | | | *1 Applicable models only. | | | | | | | | | | | | | | | | | | | | | |
| | 5M I N | | | | | | | | | | | | Be careful not to cover this area; a sensor | *2 GR-SXM58/SXM48/SX24 only. | | | | | | | | | | | | | | | | | | | | |
| | 1 / 2S | | – – – – – – – –6– – – | + | | | | | | | | | | Qnecessary for shooting is built-in here. | | *3 GR-FXM38/FX14 only. | | | | | | | | | | | | | | | | | | | | | |
| | BR I GHT | | | | | | | | | | | WGrip Strap | | | | � pg. 8 | *4 GR-SXM58 only. | | | | | | | | | | | | | | | | | | | | | | |
| | CONGRATULAT I ONS | | | | | | b a | VOLUME – | – – – – –6– – – – – + | Tripod Mounting Socket | | � pg. 8 | *5 GR-SXM58/SXM48/SX24 only. | | | | | | | | | | | | | | | | | | | | |
| | 2 5 . 1 2 . 0 1 | 1 1 : 4 5 : 1 8 | | | | | | | | | | | | | | | | | | | | | | | | |