Recording
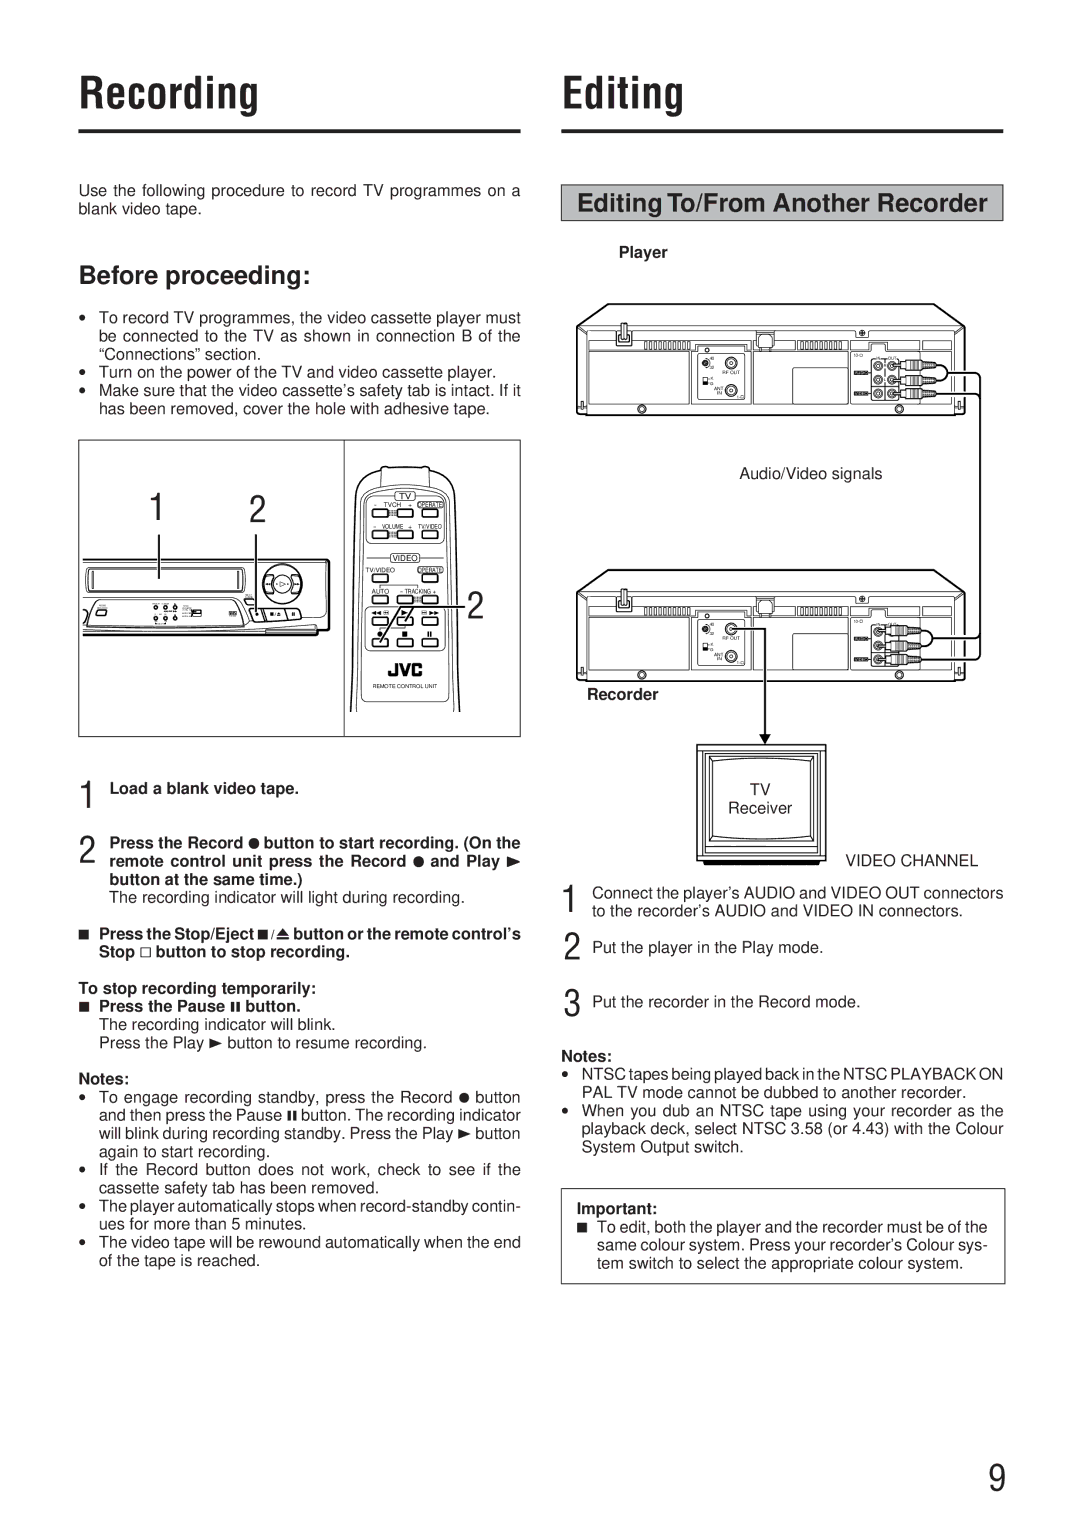
Use the following procedure to record TV programmes on a blank video tape.
Before proceeding:
∙To record TV programmes, the video cassette player must be connected to the TV as shown in connection B of the “Connections” section.
∙Turn on the power of the TV and video cassette player.
∙Make sure that the video cassette’s safety tab is intact. If it has been removed, cover the hole with adhesive tape.
1 | 2 |
|
| TV |
|
| |
- | TVCH | + | OPERATE |
| |||
- | VOLUME | + | TV/VIDEO |
| |||
|
|
|
| VIDEO |
|
| |
|
| TV/VIDEO |
| OPERATE |
| ||
| IB.E.S.T. | AUTO | - TRACKING + | 2 | |||
| PICTURE |
|
|
|
|
| |
AUDIO | NTSC |
|
|
|
|
| |
MONITOR | PLAYBACK |
|
|
|
|
| |
| ON PAL TV | (+ | - | +( | |||
| NTSC3.58 | ||||||
| NTSC4.43 | ||||||
Editing
Editing To/From Another Recorder
Player
40 | 10- | OUT |
IN | ||
32 |
| R |
RF OUT | AUDIO |
|
K |
| L |
G |
|
|
ANT. |
|
|
IN | VIDEO |
|
1- |
|
|
Audio/Video signals
[ | L | J |
REMOTE CONTROL UNIT | ||
1 Load a blank video tape.
2 Press the Record ¦ button to start recording. (On the remote control unit press the Record ¦ and Play 3 button at the same time.)
40 |
32 |
RF OUT |
K |
G |
ANT. |
IN |
1- |
Recorder
TV |
Receiver |
10- ![]()
IN OUT
R
AUDIO
L![]()
![]()
VIDEO
VIDEO CHANNEL
The recording indicator will light during recording.
7Press the Stop/Eject ¤button or the remote control’s Stop & button to stop recording.
To stop recording temporarily:
7Press the Pause 8 button.
The recording indicator will blink.
Press the Play 3 button to resume recording.
Notes:
∙To engage recording standby, press the Record ¦ button and then press the Pause 8button. The recording indicator will blink during recording standby. Press the Play 3button again to start recording.
∙If the Record button does not work, check to see if the cassette safety tab has been removed.
∙The player automatically stops when
∙The video tape will be rewound automatically when the end of the tape is reached.
1 Connect the player’s AUDIO and VIDEO OUT connectors to the recorder’s AUDIO and VIDEO IN connectors.
2 Put the player in the Play mode.
3 Put the recorder in the Record mode.
Notes:
∙NTSC tapes being played back in the NTSC PLAYBACK ON PAL TV mode cannot be dubbed to another recorder.
∙When you dub an NTSC tape using your recorder as the playback deck, select NTSC 3.58 (or 4.43) with the Colour System Output switch.
Important:
7To edit, both the player and the recorder must be of the same colour system. Press your recorder’s Colour sys- tem switch to select the appropriate colour system.
9
