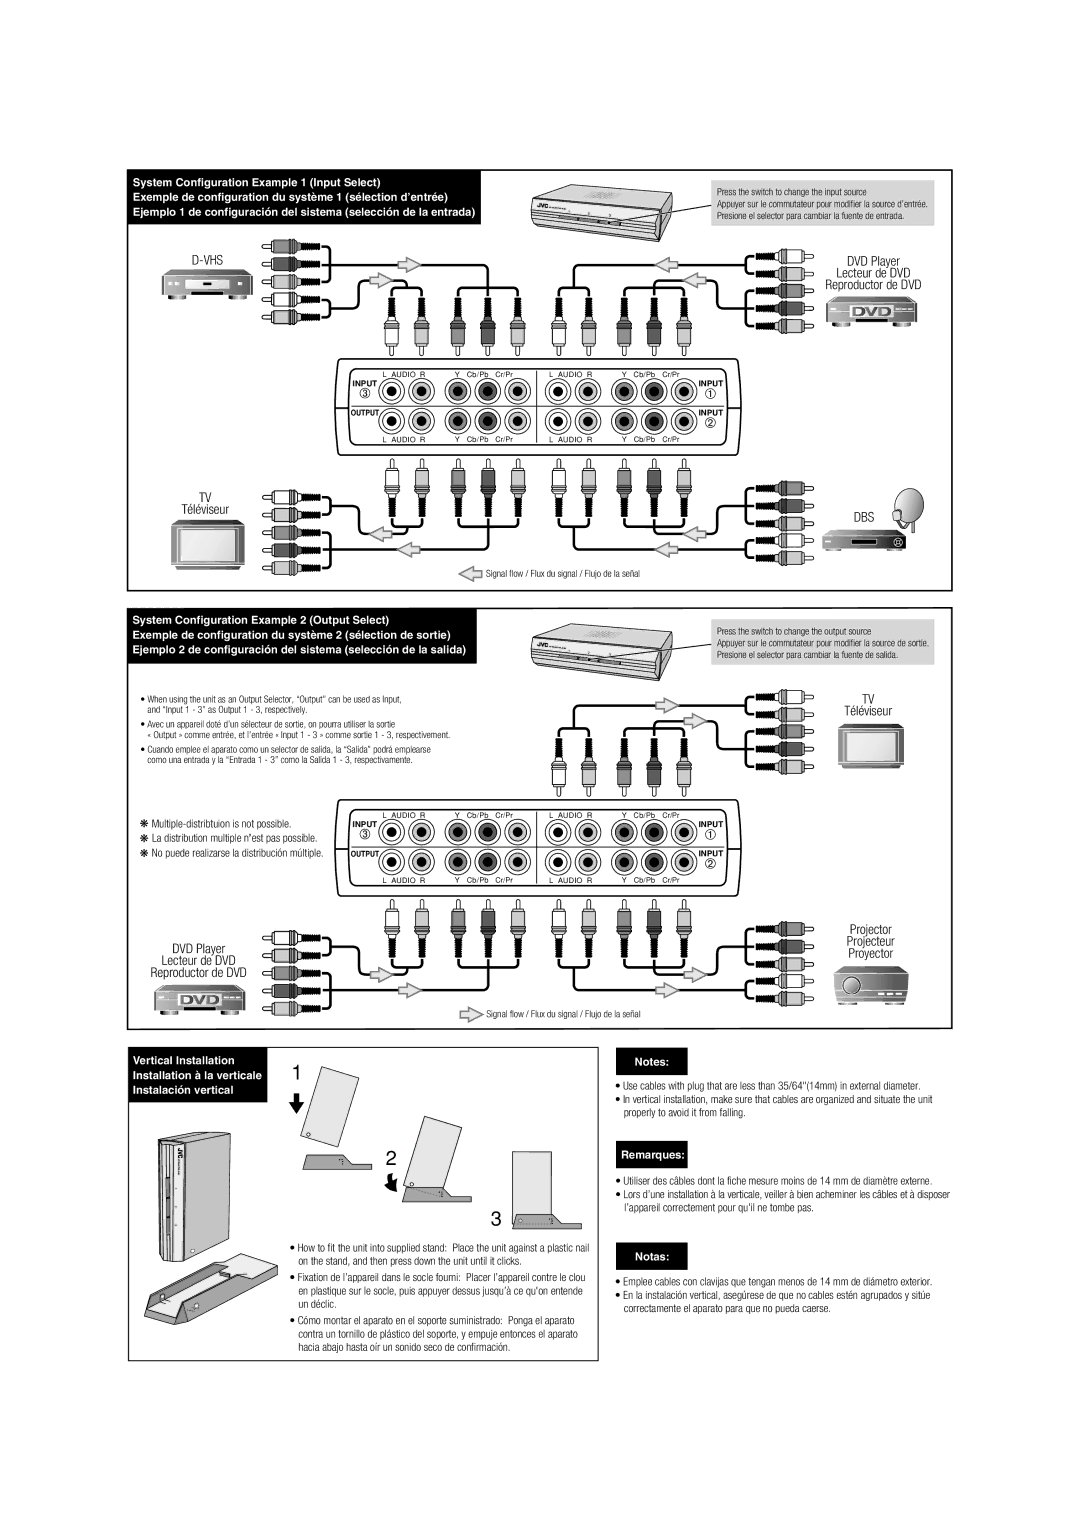
System Configuration Example 1 (Input Select)
Exemple de configuration du système 1 (sélection d’entrée) Ejemplo 1 de configuración del sistema (selección de la entrada)
Press the switch to change the input source
Appuyer sur le commutateur pour modifier la source d’entrée. Presione el selector para cambiar la fuente de entrada.
![]()
![]()
![]()
![]()
![]()
![]()
![]()
![]()
![]()
![]()
![]()
![]() DVD Player
DVD Player ![]()
![]()
![]()
![]()
![]()
![]()
![]()
![]() Lecteur de DVD
Lecteur de DVD
Reproductor de DVD
L | AUDIO | R | Y | Cb/Pb | Cr/Pr | L | AUDIO | R | Y | Cb/Pb | Cr/Pr |
INPUT |
|
|
|
|
|
|
|
|
|
| INPUT |
OUTPUT |
|
|
|
|
|
|
|
|
|
| INPUT |
L | AUDIO | R | Y | Cb/Pb | Cr/Pr | L | AUDIO | R | Y | Cb/Pb | Cr/Pr |
TV
Téléviseur
DBS
![]() Signal flow / Flux du signal / Flujo de la señal
Signal flow / Flux du signal / Flujo de la señal
System Configuration Example 2 (Output Select)
Exemple de configuration du système 2 (sélection de sortie) Ejemplo 2 de configuración del sistema (selección de la salida)
•When using the unit as an Output Selector, “Output” can be used as Input, and “Input 1 - 3” as Output 1 - 3, respectively.
•Avec un appareil doté d’un sélecteur de sortie, on pourra utiliser la sortie
« Output » comme entrée, et l’entrée « Input 1 - 3 » comme sortie 1 - 3, respectivement.
•Cuando emplee el aparato como un selector de salida, la “Salida” podrá emplearse como una entrada y la “Entrada 1 - 3” como la Salida 1 - 3, respectivamente.
Press the switch to change the output source
Appuyer sur le commutateur pour modifier la source de sortie. Presione el selector para cambiar la fuente de salida.
TV
Téléviseur

Multiple-distribtuion is not possible.
![]() La distribution multiple n’est pas possible.
La distribution multiple n’est pas possible. ![]() No puede realizarse la distribución múltiple.
No puede realizarse la distribución múltiple.
L | AUDIO | R | Y | Cb/Pb | Cr/Pr | L | AUDIO | R | Y | Cb/Pb | Cr/Pr |
INPUT |
|
|
|
|
|
|
|
|
|
| INPUT |
OUTPUT |
|
|
|
|
|
|
|
|
|
| INPUT |
L | AUDIO | R | Y | Cb/Pb | Cr/Pr | L | AUDIO | R | Y | Cb/Pb | Cr/Pr |
| Projector | |
DVD Player | Projecteur | |
Proyector | ||
Lecteur de DVD | ||
| ||
Reproductor de DVD |
| |
| Signal flow / Flux du signal / Flujo de la señal |
Vertical Installation | 1 |
Installation à la verticale |
Instalación vertical
2
3
• How to fit the unit into supplied stand: Place the unit against a plastic nail on the stand, and then press down the unit until it clicks.
• Fixation de l’appareil dans le socle fourni: Placer l’appareil contre le clou en plastique sur le socle, puis appuyer dessus jusqu’à ce qu'on entende un déclic.
•Cómo montar el aparato en el soporte suministrado: Ponga el aparato contra un tornillo de plástico del soporte, y empuje entonces el aparato hacia abajo hasta oír un sonido seco de confirmación.
Notes:
•Use cables with plug that are less than 35/64"(14mm) in external diameter.
•In vertical installation, make sure that cables are organized and situate the unit properly to avoid it from falling.
Remarques:
•Utiliser des câbles dont la fiche mesure moins de 14 mm de diamètre externe.
•Lors d’une installation à la verticale, veiller à bien acheminer les câbles et à disposer l’appareil correctement pour qu'il ne tombe pas.
Notas:
•Emplee cables con clavijas que tengan menos de 14 mm de diámetro exterior.
•En la instalación vertical, asegúrese de que no cables estén agrupados y sitúe correctamente el aparato para que no pueda caerse.
