Power Supply Preparations
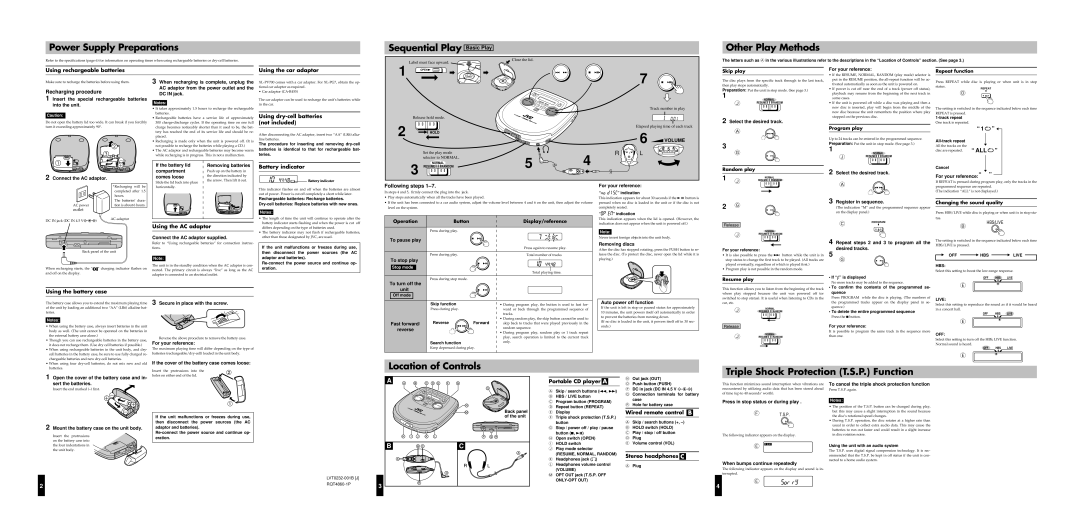
Sequential Play Basic Play
Other Play Methods
Refer to the specifications (page 6) for information on operating times when using rechargeable batteries or
Label must face upward.
Close the lid.
The letters such as A in the various illustrations refer to the descriptions in the “Location of Controls” section. (See page 3.)
Using rechargeable batteries
Make sure to recharge the batteries before using them.
Recharging procedure
1 Insert the special rechargeable batteries into the unit.
Caution:
Do not open the battery lid too wide. It can break if you forcibly turn it exceeding approximately 90°.
| 2 | |
3 |
| |
OPEN | . | |
1 | ||
, | ||
| ||
2 Connect the AC adaptor. |
| |
| *Recharging will be | |
| completed after 1.5 | |
| hours. | |
| The batteries’ dura- | |
AC power | tion is about 6 hours. | |
outlet |
|
3 When recharging is complete, unplug the AC adaptor from the power outlet and the DC IN jack.
Notes:
•It takes approximately 1.5 hours to recharge the rechargeable batteries.
•Rechargeable batteries have a service life of approximately 300
•Recharging is made only when the unit is powered off. (It is not possible to recharge the batteries while playing a CD.)
•The AC adaptor and rechargeable batteries may become warm while recharging is in progress. This in not a malfunction.
If the battery lid | Removing batteries |
compartment | Push up on the battery in |
comes loose | the direction indicated by |
Slide the lid back into place | the arrow. Then lift it out. |
| |
horizontally. |
|
OPEN |
|
Using the car adaptor
• Car adaptor
The car adaptor can be used to recharge the unit’s batteries while in the car.
Using dry-cell batteries (not included)
After disconnecting the AC adaptor, insert two “AA” (LR6) alka- line batteries.
The procedure for inserting and removing
Battery indicator
![]()
![]()
![]()
![]()
![]()
![]()
![]() Battery indicator
Battery indicator
This indicator flashes on and off when the batteries are almost out of power. Power is cut off completely a short while later.
Rechargeable batteries: Recharge batteries.
1 OPEN ![]()
7
|
|
|
|
|
|
| Track number in play |
| ||
| Release hold mode. |
|
|
|
|
|
|
|
| |
2 |
|
|
|
|
|
| Elapsed playing time of each track |
| ||
| HOLD |
|
|
|
| 6 |
|
|
| |
|
|
|
|
|
|
|
|
| ||
|
|
|
|
|
|
| VOLUME |
| ||
|
|
|
|
|
|
|
|
| ||
|
|
|
|
|
|
| 6 | 5 | 4 |
|
|
| Set the play mode | 5 | 4 |
| R | L |
|
|
|
|
| selector to NORMAL. |
|
|
|
|
|
| ||
| 3 | NORMAL |
|
|
|
|
|
| ||
| RESUME RANDOM |
|
|
|
|
|
| |||
|
|
|
|
|
|
|
| |||
Following steps |
|
| For your reference: |
|
|
| ||||
In steps 4 and 5, firmly connect the plug into the jack. |
|
| “ | ” indication |
|
|
| |||
• Play stops automatically when all the tracks have been played. |
|
| This indication appears for about 30 seconds if the 3 button8 | is | ||||||
• If the unit has been connected to a car audio system, adjust the volume level between 4 and 6 on the unit, then adjust the volume | pressed when no disc is loaded in the unit or if the disc is not | |||||||||
level on the system. |
|
|
| completely seated. |
|
|
|
| ||
Skip play
The disc plays from the specific track through to the last track, then play stops automatically.
Preparation: Put the unit in stop mode. (See page 3.)
1
NORMAL
JRESUME ![]()
![]()
![]() RANDOM
RANDOM
2 Select the desired track.
A
3
G
Random play
1 J | NORMAL | ||||||
RESUME |
|
|
|
|
| RANDOM | |
|
|
| |||||
2 G
For your reference:
•If the RESUME, NORMAL, RANDOM (play mode) selector is put in the RESUME position, the
•If power is cut off near the end of a track (power off status), playback may resume from the beginning of the next track in some cases.
•If the unit is powered off while a disc was playing and then a new disc is inserted, play will begin from the middle of the new disc because the unit remembers the position where play stopped on the previous disc.
Program play
Up to 24 tracks can be entered in the programmed sequence. Preparation: Put the unit in stop mode. (See page 3.)
1
J | NORMAL | |
RESUME | RANDOM | |
2 Select the desired track.
A
3 Register in sequence.
(The indication “M” and the programmed sequence appear
Repeat function
Press REPEAT while disc is playing or when unit is in stop status.
REPEAT
D
The setting is switched in the sequence indicated below each time REPEAT is pressed.
One track is repeated.
“ 1 | ” | |
|
| |
All the tracks on the |
| ” |
disc are repeated. “ ALL | ||
Cancel
For your reference:“ ”
If REPEAT is pressed during program play, only the tracks in the programmed sequence are repeated.
(The indication “ALL” is not displayed.)
Changing the sound quality
DC IN jack (DC IN 4.5 V | ) | |
|
Back panel of the unit
When recharging starts, the “![]()
![]() ” charging indicator flashes on and off on the display.
” charging indicator flashes on and off on the display.
Using the AC adaptor
Connect the AC adaptor supplied.
Refer to “Using rechargeable batteries” for connection instruc- tions.
Note:
The unit is in the standby condition when the AC adaptor is con- nected. The primary circuit is always “live” as long as the AC adaptor is connected to an electrical outlet.
Notes:
•The length of time the unit will continue to operate after the battery indicator starts flashing and when the power is cut off differs depending on the type of batteries used.
•The battery indicator may not flash if rechargeable batteries, other than those designated by JVC, are used.
If the unit malfunctions or freezes during use, then disconnect the power sources (the AC adaptor and batteries).
Operation | Button | Display/reference |
| Press during play. |
|
To pause play |
|
|
|
| Press again to resume play. |
| Press during play. | Total number of tracks |
To stop play |
|
|
Stop mode |
|
|
|
| Total playing time. |
To turn off the | Press during stop mode. |
|
|
|
“ ![]()
![]()
![]()
![]()
![]()
![]()
![]() ” indication
” indication
This indication appears when the lid is opened. (However, the indication does not appear when the unit is powered off.)
Note:
Never insert foreign objects into the unit body.
Removing discs
After the disc has stopped rotating, press the PUSH button to re- lease the disc. (To protect the disc, never open the lid while it is playing.)
HSUP
PUSH
Release
NORMAL
JRESUME ![]()
![]()
![]() RANDOM
RANDOM
For your reference:
•It is also possible to press the ¢ button while the unit is in stop status to change the first track to be played. (All tracks are played eventually, regardless of which is played first.)
•Program play is not possible in the random mode.
Resume play
on the display panel.)
C | PROGRAM |
|
4 Repeat steps 2 and 3 to program all the desired tracks.
5
G
• If “![]() ” is displayed
” is displayed
No more tracks may be added to the sequence.
• To confirm the contents of the programmed se- |
Press HBS/LIVE while disc is playing or when unit is in stop sta- tus.
B | HBS/LIVE |
|
The setting is switched in the sequence indicated below each time HBS/LIVE is pressed.
OFF ![]() HBS
HBS ![]() LIVE
LIVE
HBS:
Select this setting to boost the
OFF HBS LIVE
E
Using the battery case
unit |
Off mode |
This function allows you to listen from the beginning of the track where play stopped because the unit was powered off (or
quence |
Press PROGRAM while the disc is playing. (The numbers of |
The battery case allows you to extend the maximum playing time of the unit by loading an additional two “AA” (LR6) alkaline bat- teries.
Notes:
• When using the battery case, always insert batteries in the unit |
body as well. (The unit cannot be operated on the batteries in |
the external battery case alone.) |
• Though you can use rechargeable batteries in the battery case, |
it does not recharge them. (Use dry cell batteries if possible.) |
• When using rechargeable batteries in the unit body, and dry- |
cell batteries in the battery case, be sure to use fully charged re- |
chargeable batteries and new |
3 Secure in place with the screw.
Reverse the above procedure to remove the battery case.
For your reference:
The maximum playing time will differ depending on the type of batteries
| Skip function |
|
| • During program play, the button is used to fast for- | |
|
|
| |||
| Press during play. |
|
| ward or back through the programmed sequence of | |
|
|
| |||
|
|
|
|
| tracks. |
|
|
|
|
| |
Fast forward/ | Reverse | Forward |
| • During random play, the skip button cannot be used to | |
| |||||
| skip back to tracks that were played previously in the | ||||
| |||||
reverse |
|
|
|
| random sequence. |
|
|
|
| ||
|
|
|
| • During program play, random play or 1 track repeat | |
|
|
|
|
| |
|
|
|
|
| play, search operation is limited to the current track |
|
|
|
|
| |
|
|
|
|
| |
| Search function |
|
| only. | |
|
|
| |||
|
|
| |||
| Keep depressed during play. |
|
| ||
|
|
| |||
Auto power off function
If the unit is left in stop or paused status for approximately 10 minutes, the unit powers itself off automatically in order to prevent the batteries from running down.
(If no disc is loaded in the unit, it powers itself off in 30 sec- onds.)
switched to stop status). It is useful when listening to CDs in the car, etc.
JNORMAL
RESUME ![]()
![]()
![]() RANDOM
RANDOM
Release
J | NORMAL | ||||||
RESUME |
|
|
|
|
| RANDOM | |
|
|
| |||||
the programmed tracks appear on the display panel in se- |
quence.) |
• To delete the entire programmed sequence |
Press the 7button.
For your reference:
It is possible to program the same track in the sequence more than one.
LIVE:
Select this setting to reproduce the sound as if it would be heard in a concert hall.
OFF HBS LIVE
E
OFF:
Select this setting to turn off the HBS, LIVE function. Normal sound is heard.
OFF HBS LIVE
E
• When using four |
batteries. |
1 Open the cover of the battery case and in-
If the cover of the battery case comes loose:
Insert the protrusions into the holes on either end of the lid.
Location of Controls |
A |
Portable CD player A
NOut jack (OUT)
Triple Shock Protection (T.S.P.) Function
sert the batteries.
Insert the end marked
2 Mount the battery case on the unit body.
Insert the protrusions on the battery case into
If the unit malfunctions or freezes during use, then disconnect the power sources (the AC adaptor and batteries).
Back panel |
of the unit |
A Skip / search buttons (4, ¢) |
B HBS / LIVE button |
C Program button (PROGRAM) |
D Repeat button (REPEAT) |
E Display |
F Triple shock protection (T.S.P.) |
button |
G Stop / power off / play / pause |
button (7, 38) |
H Open switch (OPEN) |
I |
OPush button (PUSH)
PDC in jack (DC IN 4.5 V ![]() )
)
Q Connection terminals for battery case
R Hole for battery case
Wired remote control B
A Skip / search buttons (+, |
B HOLD switch (HOLD) |
C Play / stop / off button |
D Plug |
E Volume control (VOL) |
This function minimizes sound interruption when vibrations are encountered by utilizing audio data that has been stored ahead of time (up to 40 seconds’ worth).
Press in stop status or during play .
F | T.S.P. |
The following indicator appears on the display.
To cancel the triple shock protection function
Press T.S.P. again.
Notes:
•The position of the T.S.P. button can be changed during play, but this may cause a slight interruption in the sound because the disc’s rotational speed changes.
•During T.S.P. operation, the disc rotates at a higher rate than usual in order to collect extra audio data. This may cause the batteries to run out faster and could result in a slight increase in disc rotation noise.
the four indentations in | OPEN |
|
the unit body.
B | C |
HOLD switch |
J Play mode selector |
(RESUME, NORMAL, RANDOM) |
K Headphones jack ( ) |
L Headphones volume control |
(VOLUME) |
M OPT OUT jack (T.S.P. OFF |
Stereo headphones C
APlug
E T.S.P. | Using the unit with an audio system |
| The T.S.P. uses digital signal compression technology. It is rec- |
| ommended that the T.S.P. be kept in off status if the unit is con- |
When bumps continue repeatedly | nected to a home audio system. |
| |
The following indicator appears on the display and sound is in- |
|
terrupted. |
|
E |
2
3 |
4 |