PORTABLE MINIDISC PLAYER
ENGLISH |
|
INSTRUCTIONS
Supplied Accessories |
Check the packing carton for these accessories. |
CAUTION!
THIS PRODUCT UTILIZES A LASER.
USE OF CONTROLS OR ADJUSTMENTS OR PERFORMANCE OF PROCEDURES OTHER THAN THOSE SPECIFIED HEREIN MAY RESULT IN HAZARDOUS RADIATION EXPOSURE.
DO NOT OPEN COVERS AND DO NOT REPAIR YOURSELF. REFER SERVICING TO QUALIFIED PERSONNEL.
WARNING:
TO REDUCE THE RISK OF FIRE OR ELECTRIC SHOCK, DO NOT EXPOSE THIS APPLIANCE TO RAIN OR MOISTURE.
CLASS 1
LASER PRODUCT
1.CLASS 1 LASER PRODUCT
2.DANGER: Invisible laser radiation when open and interlock failed or defeated. Avoid direct exposure to beam.
3.CAUTION: Do not open the top cover. There are no user serviceable parts inside the Unit; leave all servicing to qualified service personnel.
AC adaptor | 1 pc. | Rechargeable nickel metal hydride battery | 1 pc. |
Headphones | 1 pc. | 1 pc. | |
Wired remote control | 1 pc. | Carrying pouch | 1 pc. |
Charger/adaptor | 1 pc. |
|
|
| *Use numbers indicated in parentheses when asking for replacement parts. |
| |
Thank you for purchasing this JVC product. Please read these instructions carefully before starting operation to be sure to obtain opti- mum performance and a longer service life from your minidisc player.
CAUTION: | WARNING LABEL, |
PLACED INSIDE | |
AC adaptor | THE UNIT |
| |
| |
tery |
|
equipments for |
|
Power Supply Preparations
Using the rechargeable Ni-MH battery (included)
1 Remove the rechargeable battery from its case.
2 Insert the rechargeable battery into the charger/adaptor.
| Charger/Adaptor |
Rechargeable battery | Rechargeable battery |
3 Set the switch on the charger/adaptor to “CHARGER”.
4 Connect the AC adaptor to the charger/adaptor.
To AC power outlet
Charger/Adaptor
AC adaptor
Charge indicator
5 The charge indicator will initially light red. It will go out when recharg- ing is completed. When recharging is complete, unplug the AC adap- tor from the AC outlet and the charger/adaptor.
6 Remove the recharged battery from the charger/adaptor and insert it into the minidisc player.
Slide the cover and | Insert the battery with its | Firmly close the cover. |
open it. | positive terminal facing |
|
| out. |
|
Notes:
•You cannot use the MD player while charging the rechargeable battery.
•It takes approximately 2 hours to recharge the rechargeable battery.
•The rechargeable battery has a service life of approximately 300
•The AC adaptor and rechargeable battery may become warm while recharging. This is not a malfunction.
•When recharging the rechargeable battery which was left unused for a long time, the charge indicator may not light immediately. It will light in a few minutes.
Refer to the specifications for information on operating time durations when using a recharge- able battery,
Using the AC adaptor
CAUTION: “Be sure there is no battery in the minidisc player or in the
1 Attach the battery case to the minidisc player.
Turn the knob on the battery case toward “LOCK” until it stops. (To detach the battery case, turn the knob toward “RELEASE” until the battery case comes loose.)
Battery case
LOCK | Knob |
E |
|
AS |
|
LE |
|
RE |
|
NICV5
D.1
2 Set the switch on the charger/adaptor to “ADAPTOR”.
3
OPEN
OPEN
D1.C5V | AC adaptor |
IN |
|
Battery case
Charger/Adaptor
Notes:
•The minidisc player is in a standby mode when the AC adaptor and charger/adaptor are connected.
•The primary circuit is “live” as long as the AC adaptor is connected to an electrical outlet.
Using a dry-cell battery (not included)
CAUTION: Do not use a
1 Open the lid of the battery case and insert a LR6
2 Attach the battery case to the minidisc player. (See “Using the AC adaptor”.)
![]() LOCK
LOCK
RELEASE
D1.C5IVN
INCV5
D.1
Battery case
Note:
•To lengthen battery life, you can use both the rechargeable battery and a
Accidental Operation Prevention Function (Hold
Mode)
This function prevents the minidisc player from operating accidentally.
Both the minidisc player and the remote control have HOLD switches, each of which works independently.
[Unit]
HOLD SEARCH VOLUME
[Remote control]
turn
Rotate the remote control switch in the direction shown by the arrow to activate the HOLD mode.
When the minidisc player is in HOLD mode, no button operation is possible for either the minidisc player unit or its remote control.
To operate the minidisc player or remote control normally, switch off the HOLD mode.
Note:
•When HOLD is released on the remote control, “HELLO” will be displayed in the display windows, and the music number and its play time will be displayed.
Cautions
Batteries
• Before replacing batteries, always turn the minidisc player off.
Rechargeable Ni - MH battery :
•Use only the rechargeable battery
•If the power delivered by the battery lasts for a very short time after recharging, it means that the battery’s service life is over. Do not use it any more.
•Recharging an already charged battery will shorten its service life.
•When recharging a battery for the first time, or when it has not been used for a long period of time, the play time may be shorter than usual. In a case like this, repeatedly recharge and discharge the battery. This will restore it to its regular state.
•Do not allow any metal objects to touch the terminals of the rechargeable battery because this may cause dangerous
•Recharge the battery at a temperature of 10°C to 35°C.
Dry cell battery and rechargeable battery:
To prevent damage to the batteries, and to avoid electrolyte leakage, heed the following instructions.
•Align the ª and ·polarities properly when inserting the batteries.
•Remove the batteries if you do not plan to use the minidisc player for a long period of time.
•Do not expose the batteries to open flame, and do not
•Do not attempt to recharge dry cell batteries.
Carrying batteries:
•When putting dry cell or rechargeable batteries in a pocket or bag, ensure that no other metal objects, such as necklaces or coins, are placed together with them. Contact with metal may cause
•Be absolutely sure to carry the rechargeable battery in the battery carrying case.
Recycling Notice
The rechargeable battery is designated recyclable.
Please follow your local recycling regulations.
AC adaptor and charger/adaptor
•Handle the AC adaptor and charger/adaptor carefully. Improper handling is dangerous.
•Do not touch them with wet hands.
•Do not place heavy objects on top of them.
•Do not forcibly bend them.
•Be sure to use only the AC adaptor and charger/adaptor provided with this minidisc player.
•Disconnect the AC adaptor from the power outlet if the unit is not going to be used for a long time.
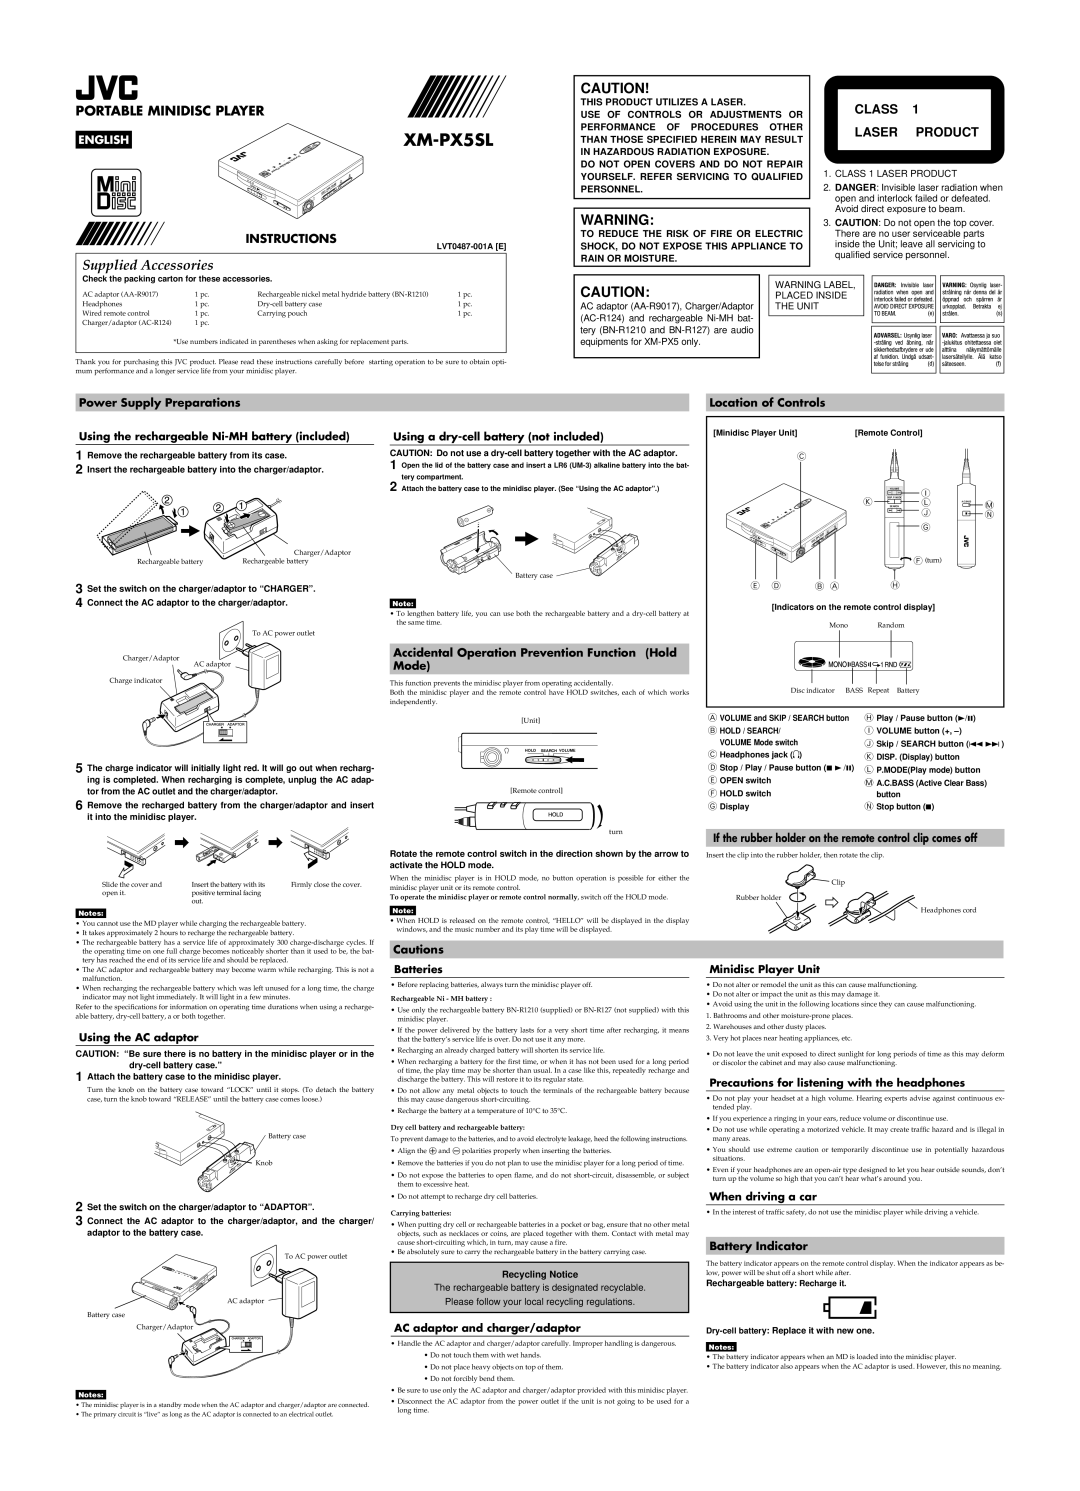
Location of Controls
[Minidisc Player Unit] | [Remote Control] |
C
VOLUME | I |
DISP. P.MODE |
K SEARCHL | A.C.BASSM |
J | N |
G
![]() F (turn)
F (turn)
E D B A H
[Indicators on the remote control display]
Mono Random
Disc indicator | BASS | Repeat Battery |
|
|
|
| |
A VOLUME and SKIP / SEARCH button | H Play / Pause button (3/8) |
| |
B HOLD / SEARCH/ |
| I VOLUME button (+, |
|
VOLUME Mode switch |
| J Skip / SEARCH button (4 | ) |
C Headphones jack ( ) |
| K DISP. (Display) button |
|
D Stop / Play / Pause button (7 | /8) | L P.MODE(Play mode) button |
|
E OPEN switch |
| M A.C.BASS (Active Clear Bass) |
|
F HOLD switch |
| button |
|
G Display |
| N Stop button (7) |
|
If the rubber holder on the remote control clip comes off
Insert the clip into the rubber holder, then rotate the clip.
Clip
Rubber holder
Headphones cord
Minidisc Player Unit
•Do not alter or remodel the unit as this can cause malfunctioning.
•Do not alter or impact the unit as this may damage it.
•Avoid using the unit in the following locations since they can cause malfunctioning.
1.Bathrooms and other
2.Warehouses and other dusty places.
3.Very hot places near heating appliances, etc.
•Do not leave the unit exposed to direct sunlight for long periods of time as this may deform or discolor the cabinet and may also cause malfunctioning.
Precautions for listening with the headphones
•Do not play your headset at a high volume. Hearing experts advise against continuous ex- tended play.
•If you experience a ringing in your ears, reduce volume or discontinue use.
•Do not use while operating a motorized vehicle. It may create traffic hazard and is illegal in many areas.
•You should use extreme caution or temporarily discontinue use in potentially hazardous situations.
•Even if your headphones are an
When driving a car
• In the interest of traffic safety, do not use the minidisc player while driving a vehicle.
Battery Indicator
The battery indicator appears on the remote control display. When the indicator appears as be- low, power will be shut off a short while after.
Rechargeable battery: Recharge it.
Dry-cell battery: Replace it with new one.
Notes:
•The battery indicator appears when an MD is loaded into the minidisc player.
•The battery indicator also appears when the AC adaptor is used. However, this no meaning.