Kenmore 141.17681, 141.16681 owner manual BasicLighting Procedures, Gas Lighting Instructions

Models: 141.17681 141.16681

1 34
Download 34 pages 45.77 Kb
Page 16
Image 16

BasicLighting Procedures

Machine oils used in the manufacturing process of stainless steel can cause stainless steel to turn a tan

color. Before initial grill use, remove protective PVC film from Control Panel and inside and outside of Grill

Lid. Use a Stainless Steel Cleaner to polish the stainless steel and remove these excess oils from

yourgnll. Never use abrasive cleaners orscrubbers because they will scratch and damage your grill. For details, see Cleaning Exterior Stainless Steel Surfaces on page 18.

Gas Lighting Instructions

Familiarize yourself with the safety guidelines at the front of this manual. Do not smoke while lighting grill or checking gas supply connections.

1.if you have a LPgas grill be sure the LP gas tank is filled, or if you have a NG grill be sure that the locking shut offvalve isopen.

2.Check that the end of each Burner Tube is properly located overeach Valve Orifice.

3.Be sure all gas connections are securely tightened.

4.Open the Grill Lid or Side Burner Lid, depending on the Burner you are lighting.

Z WARNING

Failure to open Grill Lid during the lighting procedures could result in a fire or explosion that could cause serious bodily injury, death, or property damage.

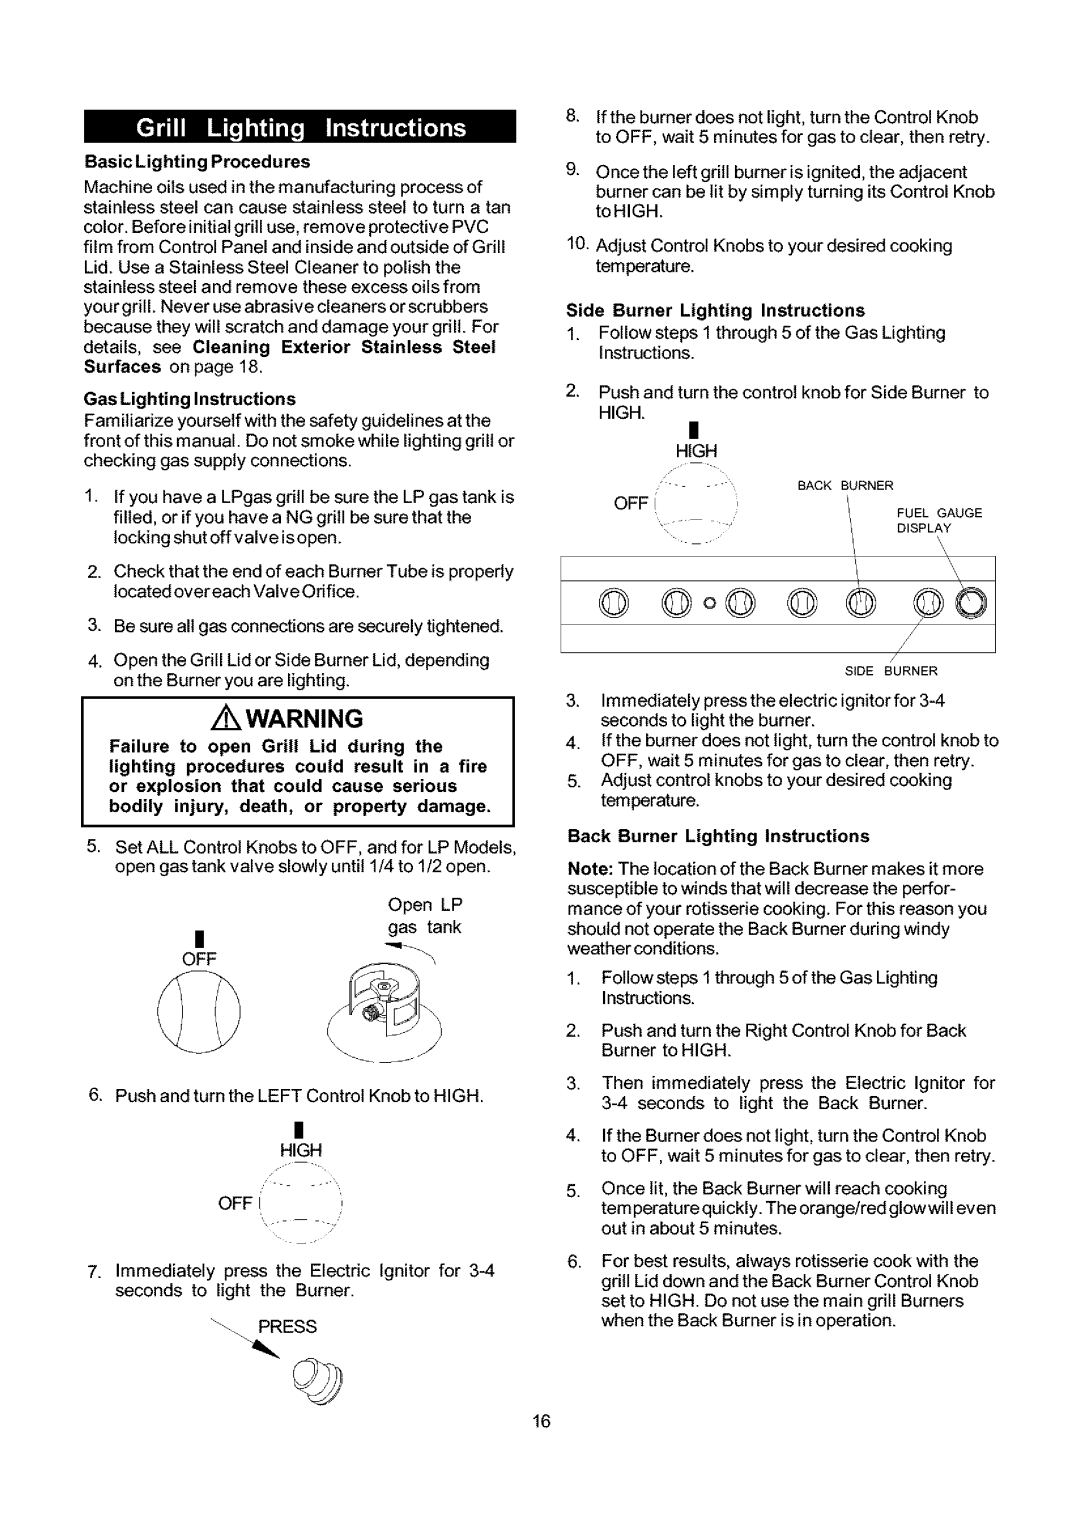
5.Set ALL Control Knobs to OFF, and for LP Models, open gas tank valve slowly until 1/4 to 1/2 open.

Open LP gas tank

OFF

6. Push and turn the LEFT Control Knob to HIGH.

I

HIGH

OFF i

7.Immediately press the Electric Ignitor for 3-4 seconds to light the Burner.

"\, PRESS

. if the burner does not light, turn the Control Knob to OFF, wait 5 minutes for gas to clear, then retry.

9.Once the left grill burner is ignited, the adjacent

burner can be lit by simply turning its Control Knob toHIGH.

10.Adjust Control Knobs to your desired cooking temperature.

Side Burner Lighting Instructions

1.Follow steps 1 through 5 of the Gas Lighting Instructions.

2.Push and turn the control knob for Side Burner to HIGH.

l

HIGH

-

_ •

BACK BURNER


OFF (


FUEL GAUGE


-


DISPLAY


_


\ \

® ®o®

®

®o

/

/

SIDE BURNER

3.Immediately press the electric ignitor for 3-4 seconds to light the burner.

4.If the burner does not light, turn the control knob to OFF, wait 5 minutes for gas to clear, then retry.

5.Adjust control knobs to your desired cooking temperature.

Back Burner Lighting Instructions

Note: The location of the Back Burner makes it more susceptible to winds that will decrease the perfor- mance of your rotisserie cooking. For this reason you should not operate the Back Burner during windy weather conditions.

1.Follow steps 1 through 5 of the Gas Lighting Instructions.

2.Push and turn the Right Control Knob for Back Burner to HIGH.

3.Then immediately press the Electric Ignitor for 3-4 seconds to light the Back Burner.

4.If the Burner does not light, turn the Control Knob to OFF, wait 5 minutes for gas to clear, then retry.

5.Once lit, the Back Burner will reach cooking temperature quickly. The orange/red glow will even out in about 5 minutes.

. For best results, always rotisserie cook with the grill Lid down and the Back Burner Control Knob set to HIGH. Do not use the main grill Burners when the Back Burner is in operation.

16

Page 16
Image 16
Kenmore 141.17681, 141.16681 BasicLighting Procedures, Gas Lighting Instructions, Side Burner Lighting Instructions

141.17681, 141.16681 specifications

The Kenmore 141.16681 and 141.17681 are notable models within Kenmore's impressive lineup of appliances, reflecting the brand's commitment to quality, functionality, and innovative technology. Both models are designed to enhance the user experience and provide efficient solutions for home cooking and food preservation.

The Kenmore 141.16681 is primarily recognized for its advanced cooking capabilities. It includes a high-powered convection oven feature, allowing for even heat distribution and more consistent cooking results. The true convection technology enables users to bake multiple items at once without worrying about uneven heat. This model also offers various cooking modes, including bake, broil, and roast, making it versatile for different culinary tasks.

On the other hand, the Kenmore 141.17681 is geared towards food preservation. This model features advanced cooling technologies, including a digital temperature control system that maintains optimal conditions for perishable items. The innovative humidity-controlled crisper drawers help to keep fruits and vegetables fresh longer. It also boasts a spacious interior with adjustable shelves, providing flexibility for storage needs. The energy-efficient design of the 141.17681 ensures that it operates effectively while minimizing energy consumption, a significant consideration for the environmentally conscious consumer.

Both models incorporate user-friendly controls that streamline the cooking and food storage processes. Touchpad controls and digital displays make it easy for users to select their desired settings quickly. Safety features are also prioritized, with auto shut-off timers and child lock options to ensure peace of mind in the kitchen.

The aesthetic design of the Kenmore 141.16681 and 141.17681 is modern and sleek, featuring stainless steel finishes that not only look stylish but are also easy to clean. These appliances are designed to integrate seamlessly into various kitchen decors, enhancing the overall ambiance of the space.

Ultimately, Kenmore continues to push the boundaries of kitchen appliance technology with models like the 141.16681 and 141.17681. Their focus on efficiency, functionality, and user-friendly design makes them suitable choices for homeowners looking to elevate their cooking and food storage experiences.