Step 2 - Install Filtered Water Faucet

MAKE HOLE FOR FAUCET

IMPORTANT: A 1-1/4” dia. hole is needed to mount the fil- tered water faucet. To avoid damaging the sink, consult a qualified plumber or installer for drilling procedures in porce- lain or stainless steel.

1.Select one of the following options to install the faucet. Make sure there is room underneath to make the needed connections.

￿Use an existing sink top hole for spray hose or soap dispenser (must be 1-1/4” in diameter).

￿Drill a new hole in the sink top.

￿Drill a hole in the countertop next to the sink.

2.Check to make sure the filtered water faucet base will sit flat against the mounting surface.

3.If drilling is needed, make a 1-1/4” dia. (minimum) hole for the faucet in the mounting surface.

INSTALL FAUCET BASE

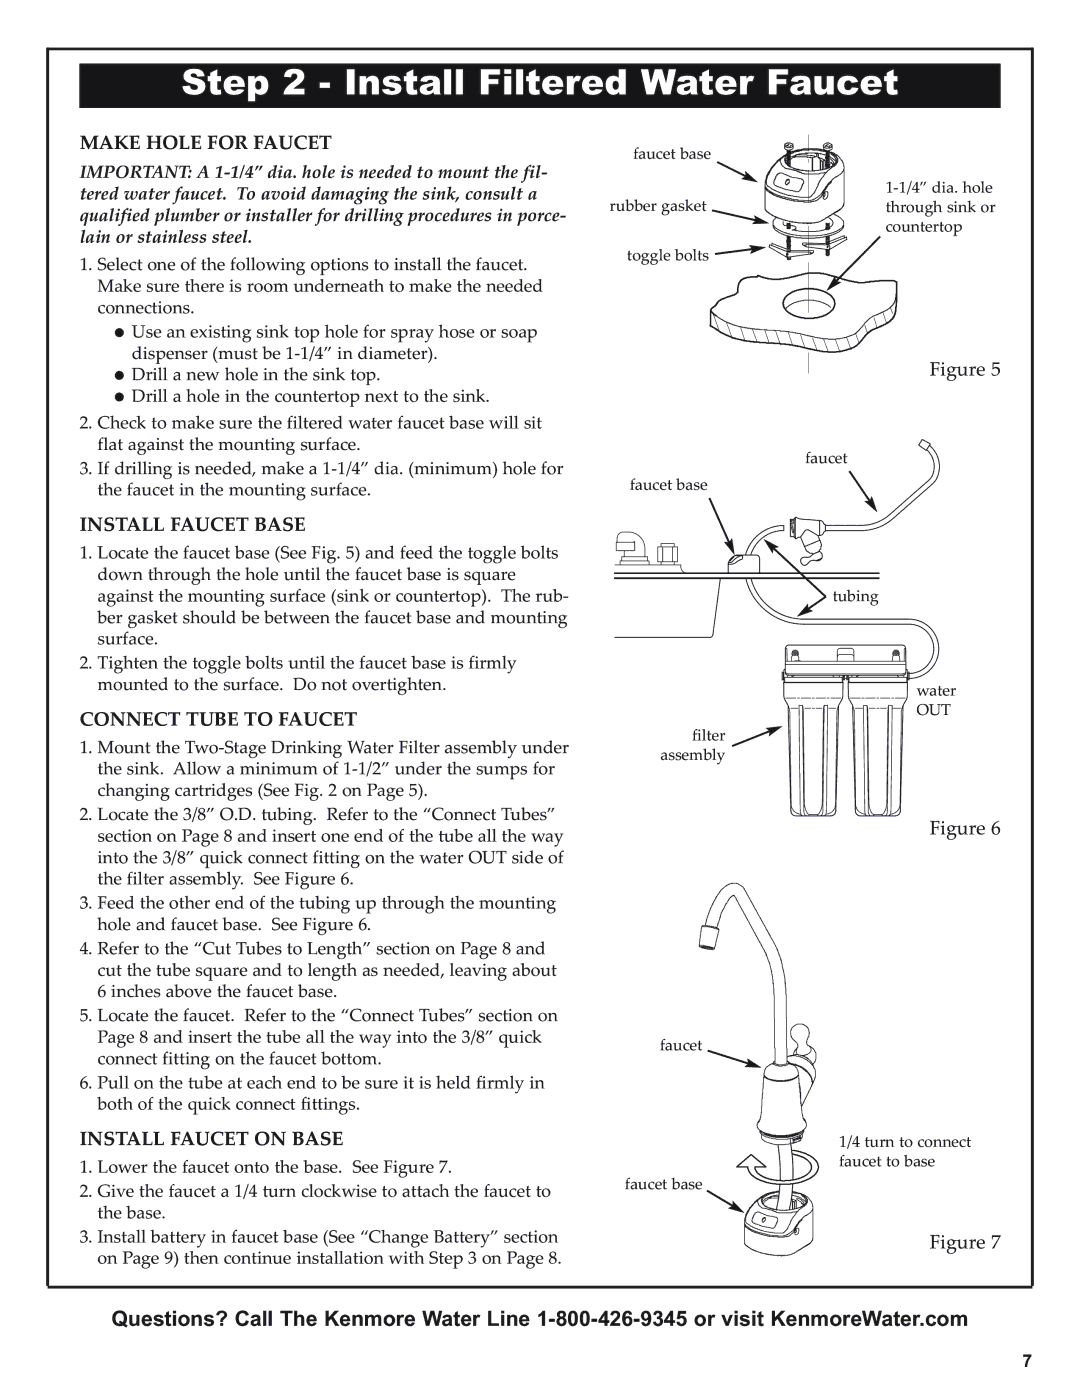
1.Locate the faucet base (See Fig. 5) and feed the toggle bolts down through the hole until the faucet base is square against the mounting surface (sink or countertop). The rub- ber gasket should be between the faucet base and mounting surface.

2.Tighten the toggle bolts until the faucet base is firmly mounted to the surface. Do not overtighten.

CONNECT TUBE TO FAUCET

1.Mount the Two-Stage Drinking Water Filter assembly under the sink. Allow a minimum of 1-1/2” under the sumps for changing cartridges (See Fig. 2 on Page 5).

2.Locate the 3/8” O.D. tubing. Refer to the “Connect Tubes” section on Page 8 and insert one end of the tube all the way into the 3/8” quick connect fitting on the water OUT side of the filter assembly. See Figure 6.

3.Feed the other end of the tubing up through the mounting hole and faucet base. See Figure 6.

4.Refer to the “Cut Tubes to Length” section on Page 8 and cut the tube square and to length as needed, leaving about 6 inches above the faucet base.

5.Locate the faucet. Refer to the “Connect Tubes” section on Page 8 and insert the tube all the way into the 3/8” quick connect fitting on the faucet bottom.

6.Pull on the tube at each end to be sure it is held firmly in both of the quick connect fittings.

INSTALL FAUCET ON BASE

1.Lower the faucet onto the base. See Figure 7.

2.Give the faucet a 1/4 turn clockwise to attach the faucet to the base.

3.Install battery in faucet base (See “Change Battery” section on Page 9) then continue installation with Step 3 on Page 8.

faucet base


1-1/4” dia. hole


rubber gasket


through sink or


toggle bolts


countertop


Figure 5

faucet

faucet base

tubing

water

OUT

filter assembly

Figure 6

faucet

1/4 turn to connect faucet to base

faucet base

Figure 7

Questions? Call The Kenmore Water Line 1-800-426-9345 or visit KenmoreWater.com

7

Page 7
Image 7
Kenmore 625.38461 warranty Install Filtered Water Faucet, Make Hole for Faucet, Install Faucet Base, Connect Tube to Faucet

625.38461 specifications

The Kenmore 625.38461 is a powerful and efficient vacuum cleaner designed to deliver exceptional cleaning performance for households. Packed with innovative features and modern technologies, this model stands out in the crowded vacuum market, making it a popular choice for homeowners looking to maintain cleanliness and hygiene.

One of the main features of the Kenmore 625.38461 is its powerful motor, engineered for robust suction capabilities. This allows the vacuum to effectively pick up dirt, dust, and debris from various surfaces, including carpets, hardwood floors, and upholstery. The powerful suction helps users achieve a thorough clean without the need for multiple passes.

Another standout characteristic is its multi-surface cleaning ability. The Kenmore 625.38461 comes equipped with adjustable height settings, enabling users to adapt the vacuum for different floor types swiftly. This flexibility ensures optimal cleaning performance, whether it’s a plush carpet or a hard floor.

The vacuum features a HEPA filtration system, which is particularly beneficial for allergy sufferers. This advanced filtration captures 99.97% of dust particles, allergens, and pet dander, effectively improving indoor air quality. Additionally, the dustbin is easy to empty and clean, promoting a hassle-free maintenance experience.

The design of the Kenmore 625.38461 emphasizes user convenience. It includes a variety of attachments, such as a crevice tool, dusting brush, and upholstery nozzle, enabling users to tackle various cleaning tasks with ease. The onboard storage for these tools also adds to the vacuum’s practicality, keeping everything organized and accessible.

Moreover, the lightweight and maneuverable design of the Kenmore 625.38461 makes it easy to navigate around furniture and tight spaces. The swivel steering feature enhances control, allowing users to reach every corner of their home without straining.

In conclusion, the Kenmore 625.38461 excels with its powerful suction, versatile cleaning capabilities, and advanced filtration system. With a user-friendly design and a comprehensive set of tools, it stands as an excellent choice for families seeking an efficient and reliable vacuum cleaner. The combination of technology and practicality makes it a standout option in the competitive landscape of household cleaning appliances.