General Care & Cleaning (cont’d)

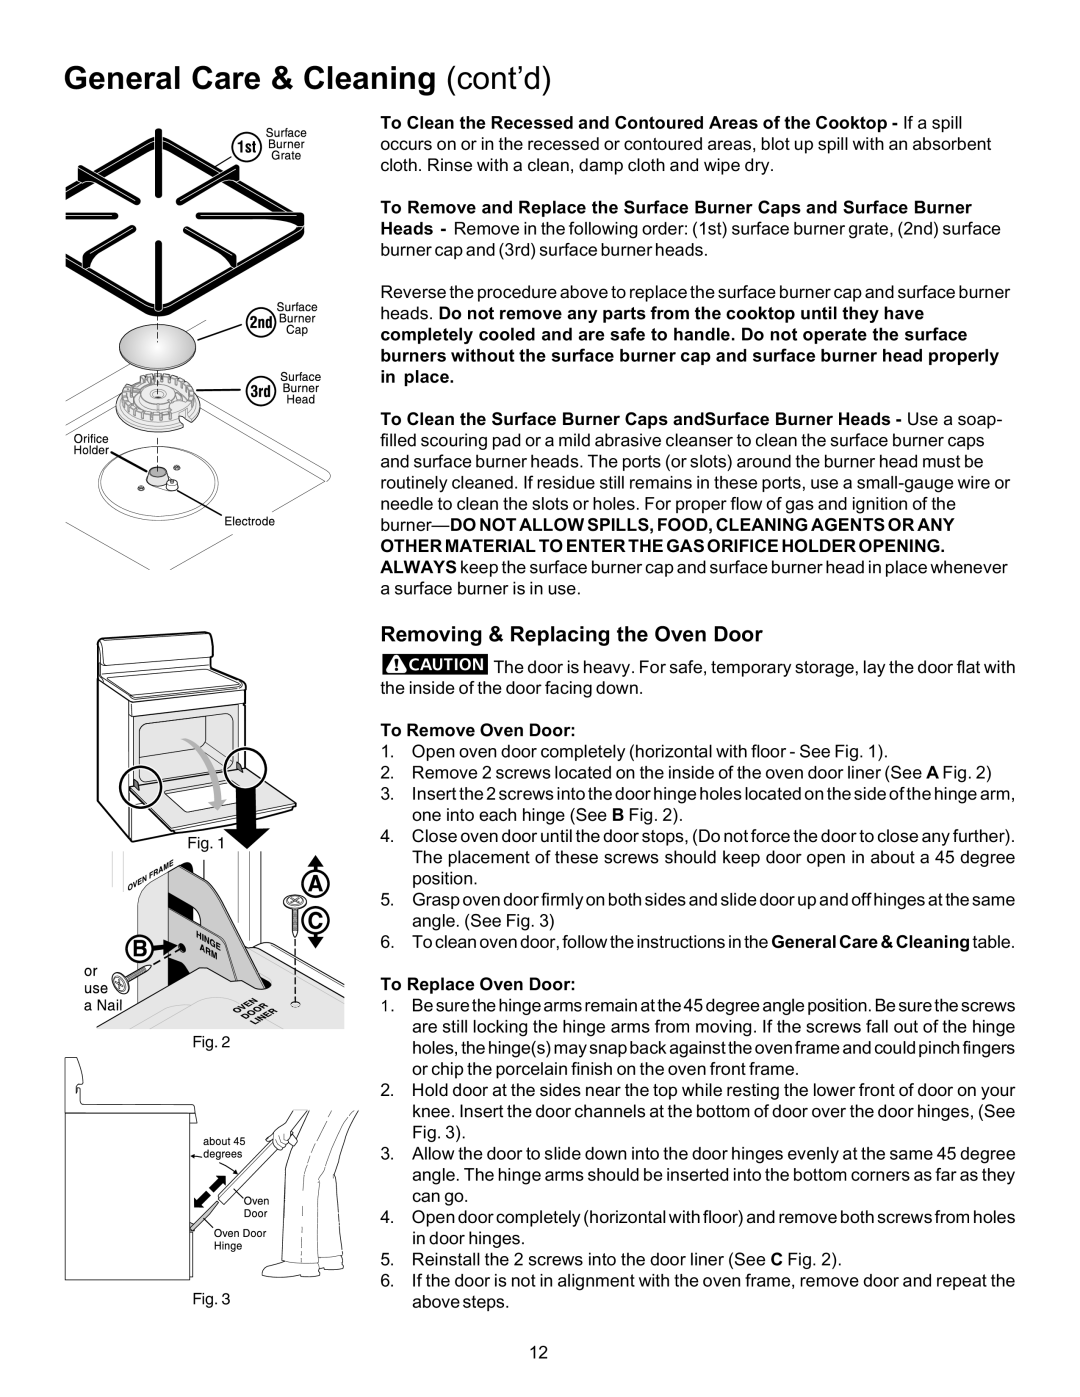
Fig. 1

Fig. 2

Fig. 3

To Clean the Recessed and Contoured Areas of the Cooktop - If a spill occurs on or in the recessed or contoured areas, blot up spill with an absorbent cloth. Rinse with a clean, damp cloth and wipe dry.

To Remove and Replace the Surface Burner Caps and Surface Burner Heads - Remove in the following order: (1st) surface burner grate, (2nd) surface burner cap and (3rd) surface burner heads.

Reverse the procedure above to replace the surface burner cap and surface burner heads. Do not remove any parts from the cooktop until they have completely cooled and are safe to handle. Do not operate the surface burners without the surface burner cap and surface burner head properly in place.

To Clean the Surface Burner Caps andSurface Burner Heads - Use a soap- filled scouring pad or a mild abrasive cleanser to clean the surface burner caps and surface burner heads. The ports (or slots) around the burner head must be routinely cleaned. If residue still remains in these ports, use a small-gauge wire or needle to clean the slots or holes. For proper flow of gas and ignition of the burner—DO NOT ALLOW SPILLS, FOOD, CLEANING AGENTS OR ANY

OTHER MATERIAL TO ENTER THE GAS ORIFICE HOLDER OPENING. ALWAYS keep the surface burner cap and surface burner head in place whenever a surface burner is in use.

Removing & Replacing the Oven Door

The door is heavy. For safe, temporary storage, lay the door flat with the inside of the door facing down.

To Remove Oven Door:

1.Open oven door completely (horizontal with floor - See Fig. 1).

2.Remove 2 screws located on the inside of the oven door liner (See A Fig. 2)

3.Insert the 2 screws into the door hinge holes located on the side of the hinge arm, one into each hinge (See B Fig. 2).

4.Close oven door until the door stops, (Do not force the door to close any further). The placement of these screws should keep door open in about a 45 degree position.

5.Grasp oven door firmly on both sides and slide door up and off hinges at the same angle. (See Fig. 3)

6.To clean oven door, follow the instructions in the General Care & Cleaning table.

To Replace Oven Door:

1. Be sure the hinge arms remain at the 45 degree angle position. Be sure the screws are still locking the hinge arms from moving. If the screws fall out of the hinge holes, the hinge(s) may snap back against the oven frame and could pinch fingers or chip the porcelain finish on the oven front frame.

2.Hold door at the sides near the top while resting the lower front of door on your knee. Insert the door channels at the bottom of door over the door hinges, (See Fig. 3).

3.Allow the door to slide down into the door hinges evenly at the same 45 degree angle. The hinge arms should be inserted into the bottom corners as far as they can go.

4.Open door completely (horizontal with floor) and remove both screws from holes in door hinges.

5.Reinstall the 2 screws into the door liner (See C Fig. 2).

6.If the door is not in alignment with the oven frame, remove door and repeat the above steps.

12

Page 12
Image 12
Kenmore 790.7131 manual Removing & Replacing the Oven Door, To Remove Oven Door, To Replace Oven Door

790.7131 specifications

The Kenmore 790.7131 is a versatile and innovative kitchen range that has garnered attention for its blend of functionality and advanced technology. Known for its seamless integration of cooking features, this model is ideal for both novice cooks and seasoned chefs alike.

One of the standout features of the Kenmore 790.7131 is its five-burner gas cooktop. The design allows for simultaneous cooking on multiple burners, enabling users to prepare an entire meal efficiently. The different burner sizes provide flexibility, catering to various cooking needs, from simmering sauces on the low heat burner to boiling pasta on the high-output burner. The continuous grates offer a sturdy and secure surface for cookwares, allowing for easy movement of pots and pans across burners.

In addition to the impressive cooktop, the oven of the Kenmore 790.7131 boasts a spacious capacity, making it suitable for baking multiple dishes at once. The oven utilizes convection cooking technology, which circulates hot air evenly throughout the oven cavity. This feature ensures that food is cooked thoroughly and evenly, resulting in perfect roasted meats and baked goods every time. Convection cooking also reduces cooking time and energy consumption, making it a more efficient option.

The range also incorporates an intuitive electronic control panel, which simplifies the cooking process. Users can easily adjust cooking settings, set timers, and monitor temperatures with precision. An integrated self-cleaning feature makes maintenance hassle-free; it can efficiently break down food residues at high temperatures, leaving the oven pristine with minimal effort.

Safety is another priority with the Kenmore 790.7131. The oven includes an automatic shut-off feature and a safety lock, ensuring peace of mind when cooking, especially in households with children. The stainless steel exterior adds a modern touch to any kitchen decor while being durable and easy to clean.

In summary, the Kenmore 790.7131 presents an excellent option for those seeking a reliable cooking appliance that combines an efficient cooktop, a capacious oven with advanced convection technology, user-friendly controls, and safety features. Its versatility and innovative characteristics make it a valuable addition to any kitchen. Whether it’s everyday meals or special occasions, the Kenmore 790.7131 is designed to meet a variety of cooking needs with ease.