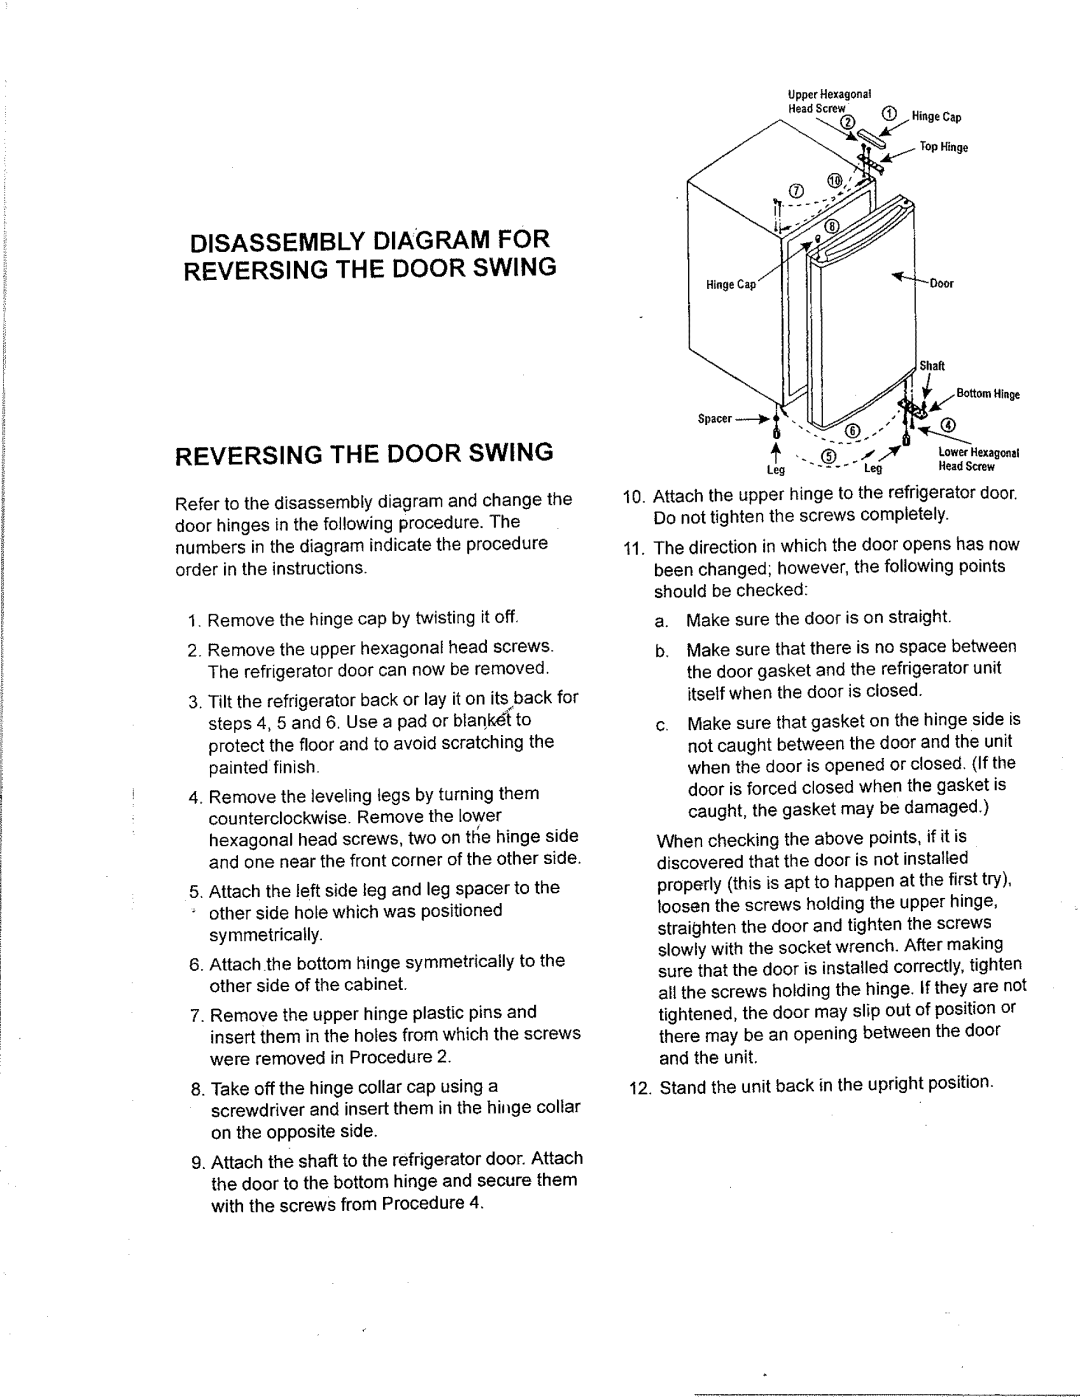
DISASSEMBLY DIAGRAM FOR REVERSING THE DOOR SWING

REVERSING THE DOOR SWING

Refer to the disassembly diagram and change the door hinges in the following procedure. The numbers in the diagram indicate the procedure order in the instructions+

1.Remove the hinge cap by twisting it off,

2.Remove the upper hexagonal head screws. The refrigerator door can now be removed.

3+Tilt the refrigerator back or lay it on its back for steps 4, 5 and 6. Use a pad or blaqk_{to

protect the floor and to avoid scratching the painted finish.

4.Remove the leveling legs by turning them counterclockwise. Remove the lower hexagonal head screws, two on tt_e hinge side and one near the front corner of the other side.

5, Attach the left side leg and leg spacer to the

+other side hole which was positioned symmetdcaUy.

6.Attach+the bottom hinge symmetrically to the other side of the cabinet.

. Remove the upper hinge plastic pins and insert them in the holes from which the screws

were removed in Procedure 2.

8.Take off the hinge collar cap using a screwdriver and insert them in the hinge collar on the opposite side.

9.Attach the shaft to the refrigerator door. Attach the door to the bottom hinge and secure them with the screws from Procedure 4.

Upper Hexagonal

Head Screw

. HingeCap

Top Hinge

Sha_

BottomHinge

Spacer _

i

'_

,

(_;


LowerHexago.a,

Leg


++ -

Leg

HeadScrew

10.Attach the upper hinge to the refrigerator door. Do not tighten the screws completely.

11.The direction in which the door opens has now been changed; however, the following points should be checked:

a. Make sure the door is on straight.

b+ Make sure that there is no space between the door gasket and the refrigerator unit itself when the door is closed.

c.Make sure that gasket on the hinge side is not caught between the door and the unit when the door is opened or closed. (If the door is forced closed when the gasket is caught, the gasket may be damaged.)

When checking the above points, if it is discovered that the door is not installed

properly (this is apt to happen at the first try), loosen the screws holding the upper hinge, straighten the door and tighten the screws slowly with the socket wrench. After making sure that the door is installed correctly, tighten all the screws holding the hinge. If they are not tightened, the door may slip out of position or there may be an opening between the door and the unit.

12. Stand the unit back in the upright position.

Page 2
Image 2
Kenmore 93365, 93361 warranty Disassembly Diagram for Reversing the Door Swing

93361, 93365 specifications

The Kenmore 93365 and 93361 are two of the standout upright vacuum models that cater to the needs of modern households. Known for their reliability and efficiency, these vacuums offer a robust set of features and advanced technologies that enhance cleaning performance.

One of the main features of both models is their powerful suction capability, which is designed to pick up dirt, dust, and allergens with ease. Utilizing a multi-cyclonic suction system, these vacuums trap dirt in a canister instead of letting it escape back into the air. This technology ensures that users achieve a deep clean on a variety of surfaces, including carpets, hardwood floors, and tiles.

Another prominent characteristic of the Kenmore 93365 and 93361 is the HEPA filtration system. This advanced filtration captures 99.97% of pet dander, pollen, and other microscopic allergens, making these vacuums a preferred choice for allergy sufferers. The HEPA filters are also washable, which means users can keep their vacuums performing optimally without the need for constant replacements.

Both models are equipped with a variety of attachments that enhance their versatility. The included pet hair attachment is particularly beneficial for pet owners, as it effectively removes stubborn pet hair from upholstery and carpets. Additionally, the crevice tool and dusting brush make it easy to clean tight spaces, corners, and delicate surfaces.

The design elements of the Kenmore 93365 and 93361 also deserve mention. They feature a lightweight and ergonomic design, making them easy to maneuver around the home. The telescoping wand allows users to reach high areas, while the easy-to-empty canister simplifies the maintenance process.

Furthermore, these models come with a range of cleaning modes, allowing users to adjust the suction power based on the surface being cleaned. This level of customization ensures optimal cleaning performance for different materials.

In summary, the Kenmore 93365 and 93361 represent the pinnacle of modern vacuum technology. With their powerful suction, HEPA filtration, and versatile attachments, they are designed to tackle any cleaning challenge. Their user-friendly design and efficient performance make them a valuable addition to any cleaning arsenal.