2566 ADIRONDACK ROCKING CHAIR
Contents: | (16) | 1/4 - 20 x 2” Bolts | |
(1) | Seat, (1) Back | (6) 1/4 - 20 x 2 1/2” Bolts | |
(2) Arm Rests | (10) Washers | ||
(2) | Front Chair legs | (10) | Locknuts |
(2) | Back Chair legs | Locknut | Washer Bolt |
(2) | Cross Braces |
|
|
(2) | Rocker Feet |
|
|
Tools Required:
#3 Phillips Head Screwdriver
7/16” Wrench
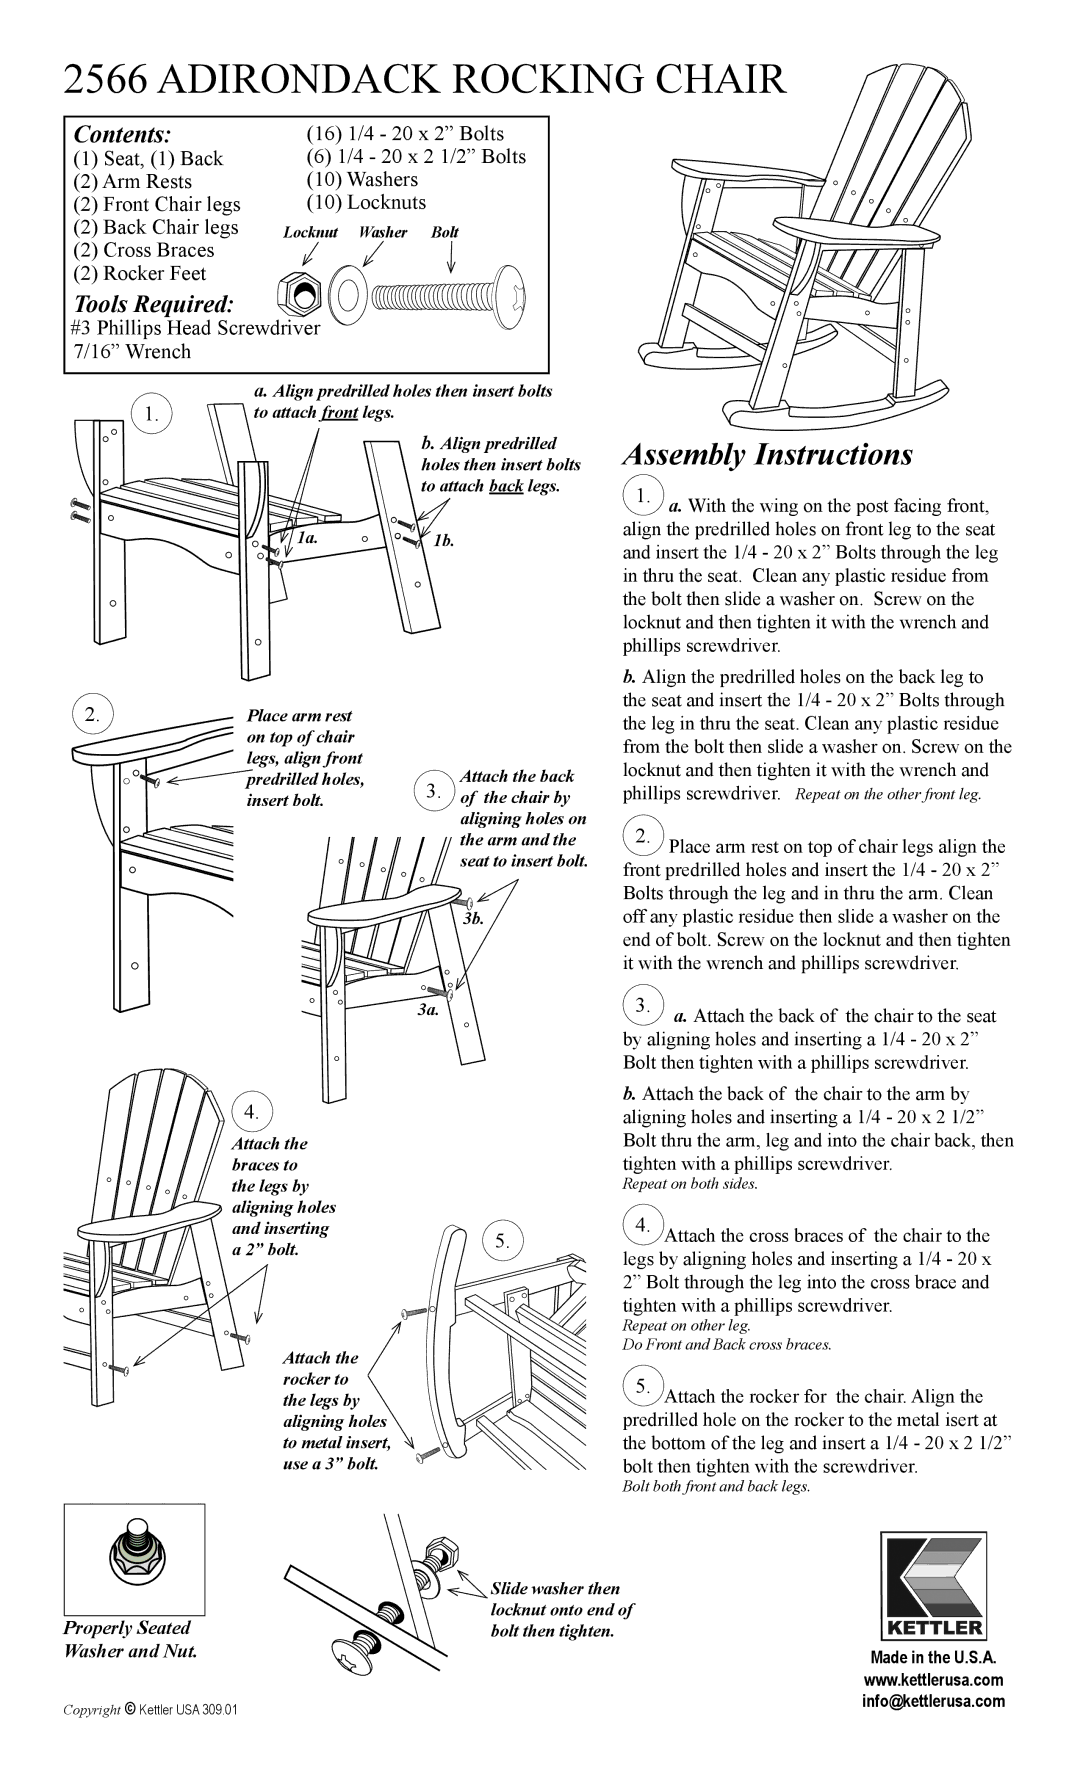
a. Align predrilled holes then insert bolts
1.to attach front legs.
b. Align predrilled holes then insert bolts to attach back legs.
![]()
![]() 1a.
1a. ![]()
![]()
![]()
![]()
![]()
![]()
![]()
![]() 1b.
1b.
Assembly Instructions
1. a. With the wing on the post facing front, |
align the predrilled holes on front leg to the seat |
and insert the 1/4 - 20 x 2” Bolts through the leg |
in thru the seat. Clean any plastic residue from |
the bolt then slide a washer on. Screw on the |
locknut and then tighten it with the wrench and |
phillips screwdriver. |
b. Align the predrilled holes on the back leg to |
the seat and insert the 1/4 - 20 x 2” Bolts through |
2. | Place arm rest |
| on top of chair |
| legs, align front |
| predrilled holes, |
| insert bolt. |
Attach the back
3.of the chair by aligning holes on the arm and the seat to insert bolt.
the leg in thru the seat. Clean any plastic residue |
from the bolt then slide a washer on. Screw on the |
locknut and then tighten it with the wrench and |
phillips screwdriver. Repeat on the other front leg. |
2. Place arm rest on top of chair legs align the |
front predrilled holes and insert the 1/4 - 20 x 2” |
![]() 3b.
3b.
3a.
4.
Attach the braces to the legs by aligning holes
and inserting5. a 2” bolt.
Attach the rocker to the legs by aligning holes to metal insert, use a 3” bolt.
Bolts through the leg and in thru the arm. Clean | |
off any plastic residue then slide a washer on the | |
end of bolt. Screw on the locknut and then tighten | |
it with the wrench and phillips screwdriver. | |
3. | a. Attach the back of the chair to the seat |
| |
by aligning holes and inserting a 1/4 - 20 x 2” | |
Bolt then tighten with a phillips screwdriver. | |
b. Attach the back of the chair to the arm by aligning holes and inserting a 1/4 - 20 x 2 1/2” Bolt thru the arm, leg and into the chair back, then tighten with a phillips screwdriver.
Repeat on both sides.
4.Attach the cross braces of the chair to the legs by aligning holes and inserting a 1/4 - 20 x 2” Bolt through the leg into the cross brace and tighten with a phillips screwdriver.
Repeat on other leg.
Do Front and Back cross braces.
5.Attach the rocker for the chair. Align the predrilled hole on the rocker to the metal isert at the bottom of the leg and insert a 1/4 - 20 x 2 1/2” bolt then tighten with the screwdriver.
Bolt both front and back legs.
Properly Seated Washer and Nut.
Copyright © Kettler USA 309.01
![]()
![]()
![]() Slide washer then locknut onto end of bolt then tighten.
Slide washer then locknut onto end of bolt then tighten.
Made in the U.S.A. www.kettlerusa.com info@kettlerusa.com