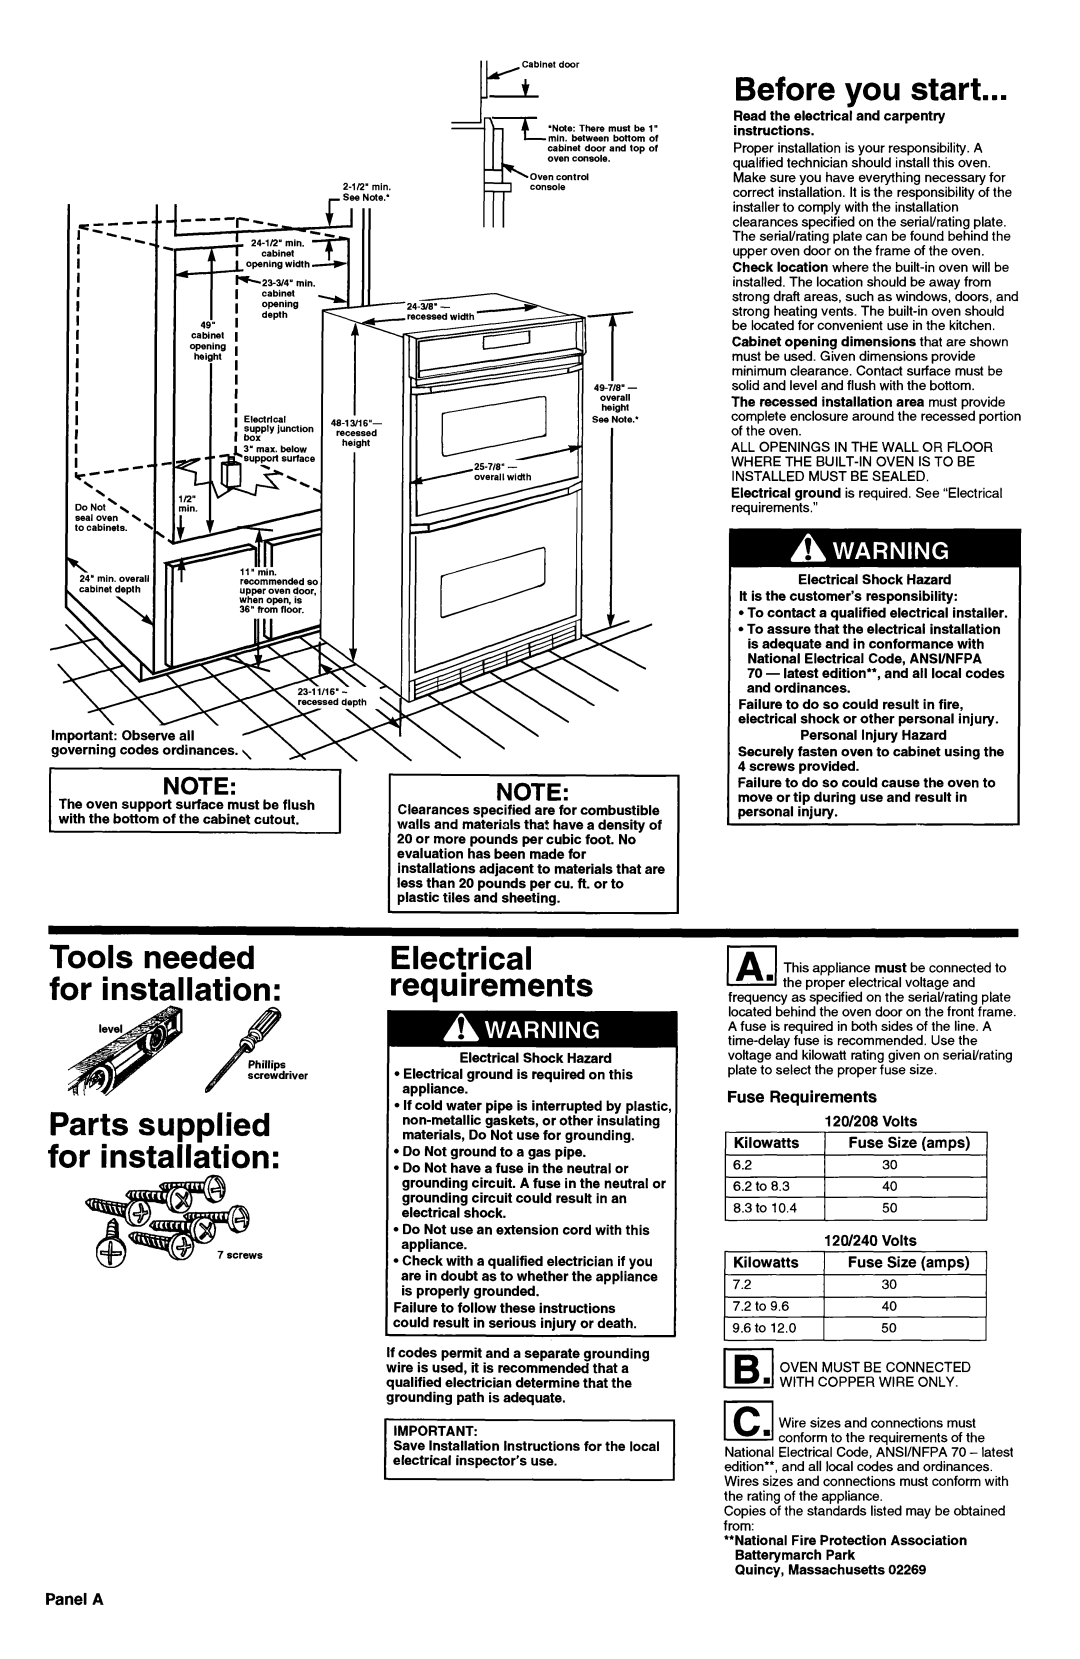
Cabinet door


‘Note: There must be 1”


min.

between

bottom of


cabinet door and top of


oven

console.


Oven control


2-l/2’

min.

r


c”--


r See

Note.’


-4,


1

--


I


I


cabinet


depth


recessed width


I


4*

I


cabinet

I


I


opening

I


I


height

i


i


I


46-l 3/l

6”-


See

Note:

!


recessed


height


I


v’--’


\


Do

Not \


\


seal

oven


\


to cabinets.

.


\


24’

min.


overall


cabinet

depth

upper

oven

door,


when

open,

is


36” from floor.

NOTE:

NOTE:

The oven support surface must be flush

Clearances specified are for combustible

with the bottom of the cabinet cutout.

walls and materials that have a density of


20 or more pounds per cubic foot. No


evaluation has been made for


installations adjacent to materials that are


less than 20 pounds per cu. ft. or to


plastic tiles and sheeting.

Tools needed

Electrical

for installation:

requirements

Before you start...

Read the electrical and carpentry instructions.

Proper installation is your responsibility. A qualified technician should install this oven. Make sure you have everything necessary for correct installation. It is the responsibility of the installer to comply with the installation clearances specified on the serial/rating plate. The serial/rating plate can be found behind the upper oven door on the frame of the oven. Check location where the built-in oven will be installed. The location should be away from strong draft areas, such as windows, doors, and strong heating vents. The built-in oven should be located for convenient use in the kitchen. Cabinet opening dimensions that are shown must be used. Given dimensions provide minimum clearance. Contact surface must be solid and level and flush with the bottom.

The recessed installation area must provide complete enclosure around the recessed portion of the oven.

ALL OPENINGS IN THE WALL OR FLOOR WHERE THE BUILT-IN OVEN IS TO BE INSTALLED MUST BE SEALED.

Electrical ground is required. See “Electrical requirements.”

Electrical Shock Hazard lt is the customer’s responsibility:

l To contact a qualified electrical installer. l To assure that the electrical installation is adequate and in conformance with National Electrical Code, ANSVNFPA

70- latest edition**, and all local codes and ordinances.

Failure to do so could result in fire, . electrical shock or other personal Injury.

Personal Injury Hazard Securely fasten oven to cabinet using the 4 screws provided.

Failure to do so could cause the oven to move or tip during use and result in personal iniurv.

IA.ThisJappliance must be connected to the proper electrical voltage and

frequency as specified on the serial/rating plate located behind the oven door on the front frame. A fuse is required in both sides of the line. A time-delay fuse is recommended. Use the

Parts su Dplied for insta lation:

Electrical Shock Hazard

riverl Electrical ground is required on this appliance.

l If cold water pipe is interrupted by plastic, non-metallic gaskets, or other insulating materials, Do Not use for grounding.

lDo Not ground to a gas pipe.

lDo Not have a fuse in the neutral or grounding circuit. A fuse in the neutral or grounding circuit could result in an electrical shock.

l Do Not use an extension cord with this appliance.

l Check with a qualified electrician if you are in doubt as to whether the appliance is properly grounded.

Failure to follow these instructions could result in serious injury or death.

If codes permit and a separate grounding wire is used, it is recommended that a qualified electrician determine that the grounding path is adequate.

voltage and kilowatt rating given on seriavrating plate to select the proper fuse size.

Fuse Requirements


120/208

Volts

Kilowatts

Fuse

Size (amps)

6.2


30

6.2

to

8.3


40

8.3

to

10.4


50


120/240

Volts

Kilowatts

Fuse

Size (amps)

7.2


30

7.2

to 9.6


40

9.6

to 12.0


50

OVEN MUST BE CONNECTED

IBI n WITH COPPER WIRE ONLY.

Save Installation Instructions for the local

la Wire sizes and connections must n conform to the requirements of the

National Electrical Code, ANSI/NFPA 70 - latest edition**, and all local codes and ordinances. Wires sizes and connections must conform with the rating of the appliance.

Copies of the standards listed may be obtained from:

**National Fire Protection Association Batterymarch Park

Quincy, Massachusetts 02269

Panel A

Page 2
Image 2
KitchenAid 3187360 installation instructions Fuse Requirements, Panel a

3187360 specifications

The KitchenAid 3187360 is a versatile and innovative kitchen appliance designed to simplify various cooking tasks and enhance culinary experiences. This model is part of KitchenAid's esteemed lineup, known for its durability, performance, and stylish design that complements any kitchen decor.

One of the standout features of the KitchenAid 3187360 is its robust 325-watt motor. This powerful motor provides the strength needed to tackle even the toughest mixing tasks with ease. Whether you're kneading dough for homemade bread or whipping egg whites for meringue, the motor ensures consistent results every time.

In addition to its power, the KitchenAid 3187360 boasts a unique 10-speed control system, allowing users to tailor their mixing and kneading speeds according to their specific needs. This level of customization enables precise control, making it possible to achieve the perfect mixture for a variety of recipes. The appliance also comes equipped with a tilt-head design, which grants easy access to the mixing bowl and attachments, making it convenient for adding ingredients and changing accessories during the mixing process.

The KitchenAid 3187360 includes a 4.5-quart stainless steel mixing bowl, which is not only durable but also dishwasher safe for easy cleaning. This bowl size is ideal for most household cooking and baking tasks, providing enough capacity to prepare meals for families or small gatherings.

One of the notable features of the KitchenAid 3187360 is its compatibility with a wide range of attachments, allowing users to transform the stand mixer into a multifunctional kitchen tool. From pasta makers and food grinders to vegetable slicers and ice cream makers, the available attachments enable culinary enthusiasts to explore new recipes and cooking techniques without cluttering their kitchen counters with multiple machines.

In terms of design, the KitchenAid 3187360 is available in various colors, catering to different tastes and kitchen aesthetics. Its classic, sleek design not only makes it a functional appliance but also a stylish addition to any countertop.

Overall, the KitchenAid 3187360 combines powerful performance, remarkable versatility, and timeless design, making it an essential tool for any home cook seeking to elevate their culinary creations. Its array of features and ability to adapt to various cooking tasks make it a standout choice in the world of kitchen appliances.