BURNER BOWLS (on some models)

Do not clean in the Self-Cleaning cycle.

Solution of ¹₂ cup (125 mL) ammonia to 1 gal. (3.75 L) water: Soak for 20 minutes, then scrub with stainless steel wool pad.

Oven cleaner:

Follow product label instructions.

Mildly abrasive cleanser:

Scrub with wet scouring pad.

Porcelain enamel only, not chrome

Dishwasher

SURFACE UNDER COOKTOP (on some models)

To avoid product damage, do not remove the cooktop. For more information, see “Lift-up Cooktop” section.

Steel-wool pad

OVEN DOOR EXTERIOR

Glass cleaner and paper towels or nonabrasive plastic scrubbing pad:

Apply glass cleaner to soft cloth or sponge, not directly on panel.

CONTROL PANEL

Do not use abrasive cleaners, steel-wool pads, gritty washcloths or some paper towels. Damage may occur.

Glass cleaner and soft cloth or sponge:

Apply glass cleaner to soft cloth or sponge, not directly on panel.

OVEN CAVITY

Do not use oven cleaners.

Food spills should be cleaned when oven cools. At high temperatures, foods react with porcelain and staining, etching, pitting or faint white spots can result.

Self-Cleaning cycle:

See “Self-Cleaning Cycle” first.

OVEN RACKS AND ROASTING RACKS

Self-Cleaning cycle:

See “Self-Cleaning Cycle” first. Remove racks or they will discolor and become harder to slide. If this happens, a light coating of vegetable oil applied to the rack guides will help them slide.

Steel-wool pad

BROILER PAN AND GRID

Do not clean in the Self-Cleaning cycle (on some models).

Mildly abrasive cleanser: Scrub with wet scouring pad.

Solution of ¹₂ cup (125 mL) ammonia to 1 gal. (3.75 L) water:

Soak for 20 minutes, then scrub with scouring or steel-wool pad.

Oven cleaner:

Follow product label instructions.

Porcelain enamel only, not chrome

Dishwasher

TEMPERATURE PROBE (on some models)

Plastic scouring pad

Cooktop Light

(on some models)

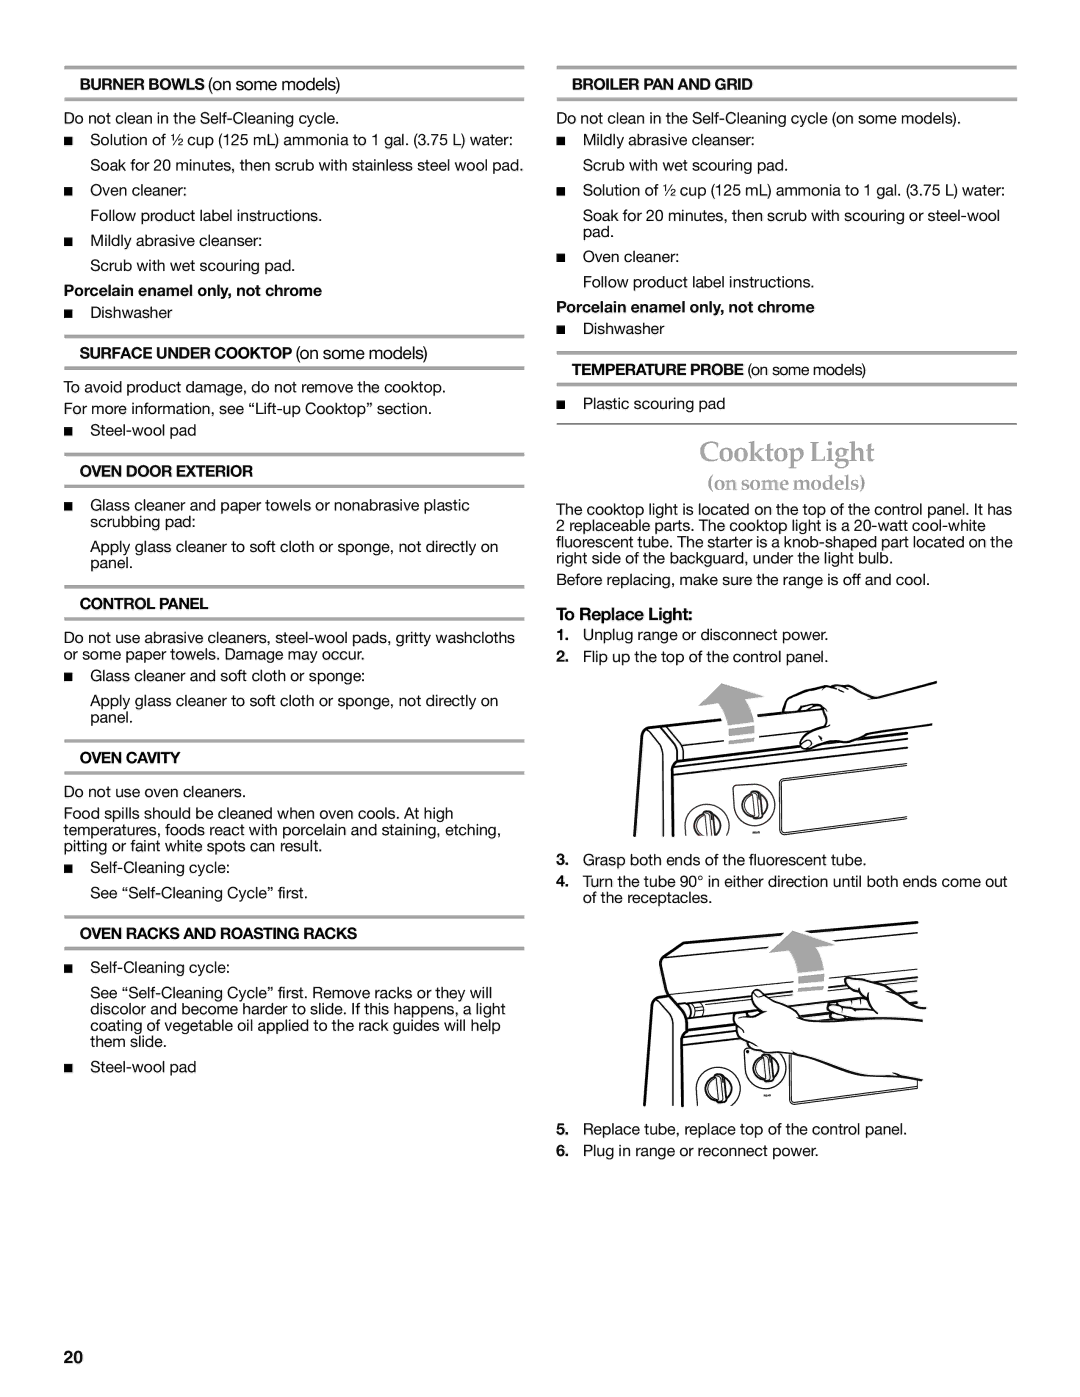
The cooktop light is located on the top of the control panel. It has 2 replaceable parts. The cooktop light is a 20-watt cool-white fluorescent tube. The starter is a knob-shaped part located on the right side of the backguard, under the light bulb.

Before replacing, make sure the range is off and cool.

To Replace Light:

1.Unplug range or disconnect power.

2.Flip up the top of the control panel.

3.Grasp both ends of the fluorescent tube.

4.Turn the tube 90° in either direction until both ends come out of the receptacles.

5.Replace tube, replace top of the control panel.

6.Plug in range or reconnect power.

20

Page 20
Image 20
KitchenAid YKERC506, KERC500 manual Cooktop Light, To Replace Light

KERC506, KERC500, YKERC506 specifications

The KitchenAid YKERC506, KERC500, and KERC506 are part of a premium line of electric ranges that reflect the brand's commitment to quality and innovation in kitchen appliances. Designed for the modern home chef, these ranges offer a balanced combination of style, technology, and functionality, ensuring that cooking is a pleasurable and efficient experience.

One of the standout features of the KitchenAid electric ranges is their powerful and versatile cooktops. Equipped with dual-element burners, the YKERC506 offers a range of cooking options from simmering delicate sauces to boiling water quickly. The KERC500 and KERC506 models provide a similar flexibility with their radiant cooking elements, providing even heat distribution and precise temperature control for optimal cooking results.

Another significant advantage of these ranges is their spacious and thoughtfully designed oven interiors. All three models feature a generous oven capacity, allowing home cooks to prepare multiple dishes simultaneously, making them ideal for family gatherings and meal prepping. The self-cleaning feature is another time-saving aspect, utilizing high temperatures to burn off food residue and simplify maintenance.

The technology integrated into these ranges is advanced yet user-friendly. The YKERC506, for instance, incorporates an intuitive electronic oven control that allows for precise temperature adjustments and cooking settings. Additionally, the models include a convection cooking option, ensuring that heat circulates evenly throughout the oven. This technology promotes even baking results and can significantly reduce cooking times, taking home cooking to a professional level.

Moreover, KitchenAid has not overlooked the importance of design in these ranges. Available in a variety of finishes, including stainless steel and vibrant color options, the KERC500 and KERC506 add a touch of elegance to any kitchen decor. The consistent attention to detail in the knobs, handles, and overall finish enhances the aesthetic appeal while ensuring durability.

In summary, the KitchenAid YKERC506, KERC500, and KERC506 electric ranges embody a perfect blend of advanced cooking technologies and stylish design, making them a valuable addition to any kitchen. With their robust features, efficient technologies, and elegant construction, these ranges are tailored for both novice cooks and seasoned chefs, ensuring every meal is a success.