Eject button

Batteries

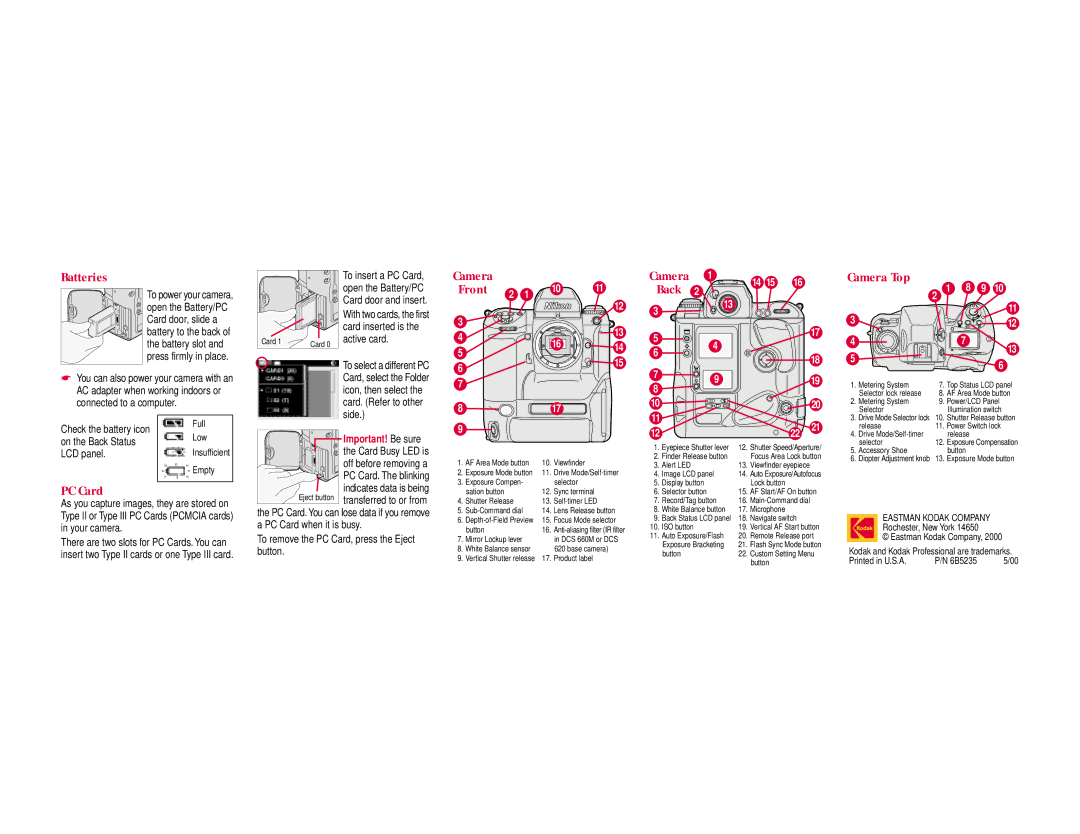
To power your camera, open the Battery/PC Card door, slide a

To insert a PC Card, open the Battery/PC Card door and insert. With two cards, the first card inserted is the

Camera

Front 2 1

3

10

11

12

Camera

1

15

16

Back

14

2


3

13


Camera Top

1

8

9

10

2


11

3


OF

O N


F

12

MODE


battery to the back of the battery slot and press firmly in place.

Card 1

Card 0

active card.

4

5

16

13 14

5

4

6


17

18

4


7

S

C

13

5


You can also power your camera with an AC adapter when working indoors or connected to a computer.

To select a different PC Card, select the Folder icon, then select the card. (Refer to other side.)

6

7

8

17

15

7

9

8


10

ISO

BKT L CSM

11


19 20


6

1. Metering System

7.

Top Status LCD panel

Selector lock release

8.

AF Area Mode button

2. Metering System

9.

Power/LCD Panel

Selector


Illumination switch

3. Drive Mode Selector lock

10.

Shutter Release button

Check the battery icon

Full

Low

on the Back Status


Important! Be sure

9

12

22

21

release

11. Power Switch lock

4. Drive Mode/Self-timer

release

selector

12. Exposure Compensation

LCD panel.

Insufficient

the Card Busy LED is

1.

Eyepiece Shutter lever

2.

Finder Release button

12. Shutter Speed/Aperture/

Focus Area Lock button

5.

Accessory Shoe

button

6.

Diopter Adjustment knob

13. Exposure Mode button

Empty

PC Card

As you capture images, they are stored on Type II or Type III PC Cards (PCMCIA cards) in your camera.

There are two slots for PC Cards. You can insert two Type II cards or one Type III card.

off before removing a

PC Card. The blinking indicates data is being transferred to or from

the PC Card. You can lose data if you remove a PC Card when it is busy.

To remove the PC Card, press the Eject button.

1.

AF Area Mode button

10.

Viewfinder

2.

Exposure Mode button

11.

Drive Mode/Self-timer

3.

Exposure Compen-


selector


sation button

12.

Sync terminal

4.

Shutter Release

13.

Self-timer LED

5.

Sub-Command dial

14.

Lens Release button

6.

Depth-of-Field Preview

15.

Focus Mode selector


button

16.

Anti-aliasing filter (IR filter

7.

Mirror Lockup lever


in DCS 660M or DCS

8.

White Balance sensor


620 base camera)

9.

Vertical Shutter release

17.

Product label

3.

Alert LED

4.

Image LCD panel

5.

Display button

6.

Selector button

7.

Record/Tag button

8.

White Balance button

9.

Back Status LCD panel

10.

ISO button

11.

Auto Exposure/Flash


Exposure Bracketing


button

13.

Viewfinder eyepiece

14.

Auto Exposure/Autofocus


Lock button

15.

AF Start/AF On button

16.

Main-Command dial

17.

Microphone

18.

Navigate switch

19.

Vertical AF Start button

20.

Remote Release port

21.

Flash Sync Mode button

22.

Custom Setting Menu


button

EASTMAN KODAK COMPANY

Rochester, New York 14650

© Eastman Kodak Company, 2000

Kodak and Kodak Professional are trademarks.

Printed in U.S.A.

P/N 6B5235

5/00

Page 2
Image 2
Kodak DCS 600 Series manual Batteries, Camera Front 2, Camera Top, PC Card

DCS 600 Series specifications

The Kodak DCS 600 Series, launched in the mid-1990s, marked a significant milestone in the evolution of digital photography. As a pioneer in the realm of professional digital cameras, the DCS 600 Series combined advanced technologies with the practical features needed for high-quality image capture.

One of the standout characteristics of the Kodak DCS 600 Series was its innovative use of a 1.5-megapixel sensor based on the Nikon F5 camera body, enabling photographers to achieve a high level of detail and image quality that was still uncommon at the time. The camera utilized a charge-coupled device (CCD) sensor, a technology that allowed for improved light sensitivity and color reproduction, making it particularly effective for studio and event photography.

The DCS 600 Series came with several models, including the DCS 620 and the DCS 660, each providing slightly different features tailored to various user needs. Key features included a built-in image processing engine that accelerated the workflow of capturing, editing, and storing images. It supported a range of ISO settings, allowing for adaptability in diverse lighting conditions, catering to both bright studio environments and low-light situations.

Another impressive aspect of the DCS 600 Series was its ability to capture JPEG images alongside RAW files, providing photographers with flexibility in post-processing. The inclusion of professional-grade lenses also ensured that users could achieve stunning results, while the camera's durable construction provided reliability for fieldwork.

Connectivity options were also ahead of its time, with the DCS 600 Series enabling photographers to transfer images quickly via serial communication. This feature was crucial for professionals who needed to send images to clients or publications swiftly.

In summary, the Kodak DCS 600 Series represented a critical juncture in the transition from film to digital photography. With its high-quality sensor, advanced processing capabilities, and robust features designed for professional use, the DCS 600 Series laid the groundwork for future digital camera developments and left a lasting legacy in the world of photography. Its impact is still felt today as it paved the way for the modern digital imaging solutions that continue to evolve.