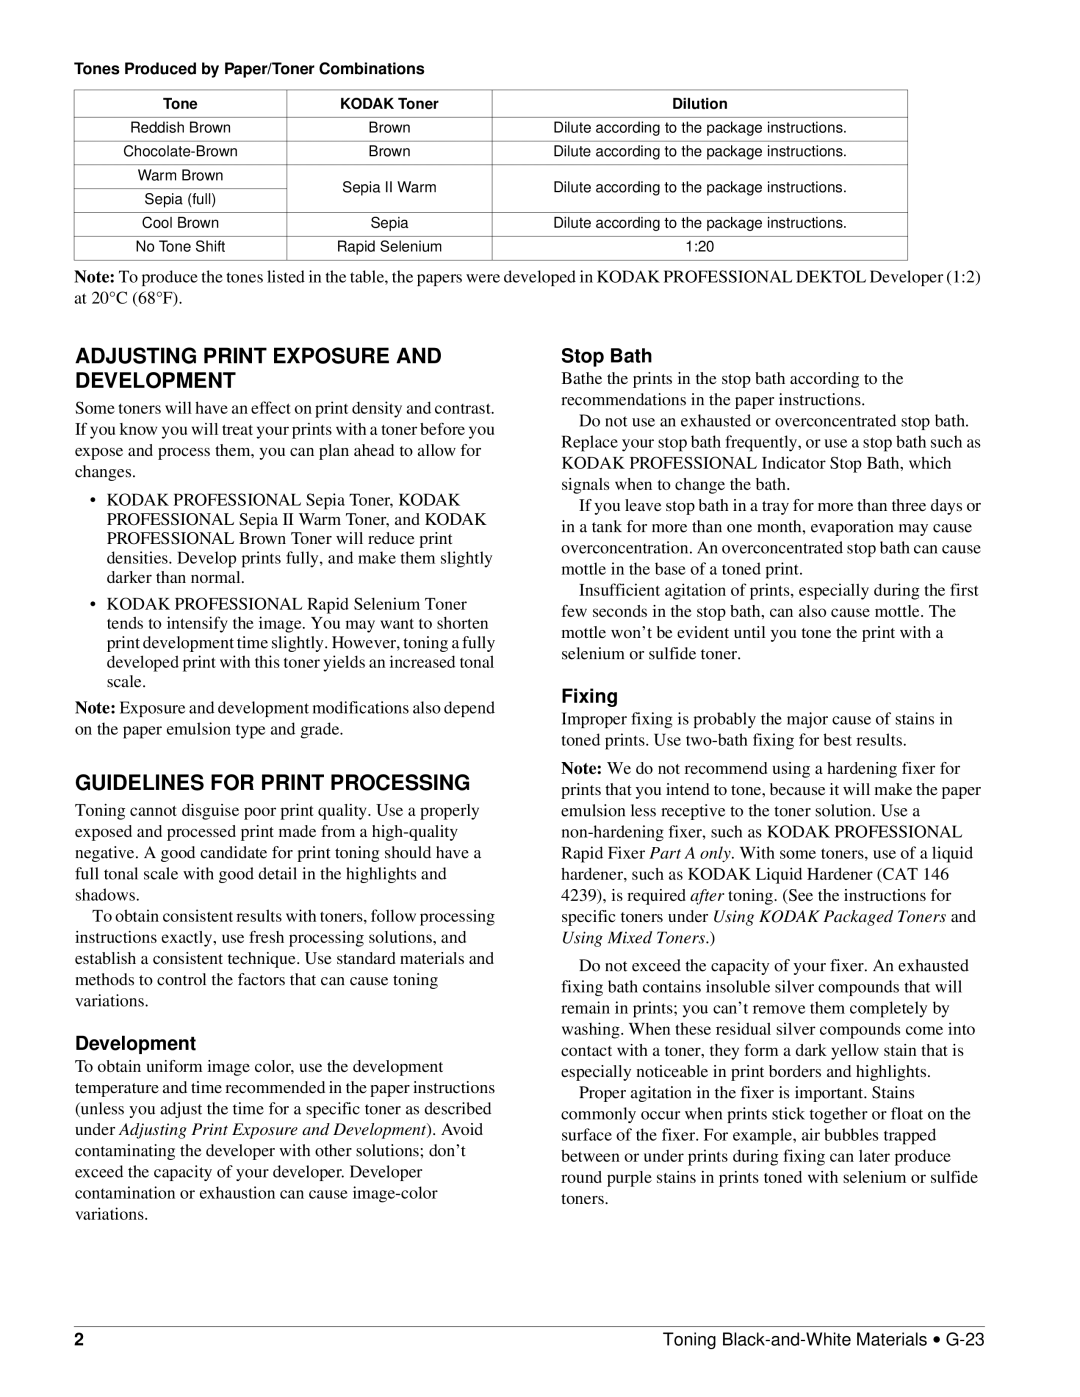
Tones Produced by Paper/Toner Combinations
Tone | KODAK Toner | Dilution | |
|
|
| |
Reddish Brown | Brown | Dilute according to the package instructions. | |
|
|
| |
Brown | Dilute according to the package instructions. | ||
|
|
| |
Warm Brown | Sepia II Warm | Dilute according to the package instructions. | |
| |||
Sepia (full) | |||
|
| ||
|
|
| |
Cool Brown | Sepia | Dilute according to the package instructions. | |
|
|
| |
No Tone Shift | Rapid Selenium | 1:20 | |
|
|
|
Note: To produce the tones listed in the table, the papers were developed in KODAK PROFESSIONAL DEKTOL Developer (1:2) at 20°C (68°F).
ADJUSTING PRINT EXPOSURE AND DEVELOPMENT
Some toners will have an effect on print density and contrast. If you know you will treat your prints with a toner before you expose and process them, you can plan ahead to allow for changes.
•KODAK PROFESSIONAL Sepia Toner, KODAK PROFESSIONAL Sepia II Warm Toner, and KODAK PROFESSIONAL Brown Toner will reduce print densities. Develop prints fully, and make them slightly darker than normal.
•KODAK PROFESSIONAL Rapid Selenium Toner tends to intensify the image. You may want to shorten print development time slightly. However, toning a fully developed print with this toner yields an increased tonal scale.
Note: Exposure and development modifications also depend on the paper emulsion type and grade.
GUIDELINES FOR PRINT PROCESSING
Toning cannot disguise poor print quality. Use a properly exposed and processed print made from a
To obtain consistent results with toners, follow processing instructions exactly, use fresh processing solutions, and establish a consistent technique. Use standard materials and methods to control the factors that can cause toning variations.
Development
To obtain uniform image color, use the development temperature and time recommended in the paper instructions (unless you adjust the time for a specific toner as described under Adjusting Print Exposure and Development). Avoid contaminating the developer with other solutions; don’t exceed the capacity of your developer. Developer contamination or exhaustion can cause
Stop Bath
Bathe the prints in the stop bath according to the recommendations in the paper instructions.
Do not use an exhausted or overconcentrated stop bath. Replace your stop bath frequently, or use a stop bath such as KODAK PROFESSIONAL Indicator Stop Bath, which signals when to change the bath.
If you leave stop bath in a tray for more than three days or in a tank for more than one month, evaporation may cause overconcentration. An overconcentrated stop bath can cause mottle in the base of a toned print.
Insufficient agitation of prints, especially during the first few seconds in the stop bath, can also cause mottle. The mottle won’t be evident until you tone the print with a selenium or sulfide toner.
Fixing
Improper fixing is probably the major cause of stains in toned prints. Use
Note: We do not recommend using a hardening fixer for prints that you intend to tone, because it will make the paper emulsion less receptive to the toner solution. Use a
Do not exceed the capacity of your fixer. An exhausted fixing bath contains insoluble silver compounds that will remain in prints; you can’t remove them completely by washing. When these residual silver compounds come into contact with a toner, they form a dark yellow stain that is especially noticeable in print borders and highlights.
Proper agitation in the fixer is important. Stains commonly occur when prints stick together or float on the surface of the fixer. For example, air bubbles trapped between or under prints during fixing can later produce round purple stains in prints toned with selenium or sulfide toners.
2 | Toning |