Kodak EasyShare Z81612/ZD8612 is digital camera
Eastman Kodak Company Rochester, NY
Zoom Telephoto/Wide Angle
Flash Lens Mode dial
Front view
Shutter button Speaker
Share button
Info, Review, Delete, Menu buttons Battery compartment
Back view
Tripod socket
Table of contents
Table of contents
Attaching the strap Loading the battery
To extend battery life, see
Language
Setting the language, date/time
Turning on the camera
Date/Time
Storing pictures on an optional SD or Sdhc card
Turn off the camera before inserting or removing a card
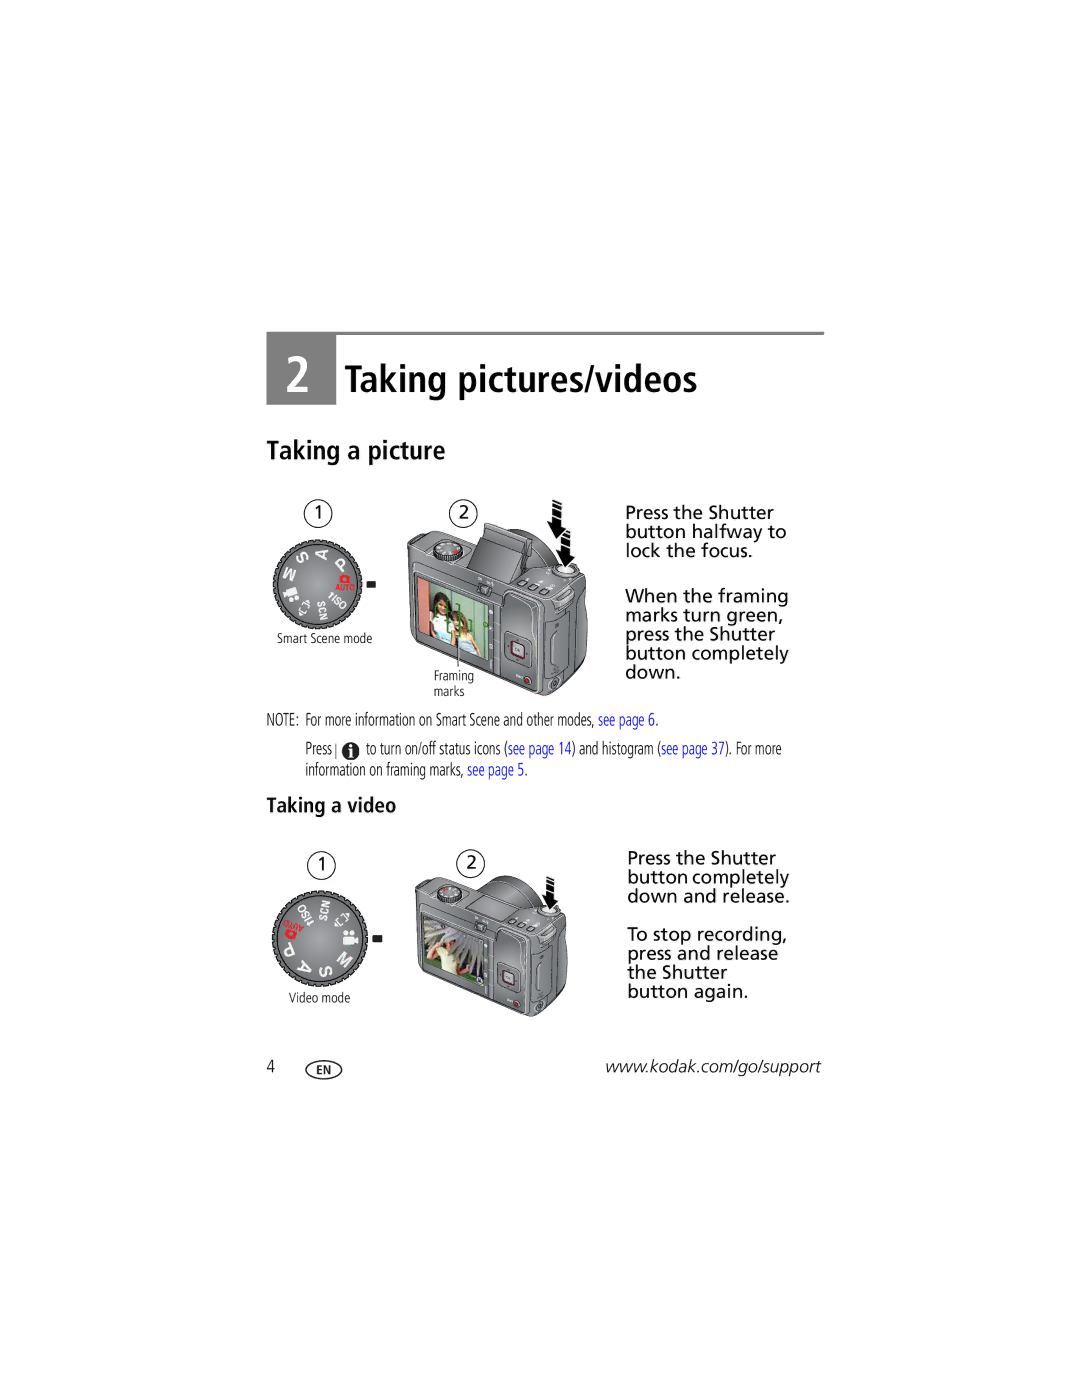
Taking a picture
Taking a video
To review pictures/videos anytime, see
Using the framing marks to take pictures
Reviewing the picture/video just taken
Press the Shutter button halfway
Capture modes
Scene modes
Landscape
SCN mode For Sport
Are Multi-Pattern Exposure Metering and Multi-Zone Focus
Marks are not available in Landscape
Focus distance
Using optical zoom
As you zoom in, move away from your subject
Auto
Taking flash pictures
Macro
Using focus modes
Focus mode
Infinity
To get into the scene
Taking self-timer pictures
Still modes, press the Self-timer/Burst button
Place the camera on a tripod or flat surface. In most
Landscape, Backlight, Fireworks,
Mode Icon Description Purpose
Taking burst pictures
Panorama modes
Taking panoramic pictures
Take the first picture
Status icons indicate mode, feature, and camera status
Understanding the picture-taking icons
Reviewing pictures/videos
Magnifying a picture during review
Playing a video
Viewing picture/video information
Deleting pictures/videos
Using the undo delete feature
Protecting pictures/videos from deletion
Using the menu button in Review
Recording a sound tag
Adding sound tags
Playing a sound tag
Cropping pictures
Using Kodak Perfect Touch technology
Edit tab Press to highlight Crop. Press the OK button
Trimming a video
Editing videos
Making a picture from a video
To pause. Press to navigate through video frames
Using bookmarks
Using video bookmarks
Setting bookmarks
Press
Making a video action print
Use Slide Show to display your pictures/videos on the LCD
Running a slide show
Starting the slide show
Running a multimedia slide show
Changing the slide show display interval
Running a continuous slide show loop
Press the OK button
Displaying pictures/videos on a television
Viewing as thumbnails multi-up
Viewing pictures/videos in different ways
Searching pictures by date, favorites, or other tag
Press the Review button, then to find a picture/video
Selecting multiple pictures/videos
Copying pictures/videos
Copy pictures/videos
Pictures
Understanding the review icons
Videos
Using the Menu button to change settings
Capture Options
Black-and-white or sepia
Normal
Settings Panorama modes White Balance
Sharpness High
Low
Setup Options
Delete Tag
Set Tag Clear All
Add Tag
Exit
Advanced Digital Zoom
Sound Volume Off, Low, Medium, High Auto Power Off Minutes
Cancel-exits without making a change
Digital zoom
Using Pasm modes
Using the framing grid to compose a picture
Mode When to use
Changing P, A, S, or M mode settings
Picture sizes
Then
Using the histogram to view picture brightness
Using exposure compensation with exposure bracketing
Interval is set to 0.3 steps
Tagging pictures for printing
Sharing your pictures
Printing tagged pictures
Second-tag pictures/videos on your camera
Tagging pictures/videos for emailing
First-on your computer
Third-transfer and email
To find a picture
Tagging pictures as favorites
Printing and emailing favorites
As favorites
First-create tags names
Tagging pictures/videos
Pre-tagging
Second-assign tags
Installing the software
Follow the on-screen instructions to install the software
Transferring pictures with the USB cable
Also available for transferring
Printing with a Kodak EasyShare printer or printer dock
Connecting the camera to an EasyShare all-in-one printer
Printing pictures
Direct printing with an EasyShare all-in-one printer
Turn on the printer. Turn on the camera
Using a printer that is not PictBridge enabled
Printing from an EasyShare all-in-one printer
Press to choose a printing option, then press the OK button
Ordering prints online
Dock compatibility for your camera
Printing from an optional SD/SDHC card
Camera problems Try one or more of the following
Including protected files
Blue or black Card or internal memory see
Clean the lens see
Make sure your camera is not in Close-up mode
Instead of a
Increase Exposure Compensation see
Turn on the flash see
Behind the subject
Purchase a certified SD/SDHC card
LCD messages
Videos, including protected files
Try one or more of the following
Software
Helpful links
Camera
Other
Italy 02 696 Japan 03 5540 Korea 080 708 Netherlands
Australia
00 800
New Zealand 0800 880 Norway 23 16 21 Philippines
Camera specifications
Appendix
Flash compensation-Yes
Flash modes-Auto, Fill, Red-eye, Off
Video size-VGA 640 x 480 @30 fps Qvga 320 x 240 @30 fps
Auto power off-Selectable 1, 3, 5, 10 minutes
Operating temperature-32-104F0-40C
Video output-NTSC or PAL selectable
When removing the battery, allow it to cool it may be hot
Extending battery life
Battery life
Do not charge non-rechargeable batteries
Limited warranty
Care and maintenance
Limited warranty coverage
Limitations
Your rights
Regulatory compliance
FCC compliance and advisory
Outside the United States and Canada
N137
Australian C-Tick
Canadian DOC statement
FCC and Industry Canada
Appendix
Russian GOST-R
Eastman Kodak Company Rochester, NY AIO-40
Out
Backlight, 7 battery
About picture, video, 16 about this camera, 34 accessories
Extending life, 58 life, 58 loading
About pictures, videos, 16 installing
Settings, 9 flower, 7 focus
Focus mode
Exposure
OK button
Lens, cleaning, 59 loading
Portrait, 6 power, camera, 2 printer dock
Night landscape, 7 night portrait
Printing
Self-timer
Numbers, 53 setting
Ready light
Tag
Sound volume, 34 tag
Support, technical, 52
Snow, 7 software
Size
Volume, adjusting Warranty, 59 WEEE, 63 white balance
Turning camera on/off Undelete
Viewing