Solutions to Common Problems

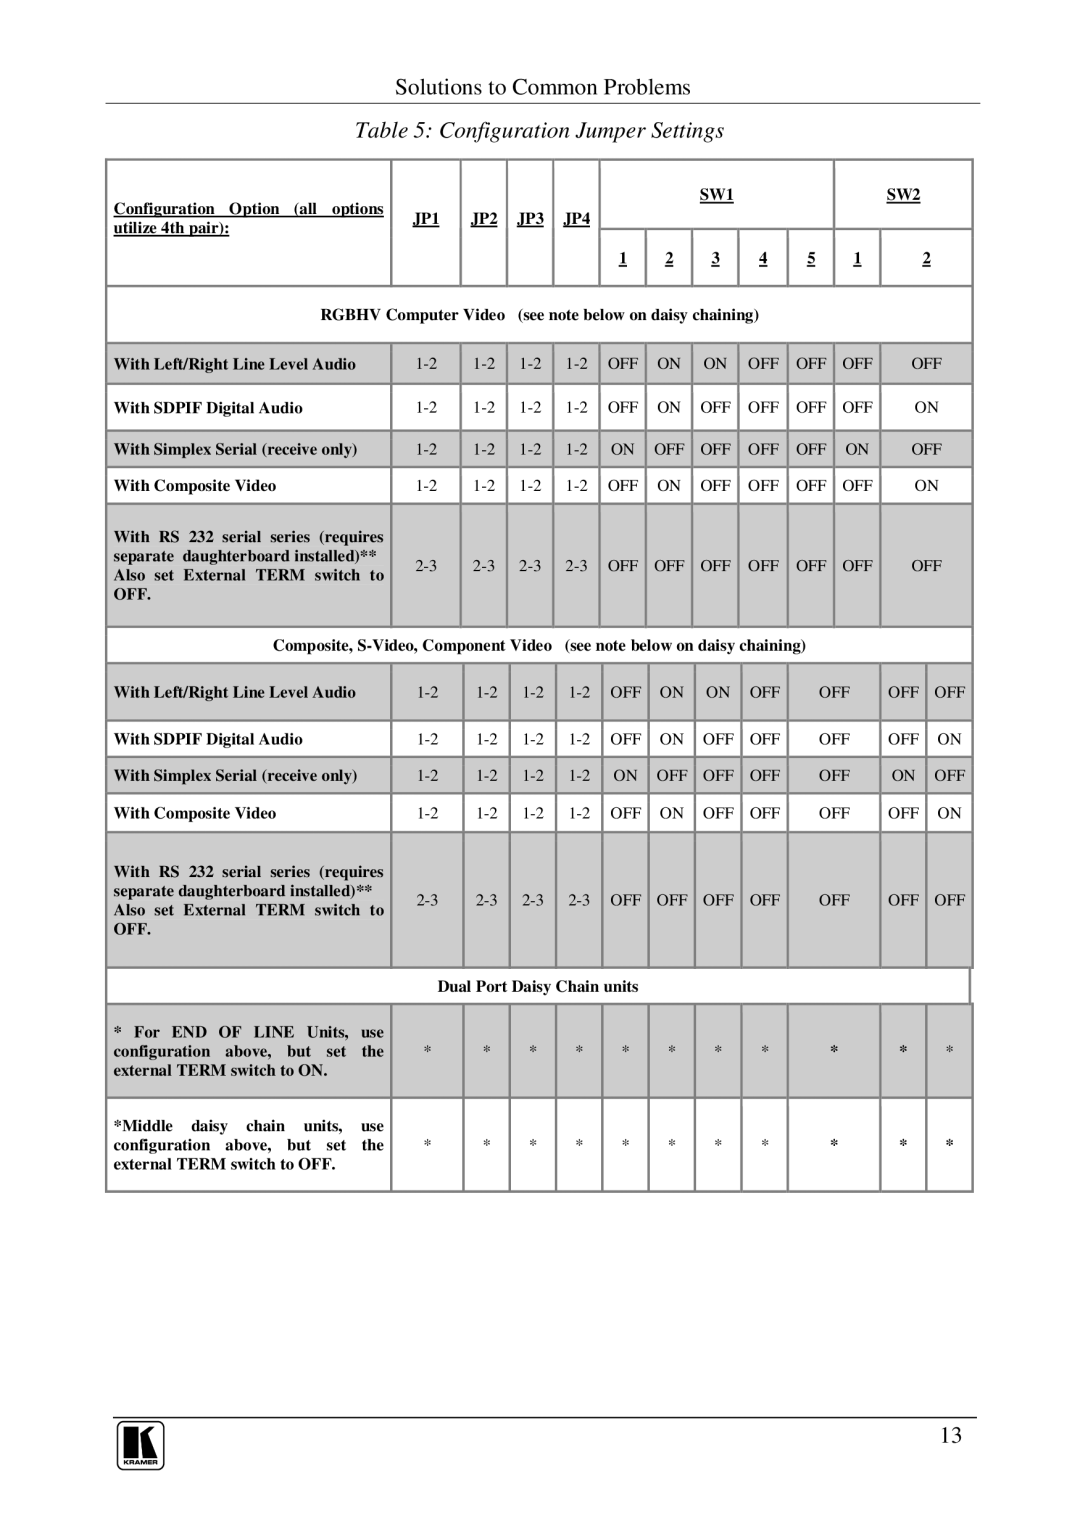
Table 5: Configuration Jumper Settings

Configuration Option (all options

JP1

JP2

JP3

JP4

utilize 4th pair):


SW1


SW2


1

2

3

4

5

1

2


RGBHV Computer Video (see note below on daisy chaining)


With Left/Right Line Level Audio


1-2


1-2


1-2


1-2


OFF


ON


ON


OFF


OFF


OFF


OFF


With SDPIF Digital Audio

1-2

1-2

1-2

1-2


OFF


ON


OFF


OFF


OFF


OFF


ON


With Simplex Serial (receive only)


1-2


1-2


1-2


1-2


ON


OFF


OFF


OFF


OFF


ON


OFF


With Composite Video

1-2

1-2

1-2

1-2


OFF


ON


OFF


OFF


OFF


OFF


ON


With RS 232 serial series (requires


separate daughterboard installed)**


2-3


2-3


2-3


2-3


OFF


OFF


OFF


OFF


OFF


OFF


OFF


Also set External TERM switch to


OFF.


Composite, S-Video, Component Video


(see note below on daisy chaining)


With Left/Right Line Level Audio


1-2


1-2


1-2


1-2


OFF


ON


ON


OFF


OFF


OFF


OFF


With SDPIF Digital Audio


1-2


1-2


1-2


1-2


OFF


ON


OFF


OFF


OFF


OFF


ON


With Simplex Serial (receive only)


1-2


1-2


1-2


1-2


ON


OFF


OFF


OFF


OFF


ON


OFF


With Composite Video


OFF


ON


OFF


OFF


OFF


OFF


ON


1-2


1-2


1-2


1-2


With RS 232 serial series (requires


separate daughterboard installed)**


2-3


2-3


2-3


2-3


OFF


OFF


OFF


OFF


OFF


OFF


OFF


Also set External TERM switch to


OFF.


Dual Port Daisy Chain units


* For END OF LINE Units, use


configuration above, but set the


*


*


*


*


*


*


*


*


*


*


*


external TERM switch to ON.


*Middle daisy chain units, use


configuration above, but set the

*


*


*


*


*


*


*


*


*


*

*


external TERM switch to OFF.


13

Page 15
Image 15
Kramer Electronics Cobra R1300A user manual Configuration Jumper Settings

Cobra R1300A specifications

Kramer Electronics has long been recognized for its commitment to innovation and quality in the AV industry. One of its standout products is the Cobra R1300A, a versatile and powerful solution designed for high-definition video and audio distribution. This device is particularly suited for professional applications, including live events, control rooms, and large conference spaces.

At the core of the Cobra R1300A is its ability to support a wide range of input and output formats. It features multiple HDMI inputs, which allow users to connect various sources such as laptops, cameras, and media players. The output capabilities include both HDMI and balanced audio, ensuring a seamless integration into any AV setup. The device natively supports high resolutions up to 4K at 60Hz, providing stunning image quality that meets the demands of today’s high-definition content.

One of the standout technologies of the Cobra R1300A is its advanced scaling feature. This technology automatically adjusts the input signal to match the output resolution, which simplifies operations and minimizes manual adjustments. This is particularly advantageous in dynamic environments where multiple sources may be in use.

The Cobra R1300A also incorporates a user-friendly interface, making it easy for operators of all skill levels to navigate and control. The front panel includes LED indicators that provide real-time feedback on signal status and active connections, which enhances usability and troubleshooting.

Furthermore, the device is built with robust connectivity options, including RS-232 and Ethernet control, allowing for integration into larger systems and remote management. This capability is essential for professional audiovisual environments where centralized control is necessary.

Another key characteristic of the Cobra R1300A is its compact design, which facilitates easy installation and placement in tight spaces. Additionally, it is engineered with thermal efficiency in mind, featuring built-in cooling mechanisms that ensure reliable performance during long operating hours without overheating.

In conclusion, the Kramer Electronics Cobra R1300A stands out as a reliable and feature-rich solution for professionals seeking high-quality video and audio distribution. Its advanced features, user-friendly interface, and robust connectivity options make it a preferred choice in demanding AV environments. Whether for corporate events, educational settings, or live performances, the Cobra R1300A delivers the performance and versatility that users expect from Kramer Electronics.