OVERVIEW
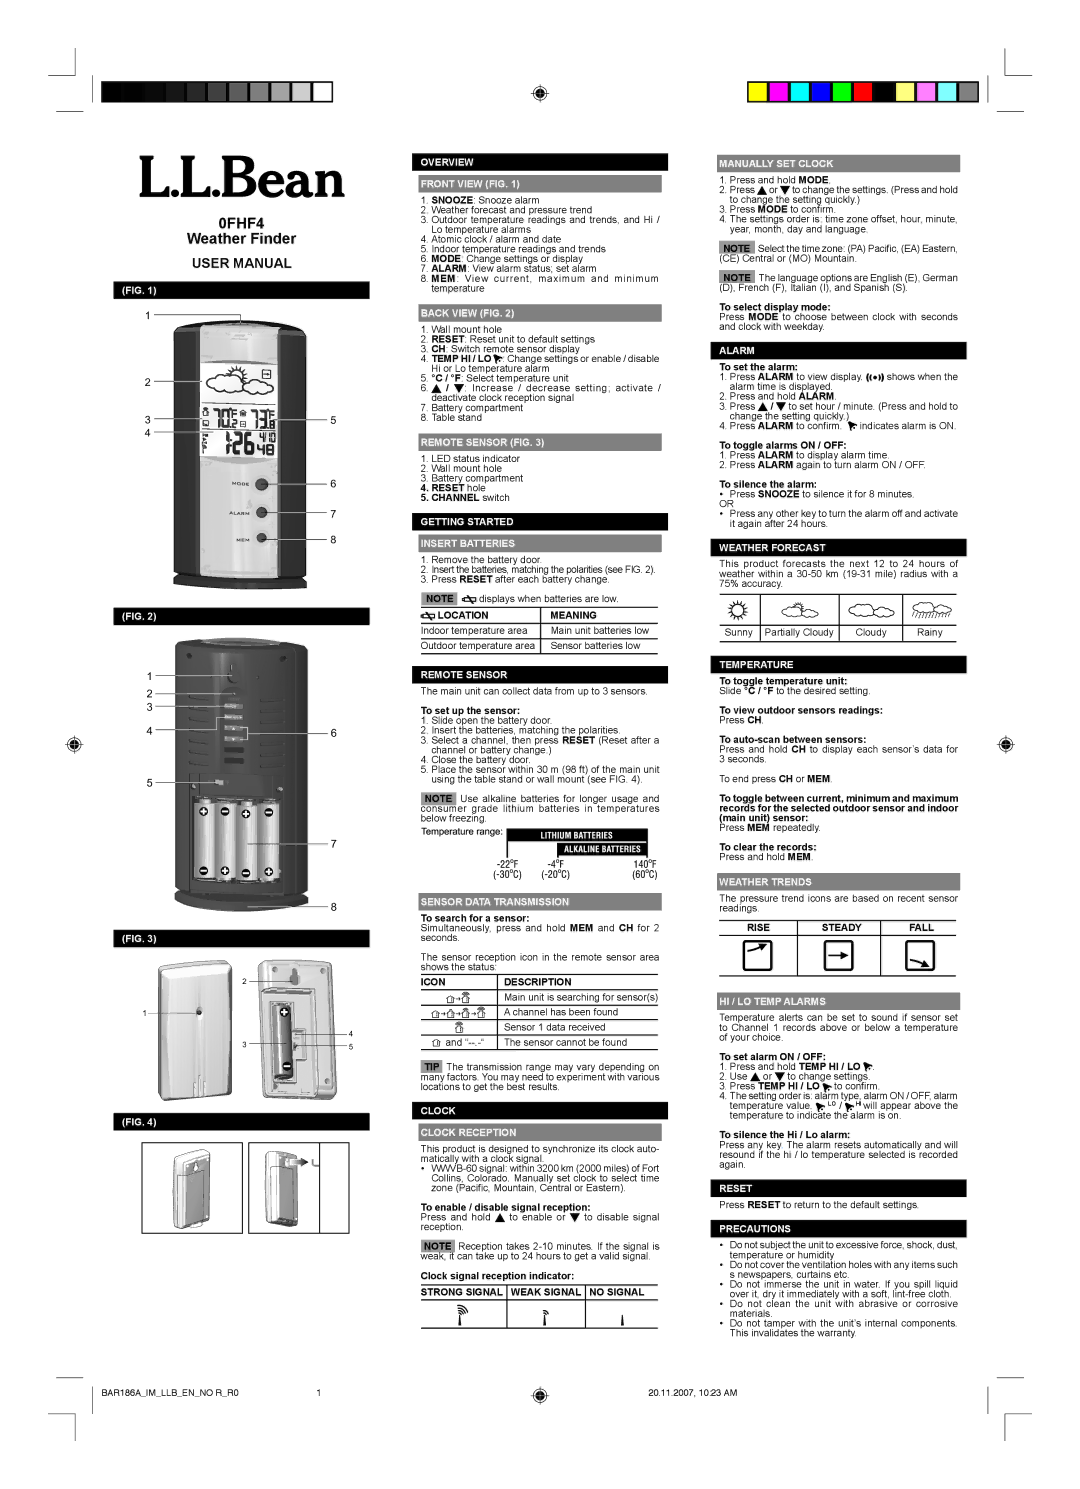
FRONT VIEW (FIG. 1)
1.SNOOZE: Snooze alarm
2.Weather forecast and pressure trend
3.Outdoor temperature readings and trends, and Hi / Lo temperature alarms
4.Atomic clock / alarm and date
5.Indoor temperature readings and trends
6.MODE: Change settings or display
7.ALARM: View alarm status; set alarm
8.MEM: View current, maximum and minimum temperature
BACK VIEW (FIG. 2)
1.Wall mount hole
2.RESET: Reset unit to default settings
3.CH: Switch remote sensor display
4.TEMP HI / LO : Change settings or enable / disable Hi or Lo temperature alarm
5.°C / °F: Select temperature unit
6./ : Increase / decrease setting; activate / deactivate clock reception signal
7.Battery compartment
8.Table stand
REMOTE SENSOR (FIG. 3)
1.LED status indicator
2.Wall mount hole
3.Battery compartment
4.RESET hole
5.CHANNEL switch
GETTING STARTED
INSERT BATTERIES
1.Remove the battery door.
2.Insert the batteries, matching the polarities (see FIG. 2).
3.Press RESET after each battery change.
NOTE  displays when batteries are low.
LOCATION | MEANING |
| |
Indoor temperature area | Main unit batteries low |
| |
Outdoor temperature area | Sensor batteries low |
REMOTE SENSOR
The main unit can collect data from up to 3 sensors.
To set up the sensor:
1.Slide open the battery door.
2.Insert the batteries, matching the polarities.
3.Select a channel, then press RESET (Reset after a channel or battery change.)
4.Close the battery door.
5.Place the sensor within 30 m (98 ft) of the main unit using the table stand or wall mount (see FIG. 4).
NOTE Use alkaline batteries for longer usage and consumer grade lithium batteries in temperatures below freezing.
SENSOR DATA TRANSMISSION
To search for a sensor:
Simultaneously, press and hold MEM and CH for 2 seconds.
The sensor reception icon in the remote sensor area shows the status:
ICON | DESCRIPTION |
| |
| Main unit is searching for sensor(s) |
| |
| A channel has been found |
| Sensor 1 data received |
| |
and “--.-“ | The sensor cannot be found |
TIP The transmission range may vary depending on many factors. You may need to experiment with various locations to get the best results.
CLOCK
CLOCK RECEPTION
This product is designed to synchronize its clock auto- matically with a clock signal.
•WWVB-60 signal: within 3200 km (2000 miles) of Fort Collins, Colorado. Manually set clock to select time zone (Pacific, Mountain, Central or Eastern).
To enable / disable signal reception:
Press and hold  to enable or
  to disable signal reception.
NOTE Reception takes 2-10 minutes. If the signal is weak, it can take up to 24 hours to get a valid signal.
Clock signal reception indicator:
STRONG SIGNAL WEAK SIGNAL NO SIGNAL
MANUALLY SET CLOCK
1. Press and hold MODE.
2. Press or to change the settings. (Press and hold to change the setting quickly.)
3.Press MODE to confirm.
4.The settings order is: time zone offset, hour, minute, year, month, day and language.
NOTE Select the time zone: (PA) Pacific, (EA) Eastern, (CE) Central or (MO) Mountain.
NOTE The language options are English (E), German (D), French (F), Italian (I), and Spanish (S).
To select display mode:
Press MODE to choose between clock with seconds and clock with weekday.
ALARM | |
To set the alarm: | |
1. | Press ALARM to view display. | shows when the |
| alarm time is displayed. | |
2. | Press and hold ALARM. | |
3. | Press / to set hour / minute. (Press and hold to |
| change the setting quickly.) | |
4. | Press ALARM to confirm. indicates alarm is ON. |
To toggle alarms ON / OFF:
1.Press ALARM to display alarm time.
2.Press ALARM again to turn alarm ON / OFF.
To silence the alarm:
•Press SNOOZE to silence it for 8 minutes.
OR
•Press any other key to turn the alarm off and activate it again after 24 hours.
WEATHER FORECAST
This product forecasts the next 12 to 24 hours of weather within a 30-50 km (19-31 mile) radius with a 75% accuracy.
| | | |
Sunny | Partially Cloudy | Cloudy | Rainy |
| | | |
TEMPERATURE
To toggle temperature unit:
Slide °C / °F to the desired setting.
To view outdoor sensors readings:
Press CH.
To auto-scan between sensors:
Press and hold CH to display each sensor’s data for 3 seconds.
To end press CH or MEM.
To toggle between current, minimum and maximum records for the selected outdoor sensor and indoor (main unit) sensor:
Press MEM repeatedly.
To clear the records:
Press and hold MEM.
WEATHER TRENDS
The pressure trend icons are based on recent sensor readings.
HI / LO TEMP ALARMS
Temperature alerts can be set to sound if sensor set to Channel 1 records above or below a temperature of your choice.
To set alarm ON / OFF: | |
1. | Press and hold TEMP HI / LO . |
2. | Use or to change settings. |
3. | Press TEMP HI / LO | to confirm. |
4. | The setting order is: alarm type, alarm ON / OFF, alarm |
| temperature value. | LO / HI will appear above the |
| temperature to indicate the alarm is on. |
To silence the Hi / Lo alarm:
Press any key. The alarm resets automatically and will resound if the hi / lo temperature selected is recorded again.
RESET
Press RESET to return to the default settings.
PRECAUTIONS
•Do not subject the unit to excessive force, shock, dust, temperature or humidity
•Do not cover the ventilation holes with any items such s newspapers, curtains etc.
•Do not immerse the unit in water. If you spill liquid over it, dry it immediately with a soft, lint-free cloth.
•Do not clean the unit with abrasive or corrosive materials.
•Do not tamper with the unit’s internal components. This invalidates the warranty.