ENCHUFE POLARIZADO
Este aparato tiene el enchufe polarizado (un diente es más ancho que el otro). Para reducir el riesgo de electrochoque, este enchufe esta hecho para que entre al toma corriente de una forma solamente. Si el enchufe no queda totalmente en el toma corriente, dele vuelva al enchufe. Si aun no queda, contacte a un eléctricista capacitado. No trate de anular este aspecto de seguridad.
MANTENIMIENTO
DESENCHUFAR SIEMPRE EL CORDÓN ANTES DE LIMPIAR O DESARMAR.
LIMPIEZA: ¡IMPORTANTE! ¡NO sumergir la piezas eléctricas en agua! Limpiar todas las piezas con tela suave humedecida con agua y detergente suave solamente. SECAR TODAS LAS PIEZAS COMPLETAMENTE ANTES DE VOLVER A CONECTAR CON LA FUENTE DE ENERGÍA.
LUBRICACIÓN: El motor ha sido lubricado permanentemente.
Proyección de
Aflojar
Proyección
Pequeña
Puerta del
Almacenaje del
Cordón
Proyección
Pequeña
Proyección de
TM
Innovators in Home Comfort
12" ULTRA FORCE | ULTRA FORCE |
WINDOW FAN with THERMOSTAT
(Model 1200)
OPERATING INSTRUCTIONS & PARTS MANUAL
READ AND SAVE THESE INSTRUCTIONS
ADERTENCIA: Para evitar lesión personal y/o el daño del Ventilador, no hay que apoyarse nunca sobre el Ventilador ni empujarlo mientras esté colocado en la ventana o durante su funcionamiento. No subir el batiente de la ventana mientras el Ventilador esté funcionando. Cerciorarse de que el Ventilador esté seguro en la ventana en todo momento.
ALMACENAJE DEL CORDÓN
1. | Empujar las Proyecciones de Aflojar (2) de la Puerta del Almacenaje |
| del Cordón hacia la izquierda y mover la puerta hacia arriba y hacia |
| afuera. (Figura 4) |
2. | Tender el Cordón en el Canal. Empezar a enrollar el Cordón en la |
| misma dirección de las manecillas del reloj, empezando en el lado a |
| mano izquierda del Poste Inferior: hacia arriba y alrededor del Poste |
| Superior. (Figura 5) |
3. | Cuando el Cordón quede completamente enroscado, remeter el |
Aflojar
Figura 4
Poste Superior
Poste Inferior
This Fan is for residential use only. It is not intended to be used in commercial or industrial settings.
GENERAL SAFETY INSTRUCTIONS
When using electrical appliances, especially where children are present, basic safety precautions should always be followed in order to reduce the risk of fire, electrical shock and injury to persons including the following:
1. | Never insert fingers, pencils, or other foreign objects through the grill. |
2. | To protect against electrical shock, do not immerse Fan, Plug or Cord |
| in water or spray with liquids. |
3. | Unplug Fan from outlet when not in use and when moving Fan to |
| another location or before cleaning. |
3.Holding the Fan in place from the front, lower the window sash slowly until it fits between the Window Grabbers on the top of the Fan. (Figure 2)
4.Once the Fan is secure, pull out both
Window Grabber |
|
Expander |
Panel |
Figure 2 |
enchufe alrededor del Cordón adyacente. |
4. Para volver a instalar la Puerta del Almacenaje del Cordón, alinear |
las Proyecciones Pequeñas (2) con sus Ranuras respectivas, mover |
la Puerta hacia abajo y empujar hasta que las Proyecciones de Aflojar |
agarren. (Figura 4) |
ALMACENAJE
Limpiar el Ventilador como se instruye y guardarlo en lugar limpio y seco.
Cordón |
|
Canal | Figura 5 |
|
4. Do not operate Fan with a damaged Cord or Plug, after a malfunction, |
or if it has been dropped or damaged in any manner. |
5. To disconnect Plug from outlet, always grip Plug and pull it away from outlet, never pull with Cord.
6. | Do not operate in the presence of explosive and/or flammable fumes. |
7. | Do not place Fan or any parts near an open flame, cooking or other |
| heating appliances. |
8. | The use of attachments not recommended or sold by the |
OPERATING INSTRUCTIONS
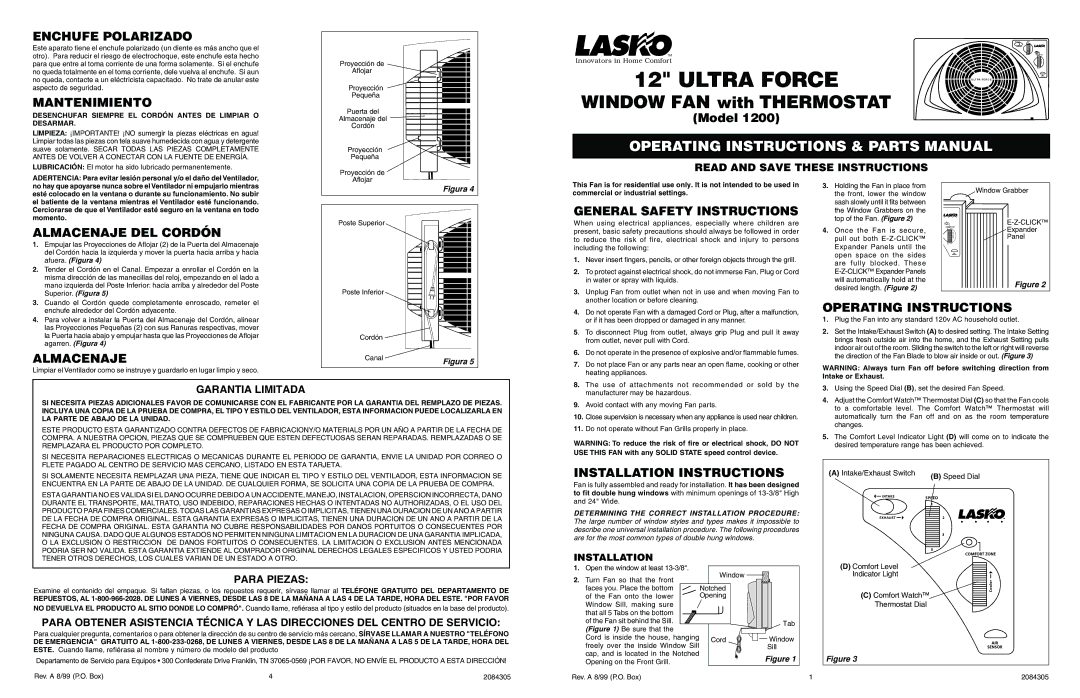
1.Plug the Fan into any standard 120v AC household outlet.
2.Set the Intake/Exhaust Switch (A) to desired setting. The Intake Setting brings fresh outside air into the home, and the Exhaust Setting pulls indoor air out of the room. Sliding the switch to the left or right will reverse the direction of the Fan Blade to blow air inside or out. (Figure 3)
WARNING: Always turn Fan off before switching direction from Intake or Exhaust.
GARANTIA LIMITADA
SI NECESITA PIEZAS ADICIONALES FAVOR DE COMUNICARSE CON EL FABRICANTE POR LA GARANTIA DEL REMPLAZO DE PIEZAS. INCLUYA UNA COPIA DE LA PRUEBA DE COMPRA, EL TIPO Y ESTILO DEL VENTILADOR, ESTA INFORMACION PUEDE LOCALIZARLA EN LA PARTE DE ABAJO DE LA UNIDAD.
ESTE PRODUCTO ESTA GARANTIZADO CONTRA DEFECTOS DE FABRICACIONY/O MATERIALS POR UN AÑO A PARTIR DE LA FECHA DE COMPRA. A NUESTRA OPCION, PIEZAS QUE SE COMPRUEBEN QUE ESTEN DEFECTUOSAS SERAN REPARADAS. REMPLAZADAS O SE REMPLAZARA EL PRODUCTO POR COMPLETO.
SI NECESITA REPARACIONES ELECTRICAS O MECANICAS DURANTE EL PERIODO DE GARANTIA, ENVIE LA UNIDAD POR CORREO O
| manufacturer may be hazardous. |
9. | Avoid contact with any moving Fan parts. |
10. | Close supervision is necessary when any appliance is used near children. |
11. | Do not operate without Fan Grills properly in place. |
WARNING: To reduce the risk of fire or electrical shock, DO NOT USE THIS FAN with any SOLID STATE speed control device.
3.Using the Speed Dial (B), set the desired Fan Speed.
4.Adjust the Comfort Watch™ Thermostat Dial (C) so that the Fan cools to a comfortable level. The Comfort Watch™ Thermostat will automatically turn the Fan off and on as the room temperature changes.
5.The Comfort Level Indicator Light (D) will come on to indicate the desired temperature range has been achieved.
FLETE PAGADO AL CENTRO DE SERVICIO MAS CERCANO, LISTADO EN ESTA TARJETA.
SI SOLAMENTE NECESITA REMPLAZAR UNA PIEZA, TIENE QUE INDICAR EL TIPO Y ESTILO DEL VENTILADOR, ESTA INFORMACION SE ENCUENTRA EN LA PARTE DE ABAJO DE LA UNIDAD. DE CUALQUIER FORMA, SE SOLICITA UNA COPIA DE LA PRUEBA DE COMPRA.
ESTA GARANTIA NO ES VALIDA SI EL DANO OCURRE DEBIDO A UN ACCIDENTE, MANEJO, INSTALACION, OPERSCION INCORRECTA, DANO DURANTE EL TRANSPORTE, MALTRATO, USO INDEBIDO, REPARACIONES HECHAS O INTENTADAS NO AUTHORIZADAS, O EL USO DEL PRODUCTO PARA FINES COMERCIALES. TODAS LAS GARANTIAS EXPRESAS O IMPLICITAS, TIENEN UNA DURACION DE UN ANO A PARTIR DE LA FECHA DE COMPRA ORIGINAL. ESTA GARANTIA EXPRESAS O IMPLICITAS, TIENEN UNA DURACION DE UN ANO A PARTIR DE LA FECHA DE COMPRA ORIGINAL. ESTA GARANTIA NO CUBRE RESPONSABILIDADES POR DANOS PORTUITOS O CONSECUENTES POR NINGUNA CAUSA. DADO QUE ALGUNOS ESTADOS NO PERMITEN NINGUNA LIMITACION EN LA DURACION DE UNA GARANTIA IMPLICADA, O LA EXCLUSION O RESTRICCION DE DANOS FORTUITOS O CONSECUENTES. LA LIMITACION O EXCLUSION ANTES MENCIONADA PODRIA SER NO VALIDA. ESTA GARANTIA EXTIENDE AL COMPRADOR ORIGINAL DERECHOS LEGALES ESPECIFICOS Y USTED PODRIA TENER OTROS DERECHOS, LOS CUALES VARIAN DE UN ESTADO A OTRO.
PARA PIEZAS:
Examine el contenido del empaque. Si faltan piezas, o los repuestos requerir, sírvase llamar al TELÉFONE GRATUITO DEL DEPARTAMENTO DE
REPUESTOS, AL
NO DEVUELVA EL PRODUCTO AL SITIO DONDE LO COMPRÓ". Cuando llame, refiérasa al tipo y estilo del producto (situados en la base del producto).
PARA OBTENER ASISTENCIA TÉCNICA Y LAS DIRECCIONES DEL CENTRO DE SERVICIO:
Para cualquier pregunta, comentarios o para obtener la dirección de su centro de servicio más cercano, SÍRVASE LLAMAR A NUESTRO "TELÉFONO
DE EMERGENCIA" GRATUITO AL
Departamento de Servicio para Equipos • 300 Confederate Drive Franklin, TN
Rev. A 8/99 (P.O. Box) | 4 | 2084305 |
INSTALLATION INSTRUCTIONS
Fan is fully assembled and ready for installation. It has been designed to fit double hung windows with minimum openings of
DETERMINING THE CORRECT INSTALLATION PROCEDURE: The large number of window styles and types makes it impossible to describe one universal installation procedure. The following procedures are for the most common types of double hung windows.
INSTALLATION
1.Open the window at least
2. Turn Fan so that the front | Window |
|
|
| |
faces you. Place the bottom | Notched |
|
of the Fan onto the lower | Opening |
|
Window Sill, making sure |
|
|
that all 5 Tabs on the bottom |
|
|
of the Fan sit behind the Sill. |
| Tab |
(Figure 1) Be sure that the |
| |
|
| |
Cord is inside the house, hanging | Cord | Window |
freely over the inside Window Sill |
| Sill |
cap, and is located in the Notched |
| Figure 1 |
Opening on the Front Grill. |
| |
|
| |
Rev. A 8/99 (P.O. Box) |
|
|
| (A) Intake/Exhaust Switch | (B) Speed Dial |
|
| |
| (D) Comfort Level |
|
| Indicator Light |
|
| (C) Comfort Watch™ |
|
| Thermostat Dial |
|
| Figure 3 |
|
1 |
| 2084305 |