MODEL 1885

PASO 1: ARMADO DE LA TUBERÍA

PASO 4: ENSAMBLE DEL ASPAY REJILLA

OPERATION

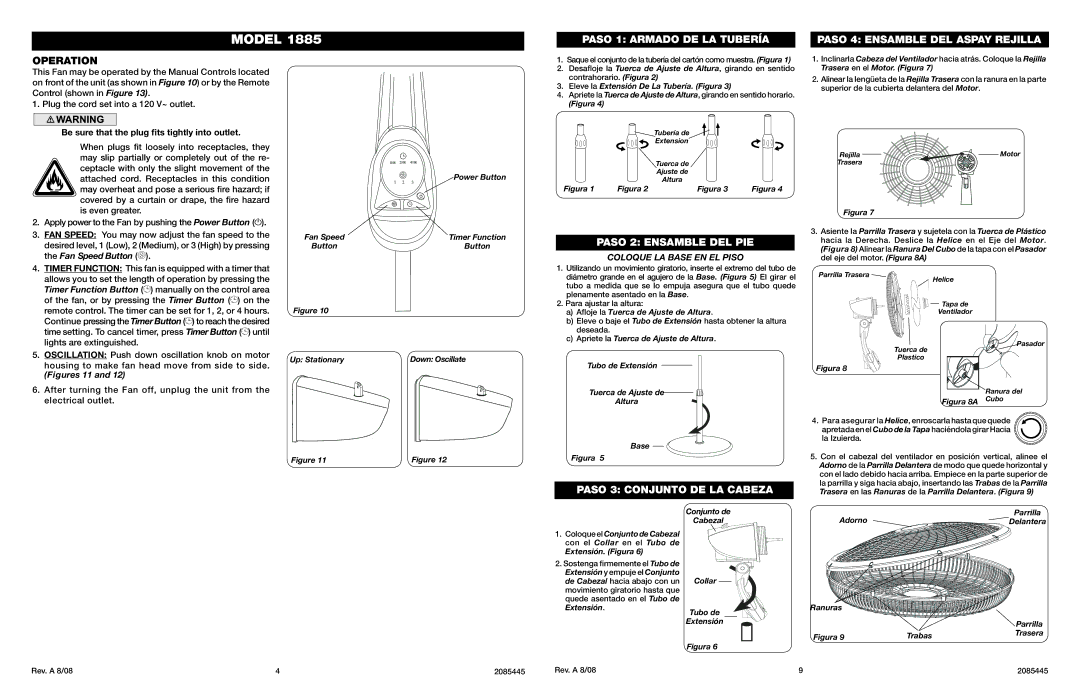
This Fan may be operated by the Manual Controls located on front of the unit (as shown in Figure 10) or by the Remote Control (shown in Figure 13).

1. Plug the cord set into a 120 V~ outlet.

Be sure that the plug fits tightly into outlet.

When plugs fit loosely into receptacles, they may slip partially or completely out of the re- ceptacle with only the slight movement of the attached cord. Receptacles in this condition may overheat and pose a serious fire hazard; if covered by a curtain or drape, the fire hazard

Power Button

1.Saque el conjunto de la tubería del cartón como muestra. (Figura 1)

2.Desafloje la Tuerca de Ajuste de Altura, girando en sentido contrahorario. (Figura 2)

3.Eleve la Extensión De La Tubería. (Figura 3)

4.Apriete la Tuerca de Ajuste de Altura, girando en sentido horario.

(Figura 4)

Tubería de

Extension

Tuerca de

Ajuste de

Altura

Figura 1

Figura 2

Figura 3

Figura 4

1.Inclinarla Cabeza del Ventilador hacia atrás. Coloque la Rejilla Trasera en el Motor. (Figura 7)

2.Alinear la lengüeta de la Rejilla Trasera con la ranura en la parte superior de la cubierta delantera del Motor.

Rejilla

Motor

Trasera


is even greater.

2.

Apply power to the Fan by pushing the Power Button ( ).

3.

FAN SPEED: You may now adjust the fan speed to the


desired level, 1 (Low), 2 (Medium), or 3 (High) by pressing


the Fan Speed Button ( ).

Fan Speed

Timer Function

Button

Button

PASO 2: ENSAMBLE DEL PIE

COLOQUE LA BASE EN EL PISO

Figura 7

3.Asiente la Parrilla Trasera y sujetela con la Tuerca de Plástico hacia la Derecha. Deslice la Helice en el Eje del Motor. (Figura 8) Alinear la Ranura Del Cubo de la tapa con el Pasador del eje del motor. (Figura 8A)

4.

TIMER FUNCTION: This fan is equipped with a timer that


allows you to set the length of operation by pressing the


Timer Function Button ( ) manually on the control area


of the fan, or by pressing the Timer Button ( ) on the


remote control. The timer can be set for 1, 2, or 4 hours.


Continue pressing the Timer Button ( ) to reach the desired


time setting. To cancel timer, press Timer Button ( ) until


lights are extinguished.

5.

OSCILLATION: Push down oscillation knob on motor


housing to make fan head move from side to side.


(Figures 11 and 12)

6.

After turning the Fan off, unplug the unit from the


electrical outlet.

Figure 10

Up: Stationary

Down: Oscillate

1.Utilizando un movimiento giratorio, inserte el extremo del tubo de diámetro grande en el agujero de la Base. (Figura 5) El girar el tubo a medida que se lo empuja asegura que el tubo quede plenamente asentado en la Base.

2.Para ajustar la altura:

a)Afloje la Tuerca de Ajuste de Altura.

b)Eleve o baje el Tubo de Extensión hasta obtener la altura deseada.

c)Apriete la Tuerca de Ajuste de Altura.

Tubo de Extensión

Tuerca de Ajuste de

Altura

Parrilla Trasera

Helice


Tapa de

Ventilador

Tuerca de

Plastico

Figura 8

Figura 8A

Pasador

Ranura del

Cubo

Base

4. Para asegurar la Helice, enroscarla hasta que quede apretada en el Cubo de la Tapa haciéndola girar Hacia la Izuierda.

Figure 11

Figure 12

Figura 5

PASO 3: CONJUNTO DE LA CABEZA

5.Con el cabezal del ventilador en posición vertical, alinee el Adorno de la Parrilla Delantera de modo que quede horizontal y con el lado debido hacia arriba. Empiece en la parte superior de la parrilla y siga hacia abajo, insertando las Trabas de la Parrilla Trasera en las Ranuras de la Parrilla Delantera. (Figura 9)

1.Coloque el Conjunto de Cabezal con el Collar en el Tubo de

Extensión. (Figura 6)

2.Sostenga firmemente el Tubo de Extensión y empuje el Conjunto de Cabezal hacia abajo con un movimiento giratorio hasta que quede asentado en el Tubo de Extensión.

Conjunto de

Cabezal

Collar

Tubo de Extensión

Adorno

Parrilla

Delantera

Ranuras


Parrilla

Figura 9

Trabas

Trasera


Rev. A 8/08

4

2085445

Figura 6

Rev. A 8/08

9

2085445

Page 4
Image 4
Lasko 1885 manual Operation, Paso 2 Ensamble DEL PIE, Paso 3 Conjunto DE LA Cabeza

1885 specifications

The Lasko 1885 is a powerful and efficient oscillating ceramic space heater designed to provide personalized comfort and warmth in various settings. With its combination of sleek design and advanced features, the Lasko 1885 stands out in the market of space heaters.

One of the key features of the Lasko 1885 is its powerful ceramic heating element, which quickly warms up any room, ensuring that you feel the heat within minutes of turning it on. This type of heating technology allows for more efficient energy use, as ceramic heaters can maintain heat longer while using less power compared to traditional metal coil heaters. The result is a comfortable environment with lower energy costs.

The Lasko 1885 also includes a built-in oscillation function that allows the heater to distribute warmth evenly throughout the room. By automatically rotating from side to side, it ensures that no cold spots are left untouched, making it an excellent choice for larger spaces. This oscillation feature can be especially beneficial in living areas or open floor plans, where heat distribution can be challenging.

Another notable characteristic is the adjustable thermostat, which allows users to set their desired temperature with precision. This feature enhances user control and energy efficiency, as the heater will maintain the selected temperature without excessive energy consumption. Additionally, the Lasko 1885 comes with multiple heat settings, including high, low, and a fan-only option, providing versatility for different seasons and preferences.

Safety remains a top priority with the Lasko 1885. The heater is equipped with an automatic overheat protection feature that shuts off the unit if it reaches an unsafe temperature, preventing potential fire hazards. It also features a cool-touch exterior, allowing users to handle the heater safely without the risk of burns.

In terms of design, the Lasko 1885 boasts a modern and compact aesthetic that fits seamlessly into any home or office decor. Its lightweight design and convenient carry handle make it easy to move from room to room as needed, adapting to changing comfort needs.

In summary, the Lasko 1885 stands out for its combination of efficient ceramic heating technology, user-friendly features, and safety measures, making it an ideal choice for anyone seeking reliable warmth during colder months. Its oscillation, adjustable thermostat, and portable design contribute to an enhanced user experience, promoting comfort and convenience in any space.