GENERAL SAFETY INFORMATION
When using electrical appliances, basic precautions should always be followed to reduce the risk of fire, elec-
trical shock and injury to persons, including the following:
Read all instructions before using this Fan.
1.Make certain the power source conforms to the electrical requirements of the Fan.
2.Make certain that the room is equipped with a working smoke detector.
3.Use this Fan only as described in this manual. Any other use not recommended by the manufacturer may cause fire, electrical shock, or injury to persons.
4.To reduce the risk of personal injury and electric shock, the Fan should not be played with or placed where small children can reach it.
5.Unplug power cord before installing, servicing, or moving the Fan.
DO NOT DEPEND ON THE ON/OFF SWITCH AS THE SOLE MEANS OF DISCONNECTING POWER WHEN SERVICING OR MOVING THE FAN. ALWAYS UNPLUG THE POWER CORD. ALWAYS TURN OFF AND UNPLUG FAN BEFORE LEAVING THE AREA. NEVER LEAVE CHILDREN UNATTENDED WHEN THE FAN IS ON OR PLUGGED IN.
6.This Fan must NOT be used in potentially dangerous locations such as flammable, explosive, chemical-laden or wet atmospheres where gasoline, paint or flammable liquids are used or stored.
7.DO NOT use Fan in or near a window. Rain may create an electrical hazard.
8.Completely assemble Fan, according to instructions, before connecting to power supply.
This appliance has a polarized plug (one blade is wider than the other). To reduce the risk of electric shock, this plug is intended to fit in a polarized outlet only one way. Match wide blade of plug to wide slot. Fully insert. If the plug does not fit fully in the outlet, reverse the plug. If it still does not fit, contact a qualified electrician. DO NOT attempt to defeat this safety feature. This plug is a safety feature. It contains a safety device (fuse) that should not be removed. Discard product if the attachment plug is damaged. To reduce the risk of fire, electric shock and personal injury, DO NOT remove, replace, repair or tamper with the originally supplied plug. If the Fan does not function properly, it may be due to the safety device incorporated in this plug. Call 800-233-0268, Monday - Friday, between 8:00 a.m. and 5:00 p.m. Eastern. If the plug warning label is missing or damaged, call the toll free number for a replacement label.
9.Where possible, avoid the use of extension cords because the extension cord may overheat and cause a fire. If you must use an extension cord, minimize the risk of overheating by using the shortest cord possible and ensuring that it is UL listed. NEVER use a single extension cord to operate more than one Fan. Do not plug Fan into any other cord connected device, such as a power strip, cord reel, surge protector, multiple outlet adapters or outlet-type air fresheners. The use of such devices may create a fire hazard.
10.NEVER operate any Fan with a damaged cord or plug or after the Fan malfunctions, has been dropped or damaged in any manner.
11.NEVER insert or allow fingers or foreign objects to enter any ventilation or exhaust opening as it may cause an electric shock or fire, or damage the Fan. To reduce the risk of fire, DO NOT block or tamper with the Fan in any manner while it is in operation.
12.Always place the Fan on a stable, flat, level surface when operating to avoid the chance of the Fan overturning. Locate the Power Cord so the Fan or other objects are not resting on it. Do not run cord under carpeting. Do not cover cord with throw rugs, runners, or similar coverings. Do not route cord under furniture or appliances. Arrange cord away from traffic area and where it will not be tripped over.
13.This Fan is not intended for use in wet or damp locations. Never locate a Fan where it may fall into a bathtub or other water container. NEVER use Fan where flammable liquids are used or stored.
14.NEVER use Fan outdoors.
15.Remote controls for other appliances or electronic equipment can sometimes interfere with the operation of this Fan. If this occurs, move the fan to another location.
16.Keep Fan remote unit away from chairs and your bed where it may be sat or laid upon and inadvertently turn on the Fan.
17.This Fan is not suitable for use in agricultural facilities including areas where livestock, poultry or other animals are confined. Please refer to National Electric Code (NEC) Article 547-7 (2008), or ap- plicable state or local codes or standards relating to electrical requirements for Agricultural Buildings. THIS FAN DOES NOT MEET THE REQUIREMENTS OF NEC ARTICLE 547-7 (2008).
18.This Fan is not suitable for use in hazardous locations. Please refer to National Electric Code (NEC) Article 500 or applicable state or local codes or standards relating to electrical requirements for Hazardous locations. THIS FAN DOES NOT MEET THE REQUIREMENTS OF NEC ARTICLE 500 (2008).
REDUCE THE RISK OF FIRE OR ELECTRIC SHOCK - DO NOT USE THIS FAN WITH ANY SOLID STATE
SPEED CONTROL DEVICES.
SAVE THESE INSTRUCTIONS
INFORMACIÓN GENERAL DE SEGURIDAD
Al usar artefactos eléctricos, siempre deben tomarse precauciones básicas para reducir el riesgo de incendio,
choque eléctrico y lesiones a personas, incluyendo las siguientes:
Lea todas las instrucciones antes de usar este Ventilador.
1. | Asegúrese que la fuente de alimentación coincida con los requerimientos eléctricos del Ventilador. |
2. | Asegúrese que la habitación esté equipada con un detector de humo en funcionamiento. |
3. | Use este Ventilador únicamente como se describe en este manual. Cualquier otro uso no recomendado por el fabricante puede causar incendio, choque eléctrico o lesiones a personas. |
4. | Para reducir el riesgo de lesiones a personas y choque eléctrico, el Ventilador no debe ser encendido o colocado donde los niños pequeños puedan alcanzarlo. |
TOOLS REQUIRED FOR ASSEMBLY (not included)- #2 Phillips Head Screwdriver
ASSEMBLY
1.For ease of assembly, lay the Fan down so that the front grill and control panel are facing up.
2.Assemble the Support Base Halves by interlocking the bosses on Support Base A into the Boss Holes on Support Base B. Thread the Power Supply Cord through the large hole in the center of the Support Base Assembly. (Figure 1)
3.Secure (2) #8 X 1/2" screws into the two outer holes in the bottom of the Base. (Figure 2)
4.Align the Support Base Assembly with the Motor Base, noting that the cord channel on the bottom of the support base assembly should be towards the back of the Fan. Attach the Support Base Assembly to the Motor Base with 1/2" long M5 screws. Make certain to align the Key on the Support Base Assembly with the Locating Notch on the Motor Base. (Figure 1) Gently pull any excess slack of the Power Supply Cord and place it in the Wire Locating Trough. (Figure 3)
HERRAMIENTAS NECESARIAS PARA EL ARMADO (no incluida) | - |
Destornillador de Cabeza Phillips # 2 | |
ARMADO | |
1.Para facilitar el armado, recueste el Ventilador de modo que la parrilla negra y el tablero de control den hacia arriba.
2.Arme las Mitades de la Base de Apoyo encastrando las Puntas de la Base de Apoyo A con los Orificios para Puntas en la Base de Apoyo B. Conecte el Cable Eléctrico a través del orificio grande en el centro de la Montura de la Base de Apoyo. (Figura 1)
3.Asegure (2) #8 X 1/2" Tornillos en los dos orificios externos en la parte inferior de la Base. (Figura 2)
4.Alinee la Montura de la Base de Apoyo con la Base del Motor, teniendo en cuenta que la ranura del cable en la parte inferior de la montura de la base de apoyo debe apuntar hacia la parte posterior del Ventilador. Adose la Montura de la Base de Apoyo a la Base del Motor con Tornillos Largos M5 de 1/2". Cerciórese de alinear la Llave del Conjunto de la Base de Soporte con la Muesca Localizadora de la Base Del Motor. (Figura 1) Suavemente tire del Cable Eléctrico para evitar que quede flojo y colóquelo en el Orificio de Colocación del Cable. (Figura 3)
| Support Base A | Power Supply |
| Base de Soporte A | Cord |
| Cable Eléctrico |
| |
| | Key |
| | Llave |
| Support | |
| Base B | Bosses |
| Base de Soporte B |
| | Copas |
| Figure 1 | Figura 1 |
| Support Base | |
| Assembly | |
| Conjunto de la | |
| Base de Soporte | |
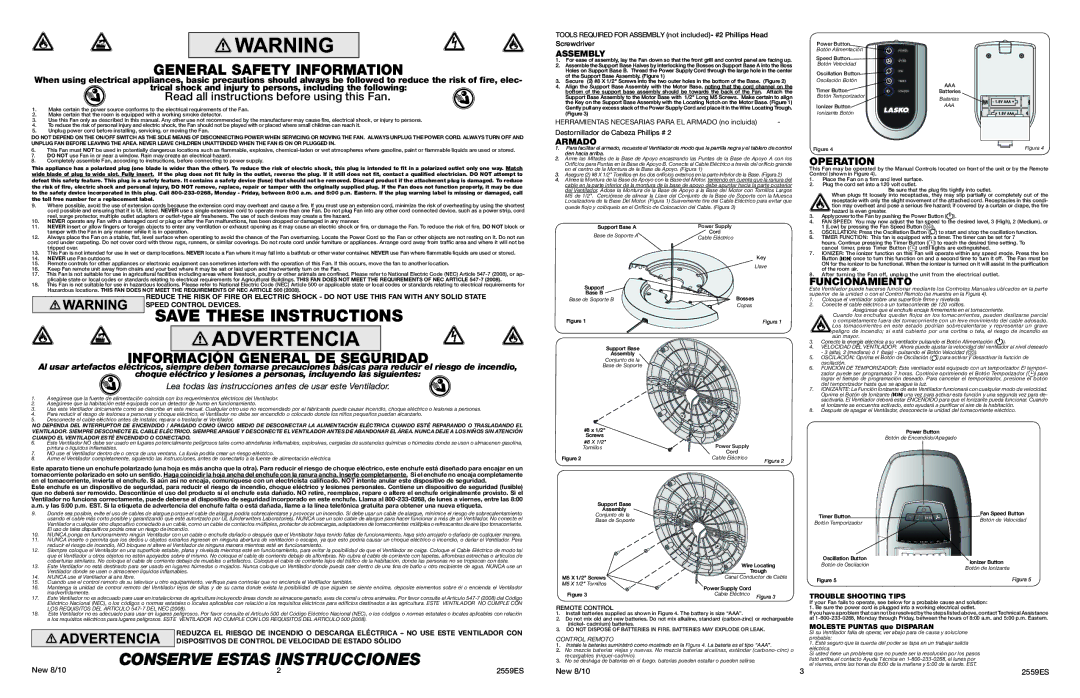
Power Button | | |
Botón Alimentación | POWER | |
Speed Button | SPEED | |
Botón Velocidad | |
| |
Oscillation Button | OSC | |
| |
Oscilación Botón | TIMER | AAA |
Timer Button | |
LIONIZERUV S | Batteries |
Botón Temporizador | | Baterías |
| |
Ionizer Button | | AAA |
Ionizante Botón | | |
Figure 4 | | Figura 4 |
OPERATION
This Fan may be operated by the Manual Controls located on front of the unit or by the Remote Control (shown in Figure 4).
1.Place the Fan on a firm and level surface.
2.Plug the cord set into a 120 volt outlet.
Be sure that the plug fits tightly into outlet.
When plugs fit loosely into receptacles, they may slip partially or completely out of the receptacle with only the slight movement of the attached cord. Receptacles in this condi- tion may overheat and pose a serious fire hazard; if covered by a curtain or drape, the fire hazard is even greater.
3.Apply power to the Fan by pushing the Power Button ( ).
4.FAN SPEED: You may now adjust the fan speed to the desired level, 3 (High), 2 (Medium), or
| 1 (Low) by pressing the Fan Speed Button ( | ). |
5. | OSCILLATION: Press the Oscillation Button ( | ) to start and stop the oscillation function. |
6. | TIMER FUNCTION: This fan is equipped with a timer. The timer can be set for 7 |
| hours. Continue pressing the Timer Button ( | ) to reach the desired time setting. To |
| cancel timer, press Timer Button ( ) until lights are extinguished. |
7. | IONIZER: The ionizer function on this Fan will operate within any speed mode. Press the Ion |
| Button ( ) once to turn this function on and a second time to turn it off. The Fan must be |
| ON for the ionizer to be functional. When the ionizer is turned on it will assist in the purification |
| of the room air. |
8. | After turning the Fan off, unplug the unit from the electrical outlet. |
FUNCIONAMIENTO
Este Ventilador puede hacerse funcionar mediante los Controles Manuales ubicados en la parte superior de la unidad o con el Control Remoto (se muestra en la Figura 4).
1.Coloque el ventilador sobre una superficie firme y nivelada.
2.Conecte el cable eléctrico a un tomacorriente de 120 voltios.
Asegúrese que el enchufe encaje firmemente en el tomacorriente.
Cuando los enchufes quedan flojos en los tomacorrientes, pueden deslizarse parcial o completamente fuera del tomacorriente con un leve movimiento del cable adosado. Los tomacorrientes en este estado podrían sobrecalentarse y representar un grave peligro de incendio; si está cubierto por una cortina o tela, el riesgo de incendio es aún mayor.
3. Conecte la energía eléctrica a su ventilador pulsando el Botón Alimentación ( ).
4.VELOCIDAD DEL VENTILADOR: Ahora puede ajustar la velocidad del ventilador al nivel deseado
- 3 (alta), 2 (mediana) ó 1 (baja) - pulsando el Botón Velocidad ( ).
5. OSCILACIÓN: Oprima el Botón de Oscilación ( ) para activar y desactivar la función de oscilación.
6.FUNCIÓN DE TEMPORIZADOR: Este ventilador está equipado con un temporizador. El tempori- zador puede ser programado 7 horas. Continúe oprimiendo el Botón Temporizador (  ) para lograr el tiempo de programación deseado. Para cancelar el temporizador, presione el botón del temporizador hasta que se apague la luz.
7.IONIZANTE: La Función Ionizante de este Ventilador funcionará con cualquier modo de velocidad. Oprima el Botón de Ionizante (
 ) una vez para activar esta función y una segunda vez para de- sactivarla. El Ventilador deberá estar ENCENDIDO para que el Ionizante pueda funcionar. Cuando el Ionizante se encuentra activado, esto ayudará a purificar el aire de la habitación.
8.Después de apagar el Ventilador, desconecte la unidad del tomacorriente eléctrico.