MODEL 2648

PASO 1: ARMADO DE LA TUBERÍA

PASO 4: ENSAMBLE DEL ASPAY REJILLA

OPERATION

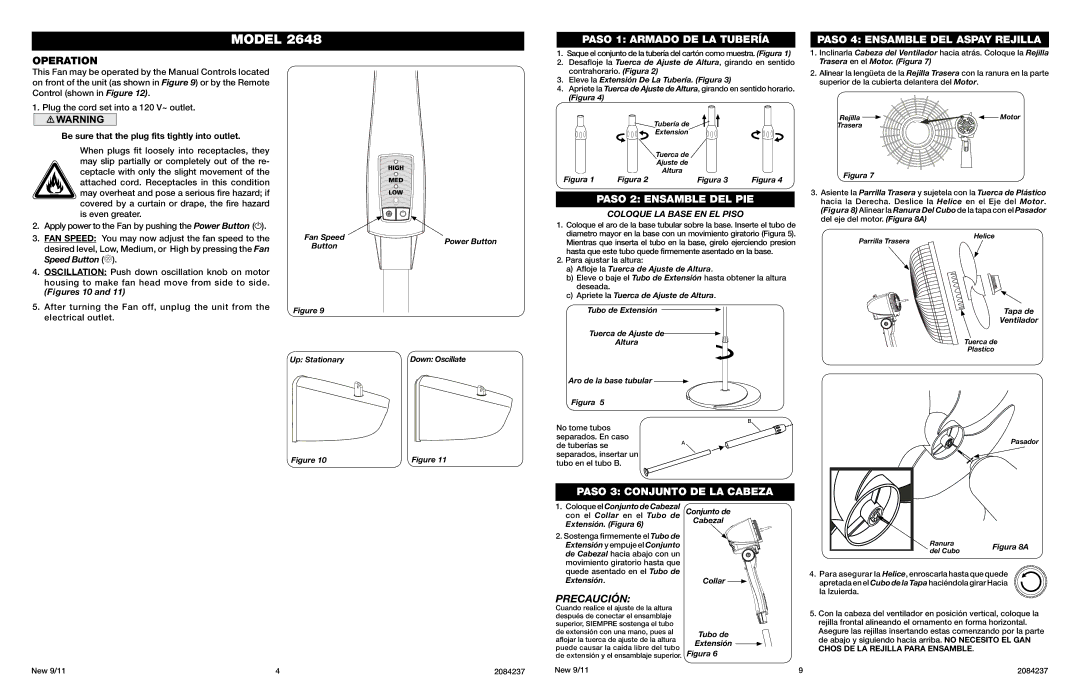
This Fan may be operated by the Manual Controls located on front of the unit (as shown in Figure 9) or by the Remote Control (shown in Figure 12).

1. Plug the cord set into a 120 V~ outlet.

Be sure that the plug fits tightly into outlet.

When plugs fit loosely into receptacles, they may slip partially or completely out of the re- ceptacle with only the slight movement of the attached cord. Receptacles in this condition may overheat and pose a serious fire hazard; if covered by a curtain or drape, the fire hazard is even greater.

2.Apply power to the Fan by pushing the Power Button ().

3.FAN SPEED: You may now adjust the fan speed to the desired level, Low, Medium, or High by pressing the Fan Speed Button ().

4.OSCILLATION: Push down oscillation knob on motor

housing to make fan head move from side to side.

(Figures 10 and 11)

5.After turning the Fan off, unplug the unit from the electrical outlet.

Fan Speed

Power Button

Button


Figure 9

1.Saque el conjunto de la tubería del cartón como muestra. (Figura 1)

2.Desafloje la Tuerca de Ajuste de Altura, girando en sentido contrahorario. (Figura 2)

3.Eleve la Extensión De La Tubería. (Figura 3)

4.Apriete la Tuerca de Ajuste de Altura, girando en sentido horario.

(Figura 4)

Tubería de

Extension

Tuerca de

Ajuste de

Altura

Figura 1

Figura 2

Figura 3

Figura 4

PASO 2: ENSAMBLE DEL PIE

COLOQUE LA BASE EN EL PISO

1.Coloque el aro de la base tubular sobre la base. Inserte el tubo de diametro mayor en la base con un movimiento giratorio (Figura 5). Mientras que inserta el tubo en la base, girelo ejerciendo presion hasta que este tubo quede firmemente asentado en la base.

2.Para ajustar la altura:

a)Afloje la Tuerca de Ajuste de Altura.

b)Eleve o baje el Tubo de Extensión hasta obtener la altura deseada.

c)Apriete la Tuerca de Ajuste de Altura.

Tubo de Extensión

Tuerca de Ajuste de

Altura

1.Inclinarla Cabeza del Ventilador hacia atrás. Coloque la Rejilla Trasera en el Motor. (Figura 7)

2.Alinear la lengüeta de la Rejilla Trasera con la ranura en la parte superior de la cubierta delantera del Motor.

Rejilla

Motor

Trasera


Figura 7

3.Asiente la Parrilla Trasera y sujetela con la Tuerca de Plástico hacia la Derecha. Deslice la Helice en el Eje del Motor. (Figura 8) Alinear la Ranura Del Cubo de la tapa con el Pasador del eje del motor. (Figura 8A)

Parrilla Trasera

Helice


Tapa de

Ventilador

Tuerca de

Plastico

Up: Stationary

Down: Oscillate

Figure 10

Figure 11

Aro de la base tubular

Figura 5

B

No tome tubos separados. En caso

de tuberías seA separados, insertar un

tubo en el tubo B.

PASO 3: CONJUNTO DE LA CABEZA

Pasador

1.Coloque el Conjunto de Cabezal con el Collar en el Tubo de

Extensión. (Figura 6)

2.Sostenga firmemente el Tubo de Extensión y empuje el Conjunto de Cabezal hacia abajo con un movimiento giratorio hasta que quede asentado en el Tubo de Extensión.

Conjunto de

Cabezal

Collar

Ranura

Figura 8A

del Cubo


4. Para asegurar la Helice, enroscarla hasta que quede apretada en el Cubo de la Tapa haciéndola girar Hacia la Izuierda.

PRECAUCIÓN:

Cuando realice el ajuste de la altura después de conectar el ensamblaje superior, SIEMPRE sostenga el tubo de extensión con una mano, pues al aflojar la tuerca de ajuste de la altura puede causar la caída libre del tubo de extensión y el ensamblaje superior.

Tubo de Extensión

Figura 6

5.Con la cabeza del ventilador en posición vertical, coloque la rejilla frontal alineando el ornamento en forma horizontal. Asegure las rejillas insertando estas comenzando por la parte de abajo y siguiendo hacia arriba. NO NECESITO EL GAN CHOS DE LA REJILLA PARA ENSAMBLE.

New 9/11

4

2084237

New 9/11

9

2084237

Page 4
Image 4
Lasko 2648 manual Operation, Paso 2 Ensamble DEL PIE, Paso 3 Conjunto DE LA Cabeza

2648 specifications

The Lasko 2648 is a versatile oscillating tower fan that stands out for its sleek design, which not only complements modern home decor but also delivers powerful air circulation. This fan is particularly popular during the warmer months when efficient air circulation is essential for comfort.

One of its main features is the fan's three quiet speed settings that provide customized airflow. Users can choose between low, medium, and high speeds depending on their needs, ensuring a comfortable atmosphere without the overwhelming noise often associated with traditional fans. The quiet operation makes it an excellent choice for bedrooms, offices, or any space where noise distraction needs to be minimal.

The Lasko 2648 is equipped with a widespread oscillation feature that enhances its ability to circulate air throughout a room. This oscillating capability allows the fan to cover a larger area, providing relief from heat in various parts of the room rather than focusing on a single spot. This characteristic makes it ideal for larger spaces where a single point of airflow may not be sufficient.

The fan also boasts a programmable timer feature, allowing users to set it to run for up to eight hours. This is particularly useful for those who wish to have the fan operate during the night or while they are away from home, adding convenience and energy savings.

In terms of design, the Lasko 2648 fan has a slender profile that makes it easy to fit into tight spaces, whether it's a corner of a room or beside furniture. Its lightweight construction allows for portability, enabling users to move it from room to room with ease.

Safety is also a significant consideration in the design of the Lasko 2648, featuring a fused safety plug that prevents electrical hazards. The fan's sturdy base ensures stability, reducing the risk of tipping over.

Overall, the Lasko 2648 oscillating tower fan combines style, powerful performance, and user-friendly features, making it an excellent solution for anyone looking to improve air circulation and comfort in their living spaces.