MODEL 5397

MODELO 5397

OPERATION (Figures 1 and 2)

The Heater may be operated by the manual controls located on the Heater (as shown in Figure 1) or by your remote control (shown in Figure 2).

1.Place the Heater on a firm, level surface, after assembling per this manual.

CAUTION: Plastic or rubber tabs, like the feet on this unit, may stick to furniture surfaces and/or hardwood floors. The unit may leave a residue that could darken, stain or leave permanent blemishes on the finish of certain furniture surfaces, including wood surfaces, and/or hardwood floors.

2. Plug the cord set into a 120 volt outlet.

Be sure that the plug fits tightly into outlet.

When plugs fit loosely into receptacles, they may slip partially or completely out of the receptacle with only the slight movement of the attached cord. Re- ceptacles in this condition may overheat and pose a serious fire hazard; if covered by a curtain or drape, the fire hazard is even greater.

3.

When the Heater is initially plugged in, there will be a ‘beep’ and


the power light will come on indicating that there is power to the


unit. The power light will remain lit until the Heater is unplugged


from the electrical outlet.

4.

Turn the Heater ON by pressing the ( ).

TIMER FUNCTION

The timer function may be activated when the Heater display is in any function or speed. This function allows you to set the length of time the Heater will run before turning itself off, from 1 hour to 8 hours. Pressing the Timer Button () will increase the length of time by 1 hour each time this button is pressed. After the display reflects 8 hours, pressing the Timer Button () once more will reset the Heater to run continuously. The Heater will turn off when the set time has elapsed. The unit can be turned back on by pressing

the Power Button ().

AUTOMATIC TEMPERATURE CONTROL

The automatic temperature function will only operate on "High" heat ( ). You cannot set the temperature automatically when the unit is in the low heat mode.

1.

To set the room at a specific temperature press the ( ) or ( )


buttons to the desired temperature. The display will now reflect


the ( ) and the temperature will be flashing. The Heater is now


in Auto Temperature Mode.

2.

When you reach the temperature at which you want to set the


unit, the set temperature will flash several times and then the


display will return to indicate the current room temperature and


will gradually change as the room temperature changes. NOTE:

ARMADO (Figuras 1 a 6)

Herramientas Necesarias: Destornillador de Cabeza #2 Phillips (no incluido)

Retire cuidadosamente el Calefactor de su bolsa y caja.

(8) - M5 X 13mm (2) - M4 X 13mm

Tamaño Real De Tornillos

Figura 1

1.Coloque el Cable Eléctrico en la parte inferior del Calefactor. Pase el Cable Eléctrico por el centro del Conjunto de Soporte de Columna.

2.Una el Conjunto de Soporte de Columna a la Base del Motor con (4) tornillos M5 X 13mm. Cerciórese de que la Llave que está en la Base del Motor quede alineada con la Muesca de Ubicación en el Conjunto de Soporte de Columna. (Figura 2)

4.Fije las mitades de la base con (2) tornillos M4 X 13 mm. Pase el Cable Eléctrico por el gran orificio que se encuentra del Conjunto de la Base. NOTA: El canal para cable en la parte inferior de la base debe estar hacia la parte posterior del Calefactor.

(Figure 4)

Cable

Eléctrico

Conjunto de la Base

Cable

Eléctrico

Figura 4

5.

When initially turned on, the Heater will display the current


room temperature in ° Fahrenheit. Press the ( ) and (


) but-


tons at the same time to change the display to ° Celsius. Press


the same two buttons together again to change the display back


to ° Fahrenheit.

6.

Upon turning the Heater on, the unit will be in HIGH heat ( ) (1500


Watts) and will display the current room temperature.

7.

Pressing the (MODE) at this point will set the Heater into LOW


( ) heat.

8.

To turn the Heater OFF, press the ( ) and unplug the unit from


the electrical outlet.


the temperature display does not indicate the temperature of


the heated air being emitted by the heater.

3.

Once the room temperature reaches 2 degrees above the set


temperature, the Heater will shut off. Once the room tempera-


ture reaches 1 degree below the set temperature, the Heater


will turn back on and continue to cycle off and on to maintain


the set temperature.

4.

This function will cancel if the (MODE) button is pressed. The


Heater will now be in High heat ( ) and run continuously.

NOTE: It is normal for the Heater “fan” to run for approximately 15 seconds when the Heater shuts off after reaching the set temperature.

Llave

Base del

Motor

Cable

Eléctrico

5.Alinee el Conjunto de la Base con el Conjunto de Soporte de Columna. Cerciórese de que la Muesca de Ubicación en el Conjunto de Soporte de Columna quede alineada con la Llave en el Conjunto de la Base (Figure 5). Una el Conjunto de la Base al Conjunto de Soporte de Columna con (4) tornillos M5 X 13 mm. Jale suavemente el Cable Eléctrico para que no quede holgado, y colóquelo en el Canal Para Cable del Conjunto de la Base. (Figura 6)

Muesca de

Ubicación

View of Control Panel

Figure 1

OSCILLATION:

Pressing the Oscillation Button () will allow the Heater to oscil- late back and forth. To stop the oscillation, press the Oscillation Button () again. When the Heater is in Automatic Temperature Control, the oscillation function will stop when the set temperature is reached and resume when the Heater turns back on.

REMOTE CONTROL:

All the functions performed with the Remote Control work

identically to the manual controls , except changing from HIGH heat ( ) to LOW heat (). On the Remote Control, the () button replaces the MODE button. (Figure 2)

1.Install the two “AAA” batteries supplied.

2.Do not mix old and new batteries. Do not mix alkaline, standard (carbon-zinc) or rechargeable (nickel-cadmium) batteries.

3.DO NOT DISPOSE OF BATTERIES IN FIRE. BATTERIES MAY EXPLODE OR LEAK.

Front View

Back View

of Remote

of Remote

Figure 2

If you lose your remote control, please call Customer Service to order a replacement at 1-800-233-0268, Monday through Friday, between the hours of 8 a.m. and 5 p.m. EST.

Conjunto de Soporte

de Columna

Figura 2

3.Arme la base enclavando las Protuberancias en los Orificios para Protuberancias. (Figura 3)

Protuberancias

Orificios

Llavepara Protuberancias

Llave

Figura 5

Cable Eléctrico

Conjunto de la Base

Conjunto de

Soporte de

Columna

New 3/10

4

5397ES


Figura 3

Figura 6

New 3/10

9

5397ES

Page 4
Image 4
Lasko 5397 manual Operation Figures 1, Armado Figuras 1 a

5397 specifications

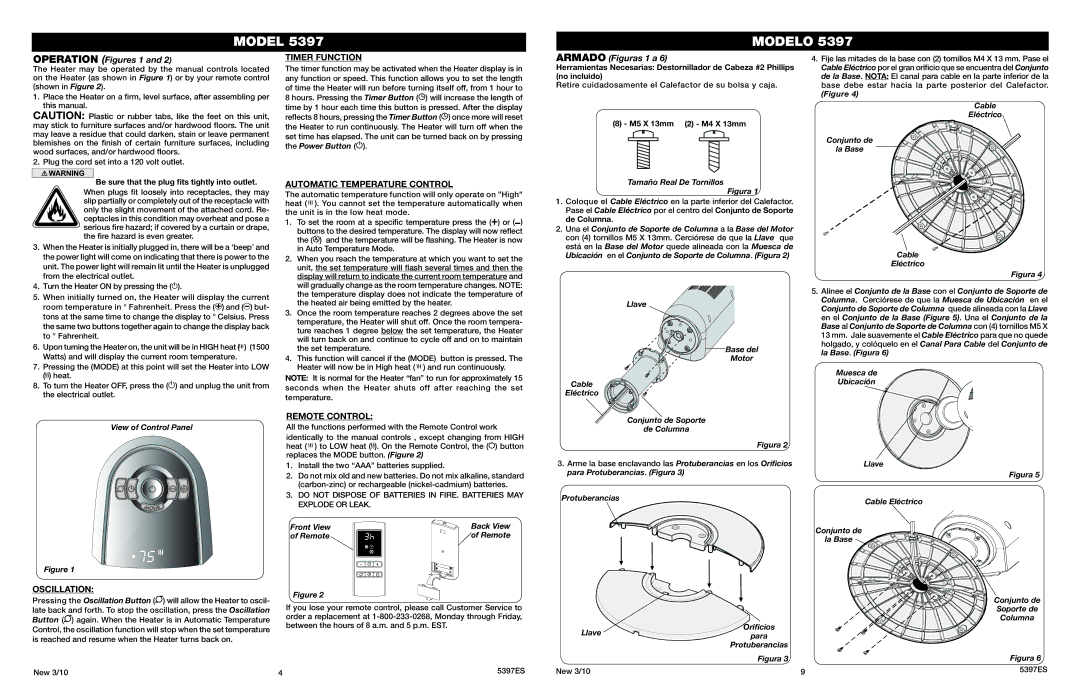
The Lasko 5397 is an innovative and highly functional oscillating tower fan that has garnered attention for its performance and user-friendly design. This fan is ideal for those seeking a reliable cooling solution for their spaces, be it at home or in the office. With its sleek design, the Lasko 5397 fits seamlessly into various room aesthetics while providing efficient airflow.

One of the key features of the Lasko 5397 is its powerful motor, which delivers robust air circulation. The fan offers three quiet speed settings, allowing users to customize their comfort level according to personal preferences and environmental conditions. Whether you desire a gentle breeze for relaxation or a more forceful airflow to combat heat, the Lasko 5397 accommodates all needs.

The fan’s oscillation feature enhances its functionality by allowing it to distribute air across a wider area. This means that a singular positioning of the fan can cool larger rooms effectively, making it a practical choice for living spaces, bedrooms, and work areas. Additionally, the tall tower design maximizes the airflow while taking up minimal floor space, making it suitable for various room layouts.

In terms of technology, the Lasko 5397 includes a remote control feature, offering added convenience for users who want to adjust settings from a distance without needing to get up. This is especially useful during hot summer days when getting up might be less appealing. Moreover, it comes with a programmable timer that allows users to set the fan to operate for a specified duration, ensuring efficient cooling even when the user is away.

The construction of the Lasko 5397 adheres to high safety standards. It features a built-in safety fuse that automatically shuts off the fan in case of overheating, providing peace of mind for users. The fan also includes a dust filter to enhance air quality by capturing dust and allergens, making it a fitting choice for those with respiratory concerns.

In summary, the Lasko 5397 oscillating tower fan is a smart investment for anyone looking to enhance their comfort during warm weather. With its powerful airflow, customizable speed settings, oscillation feature, remote control convenience, programmable timer, and safety mechanisms, this fan exemplifies efficiency and practicality.