GENERAL SAFETY INFORMATION
When using electrical appliances, basic precautions should always be followed to reduce the
risk of fire, electrical shock and injury to persons, including the following:
 Read all instructions before using this Heater.
1.DO NOT PLUG HEATER INTO ANY OTHER CORD CONNECTED DEVICE, SUCH AS A POWER STRIP, SURGE PROTECTOR, MUL- TIPLE OUTLET ADAPTER, CORD REEL OR
2.AVOID THE USE OF EXTENSION CORDS BECAUSE THE EXTENSION CORD MAY OVERHEAT AND CAUSE A RISK OF FIRE. HOWEVER, IF YOU HAVE TO USE AN EXTENSION CORD, MINIMIZE THE RISK OF OVERHEATING BY USING THE SHORTEST CORD POSSIBLE AND BY ENSURING THAT IT IS UL LISTED. THE CORD SHALL BE A
WARNING: Faulty wall outlet connections may cause the wall outlet to overheat. Be sure that heater plug fits tightly into outlet be- fore each use. During use, check to make certain the Heater plug is not overheating. If necessary have a qualified electrician check and/or replace the wall outlet.
3.Use this Heater only as described in this manual. Any other use not recommended by the manufacturer may cause fire, electrical shock, or injury to persons.
4.Make certain that the room is equipped with a working smoke detector.
5.Make certain that the power source conforms to the electrical requirements of the Heater.
6.Extreme caution is necessary when any Heater is used by or near children or invalids and whenever the Heater is left operating unattended.
7.This appliance has a polarized plug (one blade is wider than the other). To reduce the risk of electric shock, this plug is intended to fit in a polarized outlet only one way. If the plug does not fit fully in the outlet, reverse the plug. If it still does not fit, contact a qualified electrician. Do not attempt to defeat this safety feature.
8.Do not operate any Heater with a damaged cord or plug or after the Heater malfunctions, or has been dropped or damaged in any manner. Please contact Customer Service at
9.To disconnect Heater, turn controls to OFF, then remove plug from outlet.
10.Always unplug Heater when not in use. Unplug power cord before servicing or moving the Heater.
11.Do not insert or allow fingers or foreign objects to enter any ventilation or exhaust opening as it may cause an electric shock, fire, or damage the Heater. Do not block or tamper with the Heater in any manner while it is in operation.
12.To prevent a possible fire, do not block air intakes or exhaust in any manner. Do not place on soft surfaces, like a bed, where openings may become blocked.
13.Always place the Heater on a stable, flat, level surface when operating, to avoid the chance of the Heater overturning. Locate the Power Cord so the Heater or other objects are not resting on it. DO NOT run Power Cord under carpeting. DO NOT cover Power Cord with throw rugs, runners, or the like. Arrange Power Cord away from room traffic and where it will not be tripped over.
DO NOT DEPEND ON THE ON/OFF SWITCH AS THE SOLE MEANS OF DISCONNECTING POWER WHEN SERVICING OR MOVING THE HEATER. ALWAYS UNPLUG THE POWER CORD. ALWAYS TURN OFF AND UNPLUG HEATER BEFORE LEAVING THE AREA. NEVER LEAVE CHILDREN UNATTENDED WHEN THE HEATER IS ON OR PLUGGED IN.
14.This Heater is HOT when in use. To avoid burns, do not let bare skin touch hot surfaces. Always use handle when moving this Heater. Keep combustible materials, such as furniture, pillows, bedding, papers, clothes and curtains at least 3 feet (0.9 m) from the front of the Heater and keep them at least 1 foot (0.3 m) from the sides and rear.
15.A Heater has hot and arcing or sparking parts inside. DO NOT use the Heater in areas where gasoline, paint, or flammable liquids are used or stored. DO NOT use Heater in locations where flammable or explosive chemicals are stored, or in wet atmospheres. This Heater is intended for general use ONLY.
16.This Heater is not intended for use in wet or damp locations. This Heater is not intended for use in bathrooms, laundry areas and similar indoor locations. NEVER locate a Heater where it may fall into a bathtub or other water container.
17.DO NOT use Heater outdoors.
18.This Heater is not suitable for use in agricultural facilities including areas where livestock, poultry or other animals are confined. Please refer to National Electric Code (NEC) Articles
19.This Heater is not suitable for use in hazardous locations. Please refer to National Electric Code (NEC) Article 500 or applicable state or local codes or standards relating to electrical requirements for Hazardous locations. THIS HEATER DOES NOT MEET THE
REQUIREMENTS OF NEC ARTICLE 500 (2002).
WARNING: REDUCE THE RISK OF FIRE OR ELECTRIC SHOCK – DO NOT USE THIS HEATER WITH ANY SOLID STATE SPEED CONTROL DEVICES.
SAVE THESE INSTRUCTIONS
Rev. B 5/07 | 2 | 6410ES |
MODELO 6410
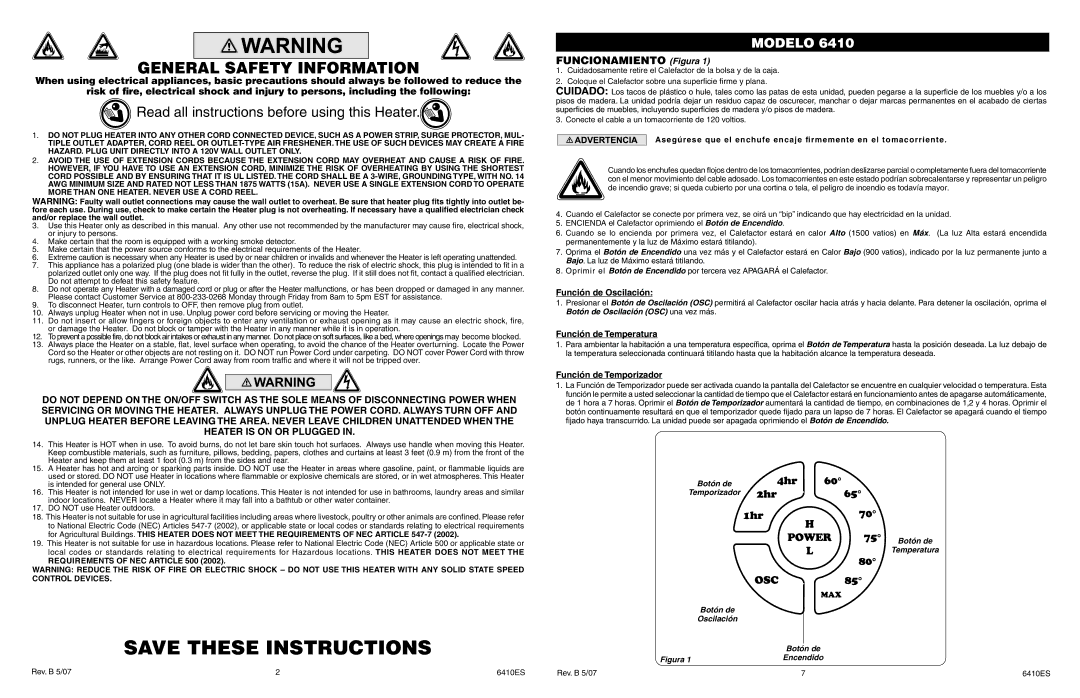
FUNCIONAMIENTO (Figura 1)
1.Cuidadosamente retire el Calefactor de la bolsa y de la caja.
2.Coloque el Calefactor sobre una superficie firme y plana.
CUIDADO: Los tacos de plástico o hule, tales como las patas de esta unidad, pueden pegarse a la superficie de los muebles y/o a los pisos de madera. La unidad podría dejar un residuo capaz de oscurecer, manchar o dejar marcas permanentes en el acabado de ciertas superficies de muebles, incluyendo superficies de madera y/o pisos de madera.
3. Conecte el cable a un tomacorriente de 120 voltios.
Asegúrese que el enchufe encaje firmemente en el tomacorriente.
Cuando los enchufes quedan flojos dentro de los tomacorrientes, podrían deslizarse parcial o completamente fuera del tomacorriente con el menor movimiento del cable adosado. Los tomacorrientes en este estado podrían sobrecalentarse y representar un peligro de incendio grave; si queda cubierto por una cortina o tela, el peligro de incendio es todavía mayor.
4.Cuando el Calefactor se conecte por primera vez, se oirá un “bip” indicando que hay electricidad en la unidad.
5.ENCIENDA el Calefactor oprimiendo el Botón de Encendido.
6.Cuando se lo encienda por primera vez, el Calefactor estará en calor Alto (1500 vatios) en Máx. (La luz Alta estará encendida permanentemente y la luz de Máximo estará titilando).
7.Oprima el Botón de Encendido una vez más y el Calefactor estará en Calor Bajo (900 vatios), indicado por la luz permanente junto a Bajo. La luz de Máximo estará titilando.
8.Oprimir el Botón de Encendido por tercera vez APAGARÁ el Calefactor.
Función de Oscilación:
1.Presionar el Botón de Oscilación (OSC) permitirá al Calefactor oscilar hacia atrás y hacia delante. Para detener la oscilación, oprima el Botón de Oscilación (OSC) una vez más.
Función de Temperatura
1.Para ambientar la habitación a una temperatura específica, oprima el Botón de Temperatura hasta la posición deseada. La luz debajo de la temperatura seleccionada continuará titilando hasta que la habitación alcance la temperatura deseada.
Función de Temporizador
1.La Función de Temporizador puede ser activada cuando la pantalla del Calefactor se encuentre en cualquier velocidad o temperatura. Esta función le permite a usted seleccionar la cantidad de tiempo que el Calefactor estará en funcionamiento antes de apagarse automáticamente, de 1 hora a 7 horas. Oprimir el Botón de Temporizador aumentará la cantidad de tiempo, en combinaciones de 1,2 y 4 horas. Oprimir el botón continuamente resultará en que el temporizador quede fijado para un lapso de 7 horas. El Calefactor se apagará cuando el tiempo fijado haya transcurrido. La unidad puede ser apagada oprimiendo el Botón de Encendido.
Botón de
Temporizador
Botón de
Temperatura
Botón de
Oscilación
| Botón de |
|
Figura 1 | Encendido |
|
Rev. B 5/07 | 7 | 6410ES |