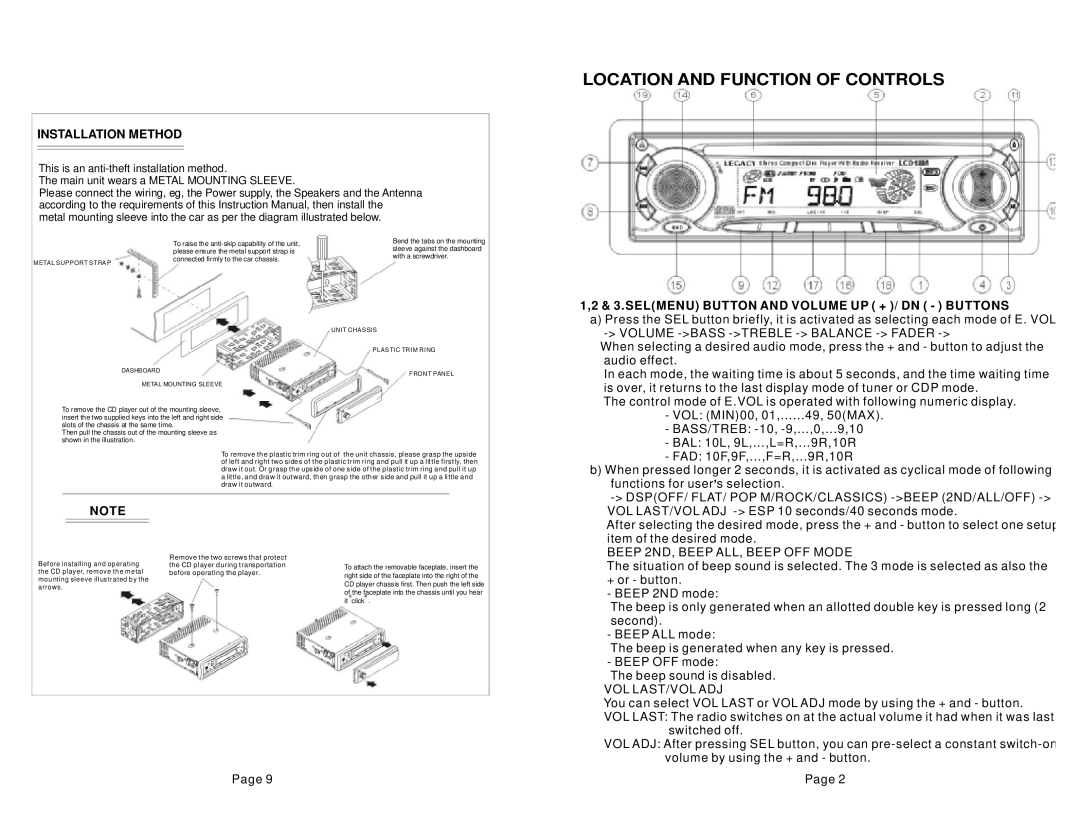
INSTALLATION METHOD
This is an
The main unit wears a METAL MOUNTING SLEEVE.
Please connect the wiring, eg, the Power supply, the Speakers and the Antenna according to the requirements of this Instruction Manual, then install the metal mounting sleeve into the car as per the diagram illustrated below.
LOCATION AND FUNCTION OF CONTROLS
| To raise the |
| please ensure the metal support strap is |
METAL SUPPORT STRAP | connected firmly to the car chassis. |
|
DASHBOARD
METAL MOUNTING SLEEVE
Bend the tabs on the mounting sleeve against the dashboard with a screwdriver.
UNIT CHASSIS
PLASTIC TRIM RING
FRONT PANEL
1,2 & 3.SEL(MENU) BUTTON AND VOLUME UP ( + )/ DN ( - ) BUTTONS
a) Press the SEL button briefly, it is activated as selecting each mode of E. VOL
When selecting a desired audio mode, press the + and - button to adjust the audio effect.
In each mode, the waiting time is about 5 seconds, and the time waiting time is over, it returns to the last display mode of tuner or CDP mode.
To remove the CD player out of the mounting sleeve, insert the two supplied keys into the left and right side slots of the chassis at the same time.
Then pull the chassis out of the mounting sleeve as shown in the illustration.
| To remove the plastic trim ring out of the unit chassis, please grasp the upside | ||
| of left and right two sides of the plastic trim ring and pull it up a little firstly, then | ||
| draw it out. Or grasp the upside of one side of the plastic trim ring and pull it up | ||
| a little, and draw it outward, then grasp the other side and pull it up a little and | ||
| draw it outward. |
| |
NOTE |
|
| |
Before installing and operating | Remove the two screws that protect |
| |
the CD player during transportation | To attach the removable faceplate, insert the | ||
the CD player, remove the metal | before operating the player. | ||
right side of the faceplate into the right of the | |||
mounting sleeve illustrated by the |
| ||
arrows. | CD player chassis first. Then push the left side | |
of the faceplate into the chassis until you hear | ||
| ||
| it click . |
Page 9
The control mode of E.VOL is operated with following numeric display.
-VOL: (MIN)00, 01,......49, 50(MAX).
-BASS/TREB:
-BAL: 10L, 9L,...,L=R,...9R,10R
-FAD: 10F,9F,...,F=R,...9R,10R
b)When pressed longer 2 seconds, it is activated as cyclical mode of following functions for user![]() s selection.
s selection.
After selecting the desired mode, press the + and - button to select one setup item of the desired mode.
BEEP 2ND, BEEP ALL, BEEP OFF MODE
The situation of beep sound is selected. The 3 mode is selected as also the
+or - button.
- BEEP 2ND mode:
The beep is only generated when an allotted double key is pressed long (2 second).
- BEEP ALL mode:
The beep is generated when any key is pressed. - BEEP OFF mode:
The beep sound is disabled.
VOL LAST/VOL ADJ
You can select VOL LAST or VOL ADJ mode by using the + and - button. VOL LAST: The radio switches on at the actual volume it had when it was last
switched off.
VOL ADJ: After pressing SEL button, you can
Page 2