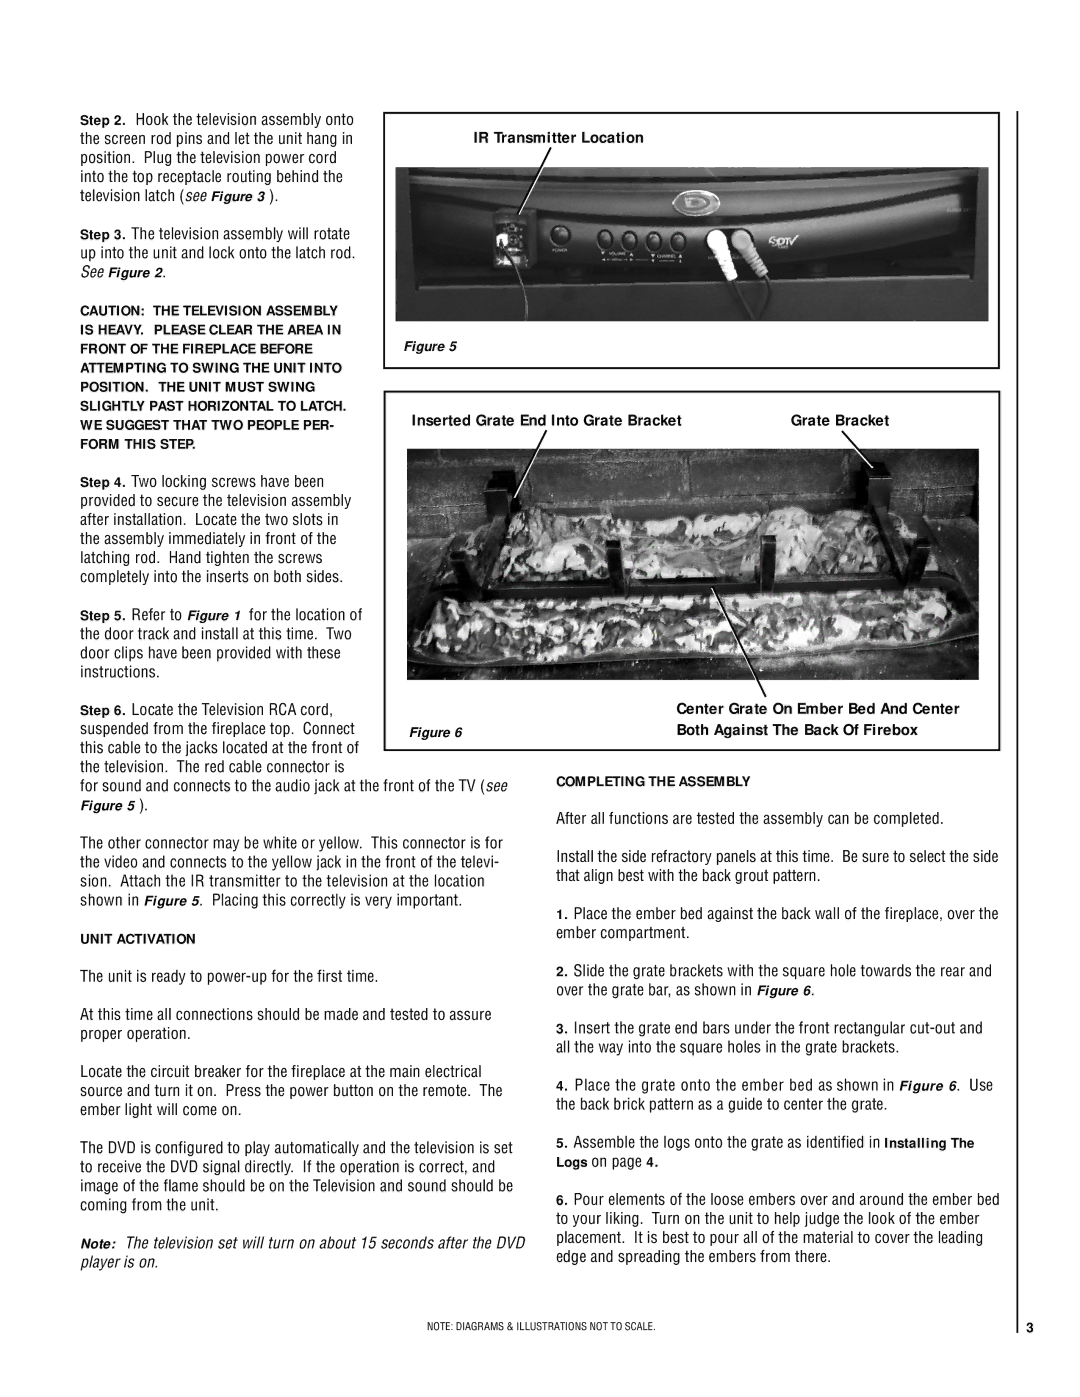
Step 2. Hook the television assembly onto | IR Transmitter Location |
|
|
| |
the screen rod pins and let the unit hang in |
|
|
| ||
position. Plug the television power cord |
|
|
|
|
|
into the top receptacle routing behind the |
|
|
|
|
|
television latch (see Figure 3 ). |
|
|
|
|
|
Step 3. The television assembly will rotate |
|
|
|
|
|
up into the unit and lock onto the latch rod. |
|
|
|
|
|
See Figure 2. |
|
|
|
|
|
CAUTION: THE TELEVISION ASSEMBLY |
|
|
|
|
|
IS HEAVY. PLEASE CLEAR THE AREA IN | Figure 5 |
|
|
|
|
FRONT OF THE FIREPLACE BEFORE |
|
|
|
| |
ATTEMPTING TO SWING THE UNIT INTO |
|
|
|
|
|
|
|
|
|
| |
POSITION. THE UNIT MUST SWING |
|
|
|
|
|
SLIGHTLY PAST HORIZONTAL TO LATCH. | Inserted Grate End Into Grate Bracket | Grate Bracket |
|
| |
WE SUGGEST THAT TWO PEOPLE PER- |
|
| |||
FORM THIS STEP. |
|
|
|
|
|
Step 4. Two locking screws have been |
|
|
|
|
|
provided to secure the television assembly |
|
|
|
|
|
after installation. Locate the two slots in |
|
|
|
|
|
the assembly immediately in front of the |
|
|
|
|
|
latching rod. Hand tighten the screws |
|
|
|
|
|
completely into the inserts on both sides. |
|
|
|
|
|
Step 5. Refer to Figure 1 for the location of |
|
|
|
|
|
the door track and install at this time. Two |
|
|
|
|
|
door clips have been provided with these |
|
|
|
|
|
instructions. |
|
|
|
|
|
Step 6. Locate the Television RCA cord, |
| Center Grate On Ember Bed And Center |
|
| |
suspended from the fireplace top. Connect | Figure 6 | Both Against The Back Of Firebox |
|
| |
this cable to the jacks located at the front of |
|
|
|
|
|
|
|
|
|
| |
the television. The red cable connector is |
| COMPLETING THE ASSEMBLY |
|
|
|
for sound and connects to the audio jack at the front of the TV (see |
|
|
| ||
|
|
|
| ||
Figure 5 ). |
| After all functions are tested the assembly can be completed. |
| ||
|
|
| |||
The other connector may be white or yellow. This connector is for | Install the side refractory panels at this time. Be sure to select the side |
| |||
the video and connects to the yellow jack in the front of the televi- |
| ||||
that align best with the back grout pattern. |
| ||||
sion. Attach the IR transmitter to the television at the location |
| ||||
|
|
|
| ||
shown in Figure 5. Placing this correctly is very important. | 1. Place the ember bed against the back wall of the fireplace, over the |
| |||
|
|
| |||
UNIT ACTIVATION |
| ember compartment. |
|
|
|
|
|
|
|
| |
The unit is ready to |
| 2. Slide the grate brackets with the square hole towards the rear and |
| ||
| over the grate bar, as shown in Figure 6. |
| |||
|
|
| |||
At this time all connections should be made and tested to assure | 3. Insert the grate end bars under the front rectangular |
| |||
proper operation. |
|
| |||
| all the way into the square holes in the grate brackets. |
| |||
|
|
| |||
Locate the circuit breaker for the fireplace at the main electrical | 4. Place the grate onto the ember bed as shown in Figure 6. Use |
| |||
source and turn it on. Press the power button on the remote. The |
| ||||
the back brick pattern as a guide to center the grate. |
| ||||
ember light will come on. |
|
| |||
|
|
|
|
| |
The DVD is configured to play automatically and the television is set | 5. Assemble the logs onto the grate as identified in Installing The |
| |||
Logs on page 4. |
|
|
| ||
to receive the DVD signal directly. If the operation is correct, and |
|
|
| ||
|
|
|
| ||
image of the flame should be on the Television and sound should be | 6. Pour elements of the loose embers over and around the ember bed |
| |||
coming from the unit. |
|
| |||
| to your liking. Turn on the unit to help judge the look of the ember |
| |||
|
|
| |||
Note: The television set will turn on about 15 seconds after the DVD | placement. It is best to pour all of the material to cover the leading |
| |||
edge and spreading the embers from there. |
| ||||
player is on. |
|
| |||
|
|
|
|
| |
| NOTE: DIAGRAMS & ILLUSTRATIONS NOT TO SCALE. |
|
| 3 | |