Product overview

FRU tests

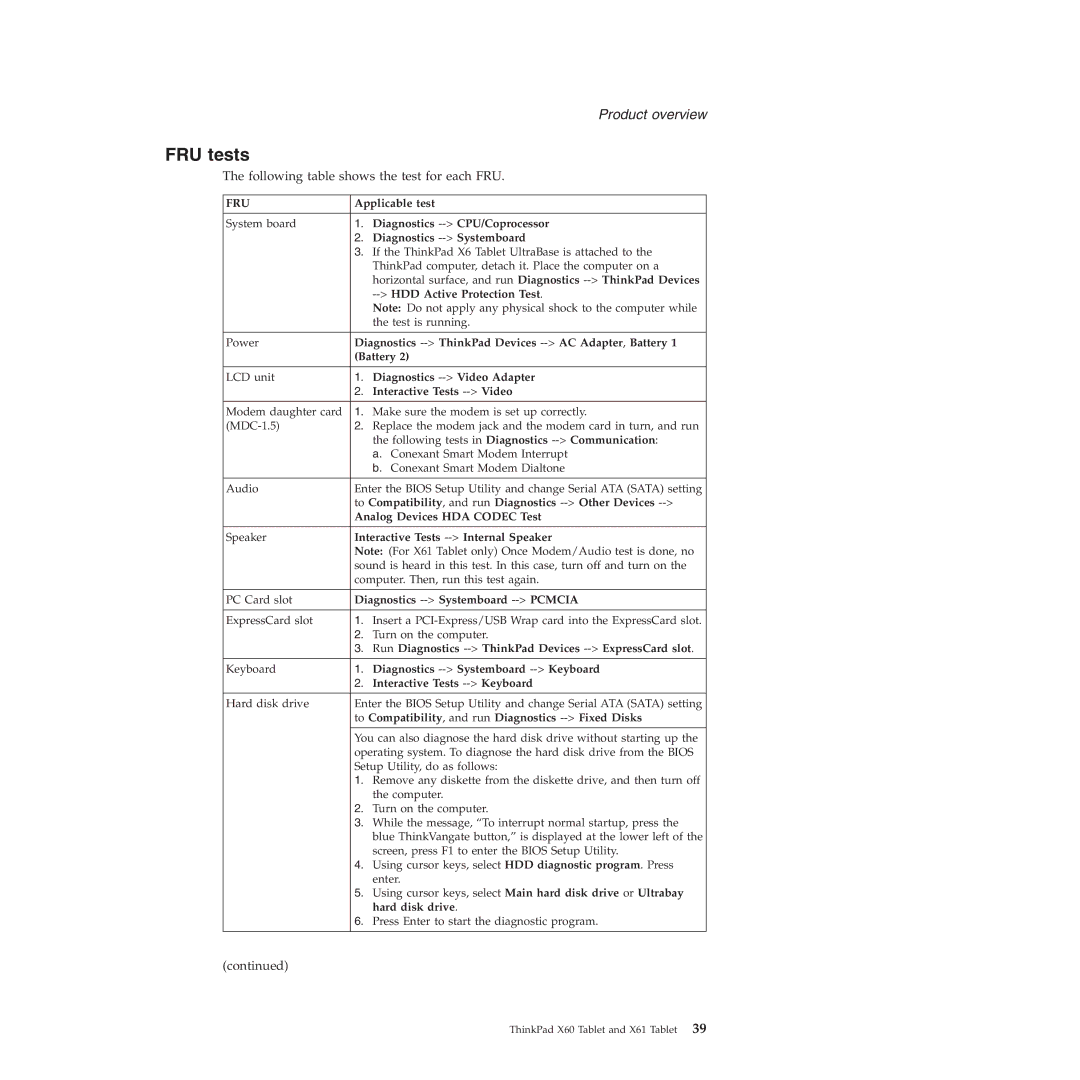
The following table shows the test for each FRU.

FRU

Applicable test


System board

1.

Diagnostics -->CPU/Coprocessor


2.

Diagnostics -->Systemboard


3.

If the ThinkPad X6 Tablet UltraBase is attached to the


ThinkPad computer, detach it. Place the computer on a


horizontal surface, and run Diagnostics --> ThinkPad Devices


-->HDD Active Protection Test.


Note: Do not apply any physical shock to the computer while


the test is running.


Power

Diagnostics -->ThinkPad Devices -->AC Adapter, Battery 1


(Battery 2)


LCD unit

1.

Diagnostics -->Video Adapter


2.

Interactive Tests -->Video


Modem daughter card

1. Make sure the modem is set up correctly.

(MDC-1.5)

2.

Replace the modem jack and the modem card in turn, and run


the following tests in Diagnostics --> Communication:


a. Conexant Smart Modem Interrupt


b. Conexant Smart Modem Dialtone


Audio

Enter the BIOS Setup Utility and change Serial ATA (SATA) setting


to Compatibility, and run Diagnostics -->Other Devices -->


Analog Devices HDA CODEC Test


Speaker

Interactive Tests -->Internal Speaker


Note: (For X61 Tablet only) Once Modem/Audio test is done, no


sound is heard in this test. In this case, turn off and turn on the


computer. Then, run this test again.


PC Card slot

Diagnostics -->Systemboard -->PCMCIA


ExpressCard slot

1. Insert a PCI-Express/USB Wrap card into the ExpressCard slot.


2.

Turn on the computer.


3.

Run Diagnostics -->ThinkPad Devices -->ExpressCard slot.


Keyboard

1.

Diagnostics -->Systemboard -->Keyboard


2.

Interactive Tests -->Keyboard


Hard disk drive

Enter the BIOS Setup Utility and change Serial ATA (SATA) setting


to Compatibility, and run Diagnostics -->Fixed Disks


You can also diagnose the hard disk drive without starting up the


operating system. To diagnose the hard disk drive from the BIOS


Setup Utility, do as follows:


1.

Remove any diskette from the diskette drive, and then turn off


the computer.


2.

Turn on the computer.


3.

While the message, “To interrupt normal startup, press the


blue ThinkVangate button,” is displayed at the lower left of the


screen, press F1 to enter the BIOS Setup Utility.


4.

Using cursor keys, select HDD diagnostic program. Press


enter.


5.

Using cursor keys, select Main hard disk drive or Ultrabay


hard disk drive.


6.

Press Enter to start the diagnostic program.


(continued)

ThinkPad X60 Tablet and X61 Tablet 39

Page 45
Image 45
Lenovo X60, X61 manual FRU tests

X60, X61 specifications

The Lenovo X60 is a prominent model in the ThinkPad series, renowned for its durability, performance, and innovative features aimed at business professionals and tech enthusiasts. Released in 2006, the X60 combines portability with robust capabilities, making it a popular choice for mobile computing.

One of the X60's standout characteristics is its compact form factor, weighing around 3.5 pounds and measuring just over an inch thick. This portability allows users to easily carry the device without sacrificing functionality. The laptop's 12.1-inch display strikes a balance between screen real estate and portability, featuring a resolution of 1024 x 768 pixels. The display is designed with anti-glare technology that reduces reflections, making it suitable for use in various lighting conditions.

Under the hood, the Lenovo X60 is powered by Intel's Core Duo or Core 2 Duo processors, providing sufficient power for multitasking and productivity applications. The system supports up to 4 GB of RAM, offering adequate performance for most business tasks and applications typical of the time.

One of the most notable features of the X60 is its robust build quality. Constructed with a magnesium alloy chassis, the laptop is designed to withstand the rigors of travel and daily use, featuring a spill-resistant keyboard that adds protection against accidental liquid damage. This durability aligns well with the ThinkPad brand’s reputation for reliability.

In terms of connectivity, the Lenovo X60 offers a range of ports, including USB 2.0 ports, Ethernet, and a VGA output, accommodating various peripherals and external displays. Additionally, it supports Wi-Fi connectivity, allowing users to stay connected in office environments and public spaces.

The X60 also features Lenovo's signature TrackPoint pointing device, which allows users to navigate effortlessly without taking their hands off the keyboard. This makes it a favorite among professionals who value productivity and efficiency during long work sessions.

Battery life is another commendable aspect, with options for standard and extended batteries, enabling users to work for extended periods without needing a recharge. This level of performance makes the Lenovo X60 a particularly attractive choice for on-the-go professionals.

In summary, the Lenovo X60 is a well-rounded laptop that meets the demands of business users with its combination of portability, durability, and performance. Its classic design and thoughtful engineering contribute to its enduring popularity, even years after its initial release. For anyone seeking a reliable mobile workstation, the Lenovo X60 remains a notable option worth considering.