Refilling Instructions —All except 10N0026
for Lexmark 12A1980/12A1985/15M0120/15M0125/17G0060/16G0065; CONTAINS SHARP BLADE | ||||
Compaq | KEEP KIT AND TOOL | |||
and Sharp |
| OUT OF REACH OF | ||
|
|
|
| CHILDREN |
CONTENTS: | Ink Dispensers | 1 Cap |
|
|
|
|
| ||
| Cyan/Magenta/Yellow | Removal Tool |
|
|
| 3 x 15cc |
|
|
|
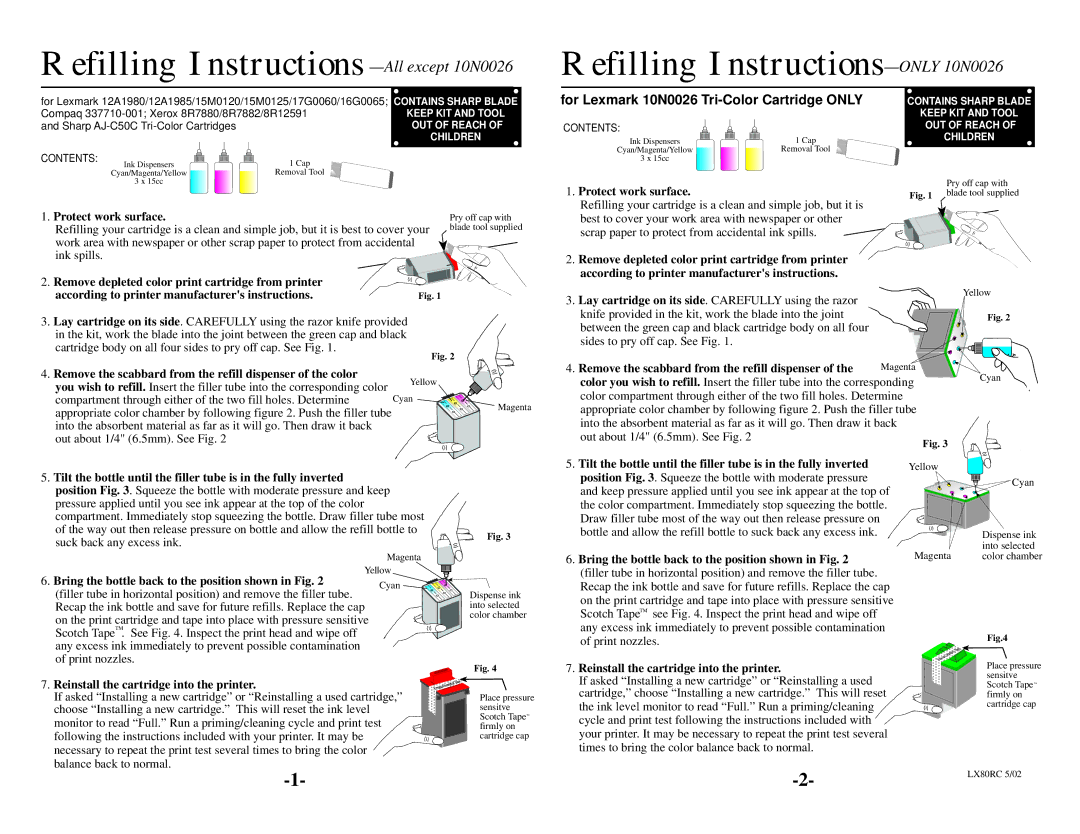
1. Protect work surface. |
|
| Pry off cap with | |
Refilling your cartridge is a clean and simple job, but it is best to cover your | blade tool supplied | |||
work area with newspaper or other scrap paper to protect from accidental |
| |||
ink spills. |
|
|
|
|
2. Remove depleted color print cartridge from printer |
|
| ||
according to printer manufacturer's instructions. | Fig. 1 | |||
3.Lay cartridge on its side. CAREFULLY using the razor knife provided in the kit, work the blade into the joint between the green cap and black cartridge body on all four sides to pry off cap. See Fig. 1.
Fig. 2
4. Remove the scabbard from the refill dispenser of the color
you wish to refill. Insert the filler tube into the corresponding color | Yellow |
| |
compartment through either of the two fill holes. Determine | Cyan |
appropriate color chamber by following figure 2. Push the filler tube | Magenta |
| |
into the absorbent material as far as it will go. Then draw it back |
|
out about 1/4" (6.5mm). See Fig. 2 |
|
Refilling Instructions—ONLY 10N0026
for Lexmark 10N0026 | CONTAINS SHARP BLADE | |||
|
|
| KEEP KIT AND TOOL | |
CONTENTS: |
|
| OUT OF REACH OF | |
Ink Dispensers | 1 Cap |
|
| CHILDREN |
Cyan/Magenta/Yellow | Removal Tool |
|
|
|
3 x 15cc |
|
|
|
|
1. Protect work surface. |
|
|
| Pry off cap with |
| Fig. 1 | blade tool supplied | ||
Refilling your cartridge is a clean and simple job, but it is |
| |||
|
|
| ||
best to cover your work area with newspaper or other |
|
|
| |
scrap paper to protect from accidental ink spills. |
|
|
| |
2. Remove depleted color print cartridge from printer |
|
|
| |
according to printer manufacturer's instructions. |
|
|
| |
3. Lay cartridge on its side. CAREFULLY using the razor |
|
| Yellow | |
|
|
| ||
knife provided in the kit, work the blade into the joint |
|
| Fig. 2 | |
between the green cap and black cartridge body on all four |
|
|
| |
sides to pry off cap. See Fig. 1. |
|
|
|
|
4. Remove the scabbard from the refill dispenser of the | Magenta |
| Cyan | |
color you wish to refill. Insert the filler tube into the corresponding |
| |||
|
| |||
color compartment through either of the two fill holes. Determine appropriate color chamber by following figure 2. Push the filler tube into the absorbent material as far as it will go. Then draw it back out about 1/4" (6.5mm). See Fig. 2
Fig. 3
5. Tilt the bottle until the filler tube is in the fully inverted position Fig. 3. Squeeze the bottle with moderate pressure and keep pressure applied until you see ink appear at the top of the color compartment. Immediately stop squeezing the bottle. Draw filler tube most of the way out then release pressure on bottle and allow the refill bottle to
Fig. 3
suck back any excess ink.
Magenta
Yellow
5.Tilt the bottle until the filler tube is in the fully inverted position Fig. 3. Squeeze the bottle with moderate pressure and keep pressure applied until you see ink appear at the top of the color compartment. Immediately stop squeezing the bottle. Draw filler tube most of the way out then release pressure on bottle and allow the refill bottle to suck back any excess ink.
6.Bring the bottle back to the position shown in Fig. 2
(filler tube in horizontal position) and remove the filler tube.
Yellow
| Cyan |
| Dispense ink |
Magenta | into selected |
color chamber |
6. Bring the bottle back to the position shown in Fig. 2 | Cyan |
|
|
(filler tube in horizontal position) and remove the filler tube. |
|
| |
|
|
| |
Recap the ink bottle and save for future refills. Replace the cap |
|
|
|
on the print cartridge and tape into place with pressure sensitive |
|
|
|
Scotch TapeTM. See Fig. 4. Inspect the print head and wipe off |
|
|
|
any excess ink immediately to prevent possible contamination |
|
|
|
of print nozzles. |
|
|
|
7. Reinstall the cartridge into the printer. |
| Pressure |
|
|
| Tape | |
|
| Sensitive |
|
If asked “Installing a new cartridge” or “Reinstalling a used cartridge,” |
|
| |
choose “Installing a new cartridge.” This will reset the ink level |
| 13806 | 19 |
monitor to read “Full.” Run a priming/cleaning cycle and print test following the instructions included with your printer. It may be necessary to repeat the print test several times to bring the color ![]() balance back to normal.
balance back to normal.
Dispense ink into selected color chamber
Fig. 4
Place pressure sensitve Scotch TapeTM firmly on cartridge cap
Recap the ink bottle and save for future refills. Replace the cap on the print cartridge and tape into place with pressure sensitive Scotch TapeTM see Fig. 4. Inspect the print head and wipe off any excess ink immediately to prevent possible contamination of print nozzles.
7.Reinstall the cartridge into the printer.
If asked “Installing a new cartridge” or “Reinstalling a used cartridge,” choose “Installing a new cartridge.” This will reset the ink level monitor to read “Full.” Run a priming/cleaning
cycle and print test following the instructions included with ![]() your printer. It may be necessary to repeat the print test several times to bring the color balance back to normal.
your printer. It may be necessary to repeat the print test several times to bring the color balance back to normal.
Fig.4
Tape
Sensitive
Pressure
Place pressure sensitve Scotch TapeTM firmly on cartridge cap
LX80RC 5/02 | ||
|