Instructions
www.easyrefills.com.au
Lexmark 1361760
Kit Code: K30CLR |
| tiksl lifer ysa |
| AUSTRALIAN MADE | |
| E | |
|
|
n | Printer Compatibility: | |
Lexmark | ||
oi | ||
7200,OPTRA COLOR 40,40n,45,45n,45n | ||
SOLARIS,Z11,Z31 | ||
t |
| |
a | Cartridge Stats: | |
mr | Colour: | |
Ink Capacity: 5 ml per chamber | ||
Weight when full: 68 grams | ||
of | Number of refills per kit: | |
n | 8 refills per kit | |
Il |
| |
a | Easyrefills manufacturers all refill kits at it’s | |
r | Queensland headquarters. Importing the | |
finest quality American made inks that are | ||
e | ||
in most cases better than or equal to | ||
n | original manufacturers specifications. Each | |
e | ||
kit has a shelf life of two years and is | ||
covered by a 100% guarantee. | ||
G | ||
Copyright 2004 Easyrefills. All names and numbers used are | ||
| registered trademarks of their respective owners. | |
| www.easyrefills.com.au |
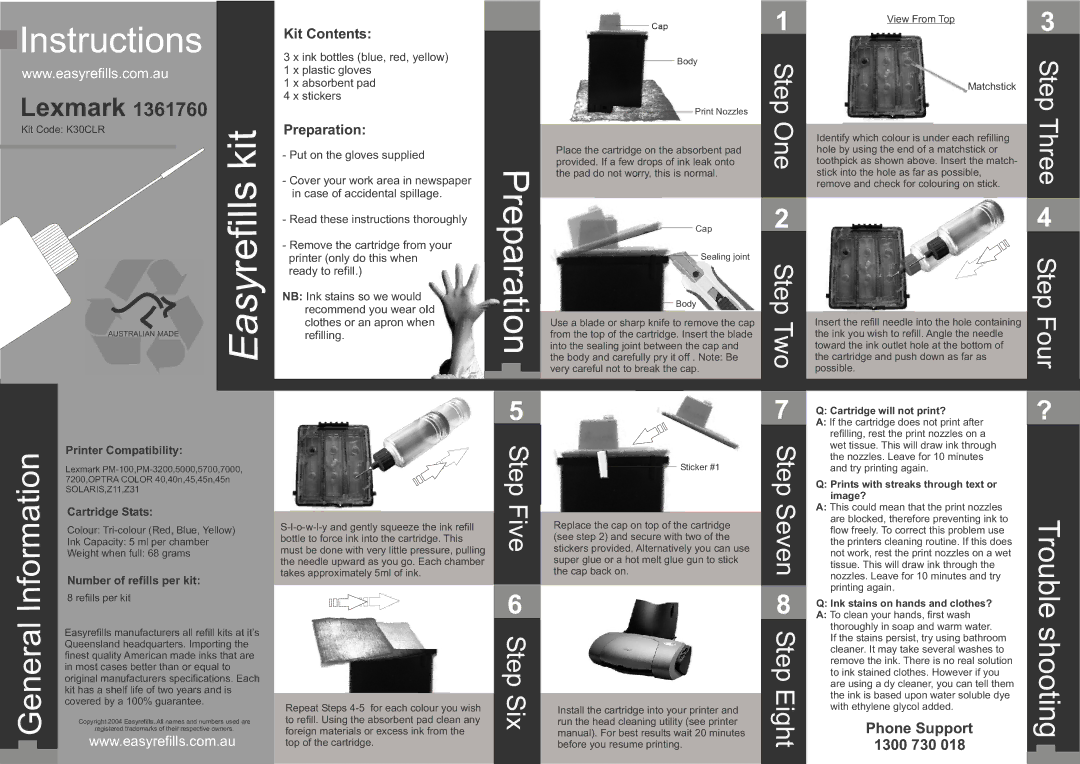
Kit Contents:
3 x ink bottles (blue, red, yellow)
1 x plastic gloves
1 x absorbent pad
4 x stickers
Preparation:
-Put on the gloves supplied
-Cover your work area in newspaper in case of accidental spillage.
-Read these instructions thoroughly
-Remove the cartridge from your printer (only do this when ready to refill.)
NB: Ink stains so we would recommend you wear old clothes or an apron when refilling.
Repeat Steps
Pre pa ra tio n
5
Step Five
6
Step Six
|
|
|
| Cap | 1 | ||
|
|
|
|
| Body | Ste | |
|
|
|
|
| |||
|
|
|
|
|
|
| |
|
|
|
|
|
| Print Nozzles | p |
|
|
|
|
|
| ||
|
|
|
|
|
| On | |
Place the cartridge on the absorbent pad | |||||||
provided. If a few drops of ink leak onto | e | ||||||
the pad do not worry, this is normal. |
| ||||||
|
|
|
|
| Cap | 2 | ||
|
|
|
|
| ||||
|
|
|
|
|
| Sealing joint | Ste | |
|
|
|
|
|
| |||
|
|
|
|
|
|
| ||
|
|
|
| Body | p | |||
|
|
|
| |||||
|
|
|
|
|
|
| ||
Use a blade or sharp knife to remove the cap | Tw | |||||||
from the top of the cartridge. Insert the blade | ||||||||
into the sealing joint between the cap and | ||||||||
the body and carefully pry it off . Note: Be | ||||||||
o | ||||||||
very careful not to break the cap. | ||||||||
| ||||||||
7
|
| Sticker #1 | tSe |
|
|
| pS |
Replace the cap on top of the cartridge | e | ||
(see step 2) and secure with two of the | ve | ||
stickers provided. Alternatively you can use | |||
super glue or a hot melt glue gun to stick | n | ||
the cap back on. | |||
| 8 | |
| Ste | |
Install the cartridge into your printer and | pEi | |
g | ||
run the head cleaning utility (see printer | ||
manual). For best results wait 20 minutes | ht | |
before you resume printing. |
View From Top | 3 | |
| ||
Matchstick | Ste | |
| p | |
Identify which colour is under each refilling | Th | |
hole by using the end of a matchstick or | r | |
toothpick as shown above. Insert the match- | e | |
stick into the hole as far as possible, | e | |
remove and check for colouring on stick. | ||
| ||
| 4 | |
| Ste | |
| p | |
Insert the refill needle into the hole containing | Fo | |
the ink you wish to refill. Angle the needle | u | |
toward the ink outlet hole at the bottom of | ||
the cartridge and push down as far as | ||
possible. | r | |
| ||
Q: Cartridge will not print? | ? | |
|
A:If the cartridge does not print after refilling, rest the print nozzles on a wet tissue. This will draw ink through the nozzles. Leave for 10 minutes and try printing again.
Q:Prints with streaks through text or image?
A: This could mean that the print nozzles | Trou | |
are blocked, therefore preventing ink to | ||
flow freely. To correct this problem use | ||
the printers cleaning routine. If this does | ||
not work, rest the print nozzles on a wet | ||
tissue. This will draw ink through the | ||
nozzles. Leave for 10 minutes and try | ||
printing again. | bl | |
Q: Ink stains on hands and clothes? | e | |
A: To clean your hands, first wash | ||
thoroughly in soap and warm water. | s | |
If the stains persist, try using bathroom | ||
cleaner. It may take several washes to | h | |
remove the ink. There is no real solution | o | |
to ink stained clothes. However if you | ot | |
are using a dy cleaner, you can tell them | ||
the ink is based upon water soluble dye | ||
with ethylene glycol added. | i | |
ng | ||
Phone Support | ||
1300 730 018 |
|