LCD TV Models
Page
FCC Notice
Safety Instruction
Important Safety Instructions
Thunder or lighting storm
Cables on the back of the TV
Grounding
Cleaning
Antennas
Outdoor antenna grounding
Moving
Contents
Features of this TV
Accessories
Preparation
CD Manual
Protective Bracket and Bolt for Power Cord
Sub 15 pin Cable
Preparation
Preparation
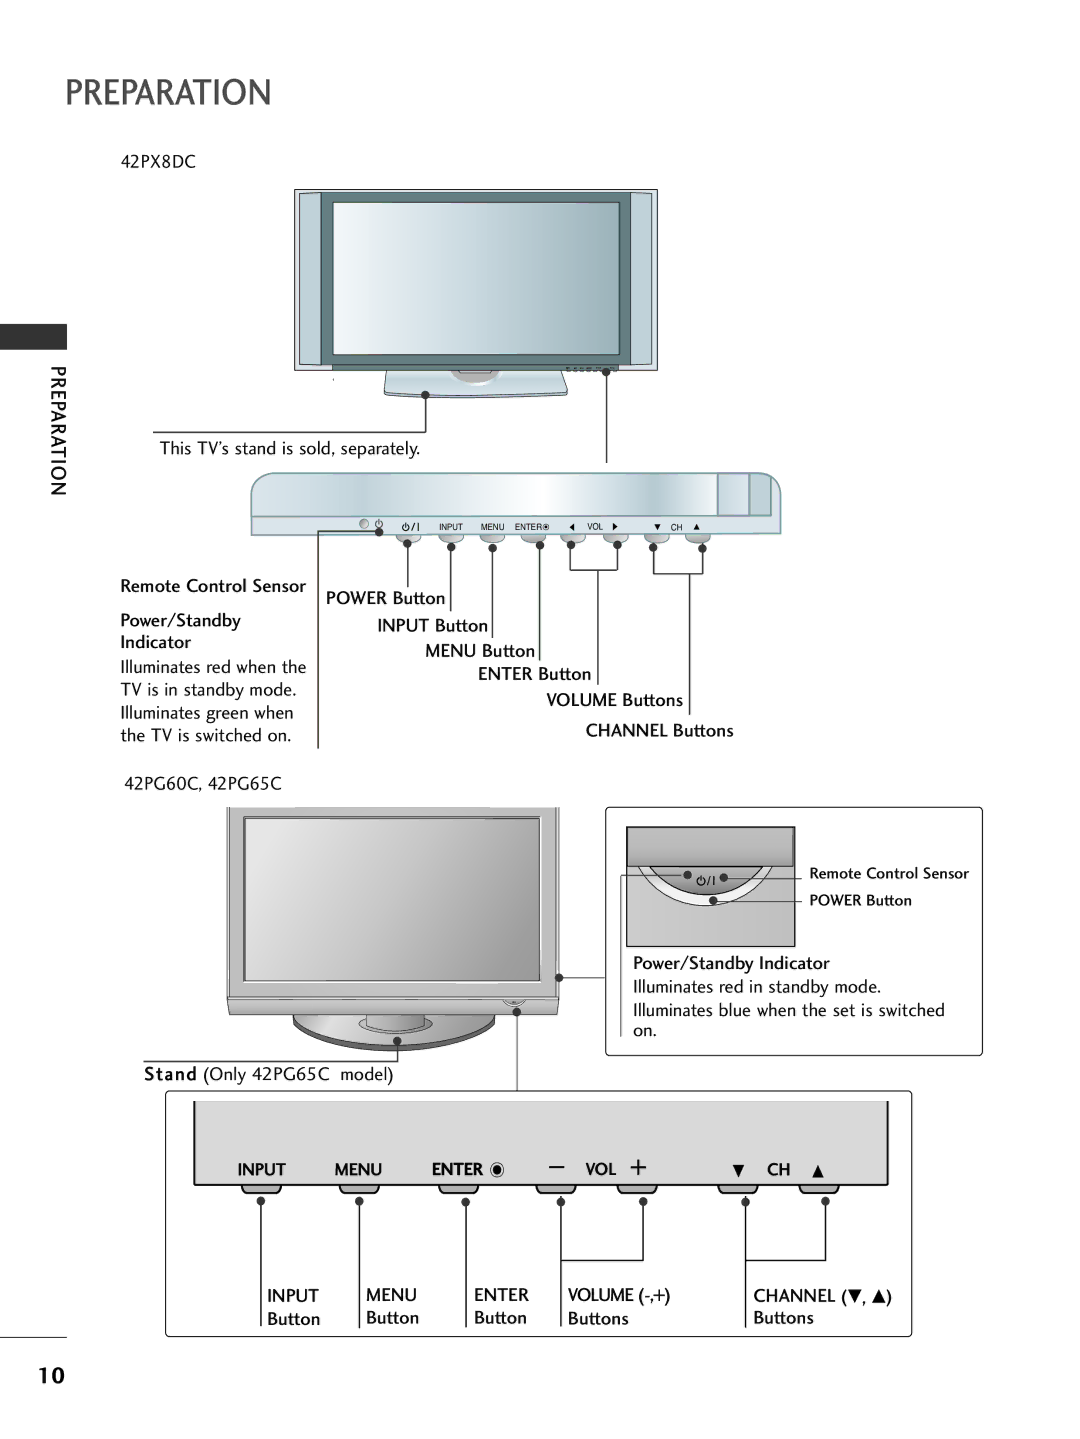
Front Panel Controls
NT ER M ENU Input
Remote Control Sensor Power/Standby Indicator
Volume -,+ Buttons Channel E, D Buttons
42PX8DC Preparation
This TV’s stand is sold, separately
42PX8DC
32LX5DC*, 32LX50C
42PG60C, 42PG65C
RESET/UPDATE/REMOTE Control OUT Service only RGB in PC
HDMI/DVI IN, Hdmi
Digital Audio OUT
Audio in RGB, DVI
Back Cover for Wire Arrangement
Install the Cable Holder as shown
Install the Cable Management as shown
Bolt Cable Holder
Cable Management Clip
Attaching the TV to a Wall
Swivel Stand
Ensure the eye-bolts or brackets are tightened securely
Attaching the TV to a Desk
42PG65C
Stand Installation
On a cushioned surface that will protect prod
Uct and screen from damage
Desktop Pedestal Installation
Vesa Wall Mounting
LCD TV
Antenna or Cable Connection
Antenna Analog or Digital
External Equipment Setup
HD Receiver Setup
External Equipment Setup
External Equipment Setup
Equipment
When connecting Hdmi to DVI cable
DVD Setup
Select Component input source with using the Input
Connect the audio outputs of the DVD to
Turn on the DVD player, insert a DVD
When connecting with an S-Video cable
Setup
VCR Setup
When connecting with an antenna
Equipment Setup
External
Other A/V Source Setup
External Equipment
Set the TV Speaker option Off in the Audio
PC Setup
Connect the DVI output of the PC to the HDMI/DVI
1DVI
Connect PC audio output to the Audio
Supported Display Specifications RGB/HDMI1-PC
Supported Display Specifications RGB/HDMI1-DTV
Supported Display Specifications HDMI2-DTV
Supported Display Specifications Y, CB /PB, CR /PR
640x350
1400x1050
1600x1200
15.73 720x480 31.47 31.50
Remote Control Functions
Watching TV / Channel Control
Watching TV / Channel Control
EZ PIC
Installing Batteries
Volume Adjustment
TV or press the Power button on the remote control
Watching TV /CHANNEL Control
Turning on TV
Setup Video
ON-SCREEN Menus Selection
Watching TV / Channel Lock
Control Screen
Channel Setup
Auto Scan EZ Scan
Channel
Add/Delete Channel Manual Scan
Watching TV / Channel
Control
Channel Editing
Watching TV Channel
DTV Signal Strength
Button to select DTV Signal
Choose preset labels for your channels
Channel Label
Button to select Channel Label
Press the PIP button to access the sub picture
Picture Control
Watching DW Double Window
Picture Control
Picture Control
TV Program Selection for PIP
Picture Size Aspect Ratio Control
Set by program
Horizon
Preset Picture Settings
EZ Picture Preset
Color Tone Preset
Manual Picture Adjustment
EZ Picture User Mode
Or button to make appropriate adjustments
Press the G or button and then use F or G or
Color Tone User Mode
Button to select User
Button to select Red, Green, or Blue
40 ~ +40
Button and then use D or E
Button to select XD Contrast, XD
Color or XD NR Noise, Mpeg NR
Ture
Advanced Cinema Mode
Picture
Button to select Cinema
Button to select O n or Off
Advanced Black Darkness Level
Picture Reset
Or button to select Reset Press the G or
Options to original values
Image Sticking Minimizationism Method
Button to select the Option menu
Orbiter
Auto Volume Leveler EZ Soundrite
Sound & Language Control
Sound & Language Control
Preset Sound Settings EZ Sound
Sound & Language Control
Sound Setting Adjustment User Mode
Sound &LANGUAGE Control
Sound
Language Control
Balance Adjustment
Button to select Balance
Button and then use or
TV Speakers ON/OFF Setup
Turn the TV speakers off if using external audio equipment
Button to select the Audio menu Press the G or
Button to select TV Speakers Press the G or
STEREO/SAP Broadcast Setup
Audio Language
Button to select the Audio menu
ON-SCREEN Menus Language Selection
Caption / Text
Analog Broadcasting System Captions
Caption
Text
Digital Broadcasting System Captions
Button to select Caption/Text
Caption Options
Button to select Caption Options
Button to select Custom
Time Setting
Clock Setting
Time Setting
Time Setting
Time
Once selected, use the D or E or
Auto ON/OFF Timer Setting
To cancel the On/Off timer function, select Off
Setting
Auto SHUT-OFF Setting
Sleep Timer Setting
Screen Adjustment
Auto Configure RGB PC Mode only
Screen Adjustment
Manual Configure
Phase
Clock
Position / V-position
Screen Adjustment
Selecting XGA Mode
Tion
Initializing Reset to Original Factory Settings
SET Password & Lock System
TV is set up with the initial Password
Parental Control / Ratings
Parental Control / Rating
Change the password by inputting a new password twice
For Canada
Rating
Parental Control /RATINGS
Channel Blocking
Button to choose Block Channel
Button to choose Aux. Block
Movie & TV Rating
Parental
Control / Rating
After inputting the password, use the D or E or
Button to choose TV Rating-Children
Press the G or Button and then use the D or E or
Button to select block options
18+Adult programming Blocking OffPermits all programs
Button to select E, G, ans+ Ans+
Troubleshooting
Remote control Doesn’t work Power is suddenly Turned off
Appendix
Appendix
Audio function does not work
Vertical bar or stripe on Background
Maintenance
Product Specifications
Appendix
32LC50C/S/B-UA
Programming the Remote Control
Programming a code into a remote mode
VCR
Button to adjust Set ID to choose
SET ID
Use this function to specify a TV ID number
Button to select Set ID Press the G or
IR Codes
Code Function