Installation

External A/V Source Setup

How to connect

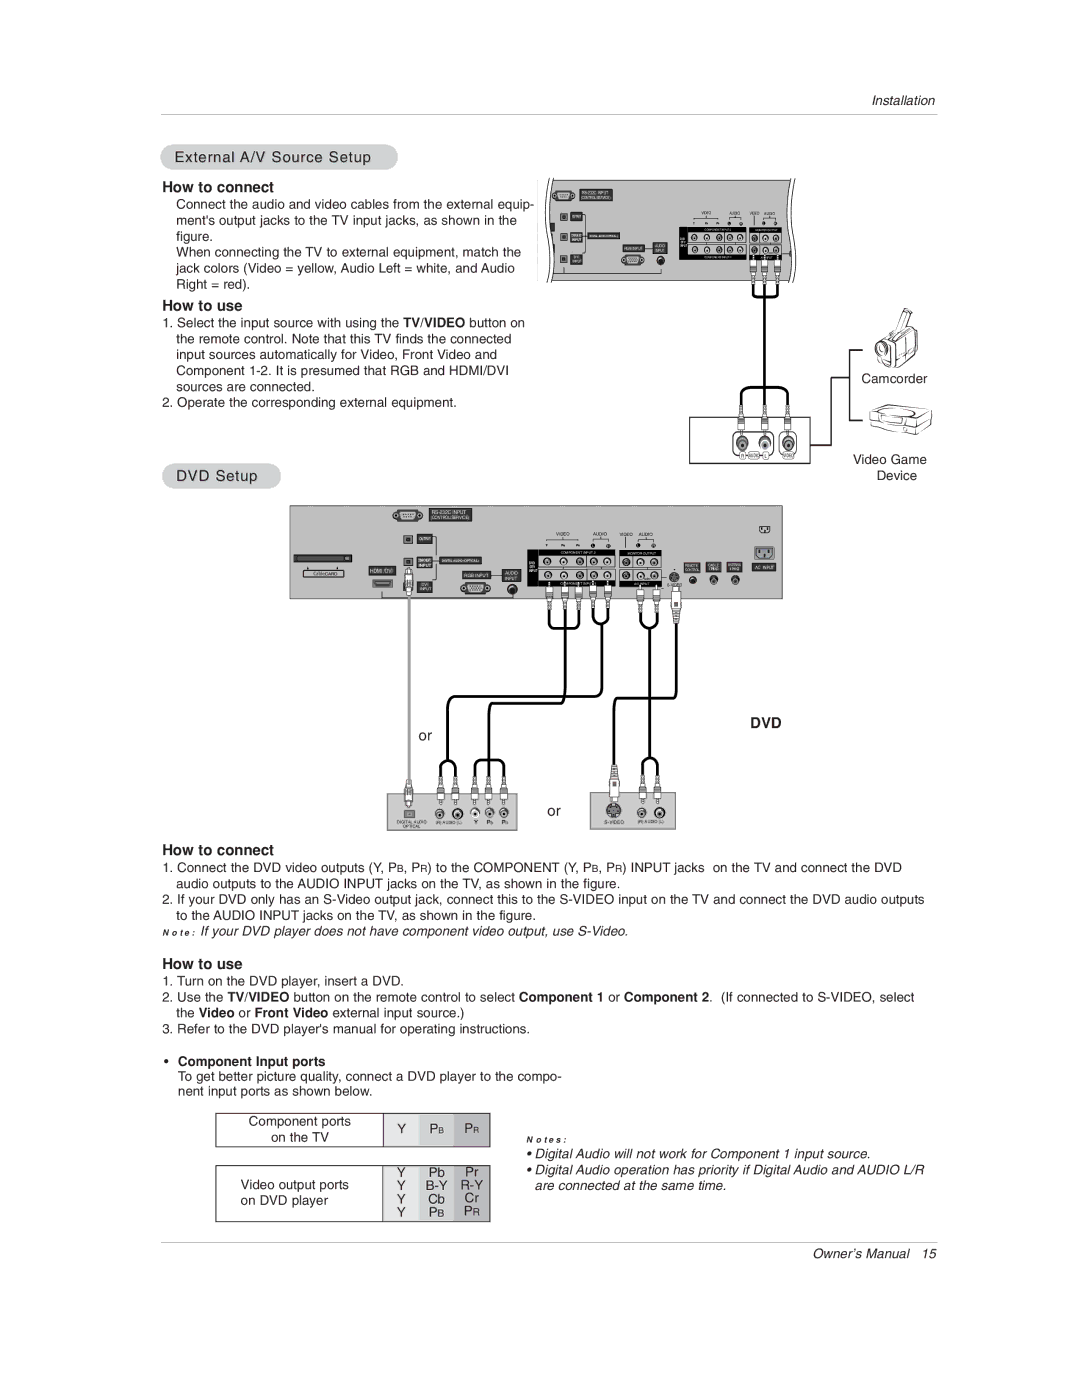
Connect the audio and video cables from the external equip- ment's output jacks to the TV input jacks, as shown in the

HDMI 2

figure.

When connecting the TV to external equipment, match the

HDMI /DVI


jack colors (Video = yellow, Audio Left = white, and Audio


Right = red).


How to use

1.Select the input source with using the TV/VIDEO button on the remote control. Note that this TV finds the connected input sources automatically for Video, Front Video and Component 1-2. It is presumed that RGB and HDMI/DVI sources are connected.

2.Operate the corresponding external equipment.

RS-232C INPUT (CONTROL/SERVICE)


S

R

C


VIDEO


AUDIO


VIDEO AUDIO


E

O

OUTPUT


V

M N


I

O T


D

T

R


L

R


L

R

E

E

O


O


L


COMPONENT INPUT 2

MONITOR OUTPUT


COMPONENT2

DIGITAL AUDIO (OPTICAL)


DVD


INPUT


CABLE

ANTENNA


/DTV


RGB INPUT

AUDIO

INPUT


INPUT


(MONO)


DVI


COMPONENT INPUT 1

A/V INPUT


INPUT


AC INPUT

Camcorder

R AUDIO L

VIDEO

Video Game

DVD Setup

Cable

RS-232C INPUT

(CONTROL/SERVICE)


OUTPUT


VIDEO

AUDIO


VIDEO

AUDIO


L

R


L

R


COMPONENT INPUT 2


MONITOR OUTPUT


COMPONENT2

DIGITAL AUDIO (OPTICAL)


DVD


INPUT


REMOTE

CABLE

ANTENNA


/DTV


HDMI /DVI


AUDIO

INPUT


CONTROL


RGB INPUT


INPUT


(MONO)


DVI


COMPONENT INPUT 1


A/V INPUT

S-VIDEO


INPUT


AC INPUT

Device

DVD

or

or

DIGITAL AUDIO

(R) AUDIO (L)

B

R

S-VIDEO

(R) AUDIO (L)

OPTICAL


How to connect

1.Connect the DVD video outputs (Y, PB, PR) to the COMPONENT (Y, PB, PR) INPUT jacks on the TV and connect the DVD audio outputs to the AUDIO INPUT jacks on the TV, as shown in the figure.

2.If your DVD only has an S-Video output jack, connect this to the S-VIDEO input on the TV and connect the DVD audio outputs to the AUDIO INPUT jacks on the TV, as shown in the figure.

Note: If your DVD player does not have component video output, use S-Video.

How to use

1.Turn on the DVD player, insert a DVD.

2.Use the TV/VIDEO button on the remote control to select Component 1 or Component 2. (If connected to S-VIDEO, select the Video or Front Video external input source.)

3.Refer to the DVD player's manual for operating instructions.

Component Input ports

To get better picture quality, connect a DVD player to the compo- nent input ports as shown below.

Component ports

Y

PB

PR

on the TV


Video output ports

Y

Pb

Pr

Y

B-Y

R-Y

on DVD player

Y

Cb

Cr


Y

PB

PR

Notes:

Digital Audio will not work for Component 1 input source.

Digital Audio operation has priority if Digital Audio and AUDIO L/R are connected at the same time.

Owner’s Manual 15

Page 15
Image 15
LG Electronics 50PX1D-UC External A/V Source Setup, How to connect, How to use, DVD Setup, Component Input ports

50PX1D, 50PX1D-UC specifications

The LG Electronics 50PX1D-UC and 50PX1D are impressive plasma display models that embody advanced technology and cutting-edge design intended for enhancing home entertainment. With a resolution of 1366 x 768 pixels, these displays provide stunningly clear visuals, ensuring that whether it's a blockbuster movie or the latest gaming title, viewers experience every detail with remarkable clarity.

One of the standout features of the 50PX1D series is its use of plasma technology, which delivers deeper blacks and more vibrant colors compared to traditional LCD screens. The rich color reproduction is complemented by a phenomenal contrast ratio, allowing for breathtaking images with a wide range of colors that pop off the screen. The plasma panel also boasts wide viewing angles, ensuring that the picture quality remains excellent from virtually any position in the room.

In terms of audio, the 50PX1D-UC and 50PX1D incorporate sophisticated sound technology that enhances the audio experience. With integrated speakers offering a powerful output, users can enjoy clearer dialogue and immersive soundscapes, bringing the cinematic experience right into their living rooms.

Connectivity is another strong suit for these models. Equipped with multiple HDMI inputs, the 50PX1D series allows users to connect various devices such as gaming consoles, Blu-ray players, and streaming devices with ease. This ensures seamless switching between devices without the hassle of constantly plugging and unplugging different cables. The inclusion of a USB port adds another layer of versatility, enabling users to playback a range of media files directly from compatible USB devices.

In terms of design, the LG PX1D series features a sleek and modern aesthetic that fits comfortably within any home décor. The minimal bezel design maximizes screen space while providing a polished and sophisticated look.

Energy efficiency is addressed as well, with these plasma screens designed to minimize power consumption without sacrificing performance. This feature is invaluable for consumers looking to reduce their energy bills while enjoying high-quality entertainment.

In summary, the LG Electronics 50PX1D-UC and 50PX1D plasma displays are engineered to deliver an outstanding viewing experience. With their vibrant picture quality, impressive sound capabilities, versatile connectivity options, and stylish design, these models are a solid choice for anyone looking to elevate their home entertainment.