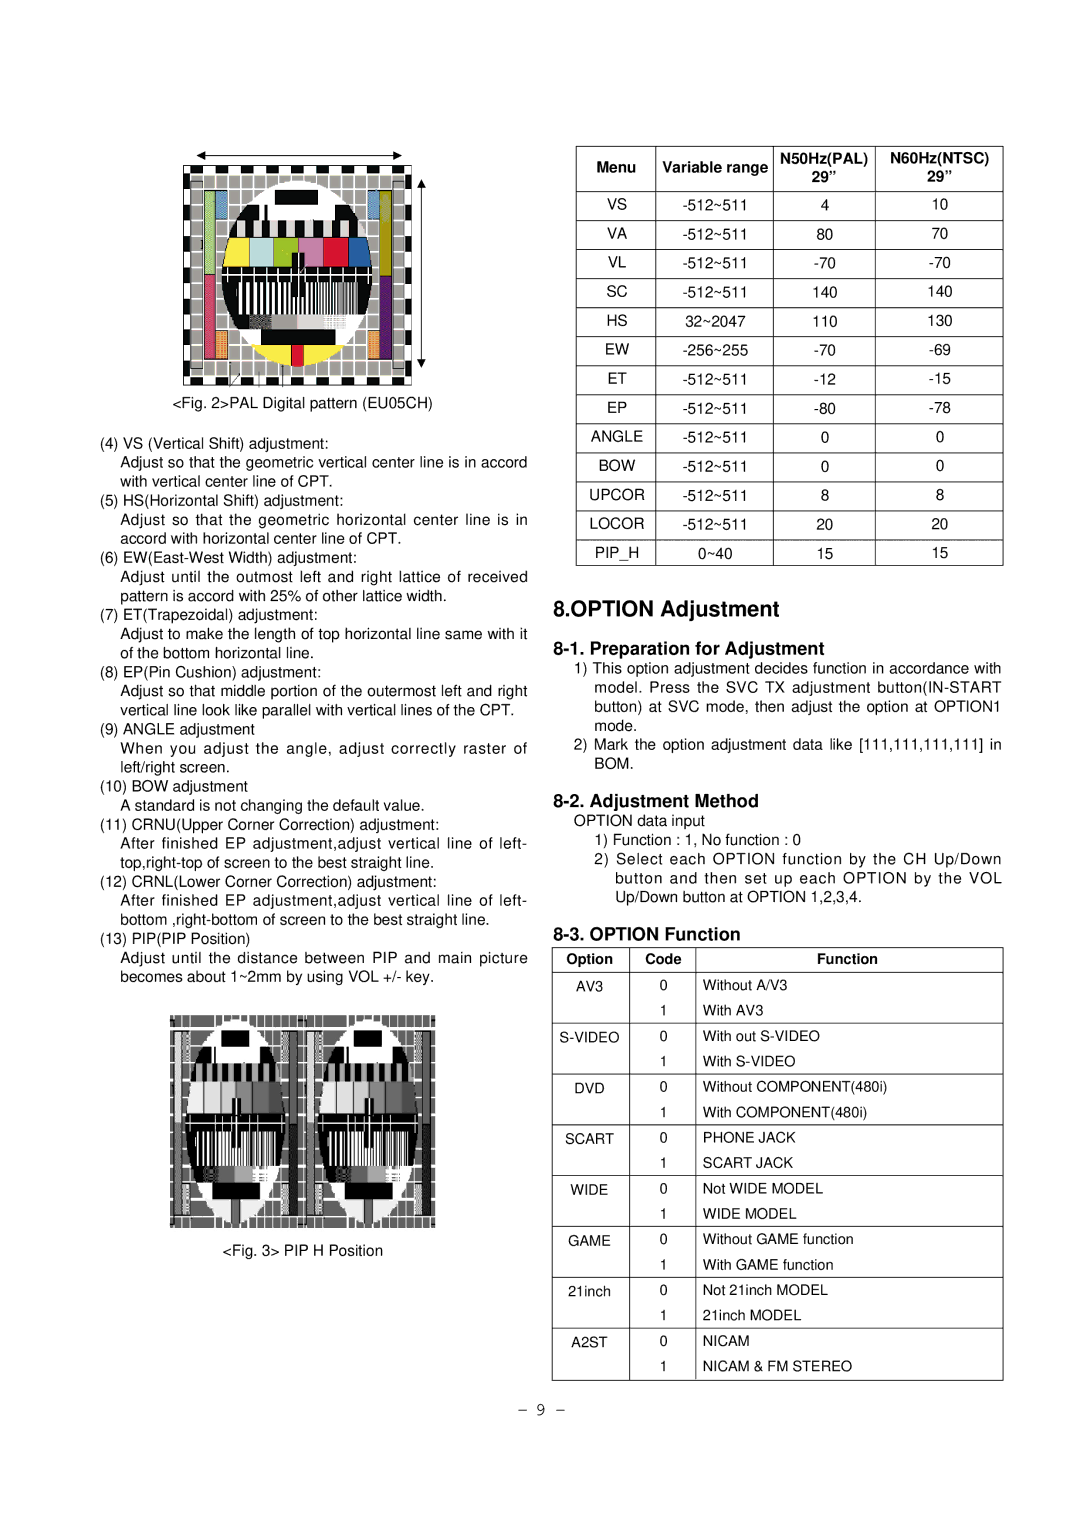
<Fig. 2>PAL Digital pattern (EU05CH)
(4) VS (Vertical Shift) adjustment:
Adjust so that the geometric vertical center line is in accord with vertical center line of CPT.
(5) HS(Horizontal Shift) adjustment:
Adjust so that the geometric horizontal center line is in accord with horizontal center line of CPT.
(6) EW(East-West Width) adjustment:
Adjust until the outmost left and right lattice of received pattern is accord with 25% of other lattice width.
(7) ET(Trapezoidal) adjustment:
Adjust to make the length of top horizontal line same with it of the bottom horizontal line.
(8) EP(Pin Cushion) adjustment:
Adjust so that middle portion of the outermost left and right vertical line look like parallel with vertical lines of the CPT.
(9) ANGLE adjustment
When you adjust the angle, adjust correctly raster of left/right screen.
(10) BOW adjustment
A standard is not changing the default value.
(11) CRNU(Upper Corner Correction) adjustment:
After finished EP adjustment,adjust vertical line of left- top,right-top of screen to the best straight line.
(12) CRNL(Lower Corner Correction) adjustment:
After finished EP adjustment,adjust vertical line of left- bottom ,right-bottom of screen to the best straight line.
(13) PIP(PIP Position)
Adjust until the distance between PIP and main picture becomes about 1~2mm by using VOL +/- key.
<Fig. 3> PIP H Position
Menu | Variable range | N50Hz(PAL) | N60Hz(NTSC) |
|
| 29” | 29” |
VS | 4 | 10 | |
|
|
|
|
VA | 80 | 70 | |
|
|
|
|
VL | |||
|
|
|
|
SC | 140 | 140 | |
|
|
|
|
HS | 32~2047 | 110 | 130 |
|
|
|
|
EW | |||
|
|
|
|
ET | |||
|
|
|
|
EP | |||
|
|
|
|
ANGLE | 0 | 0 | |
|
|
|
|
BOW | 0 | 0 | |
|
|
|
|
UPCOR | 8 | 8 | |
|
|
|
|
LOCOR | 20 | 20 | |
|
|
|
|
PIP_H | 0~40 | 15 | 15 |
|
|
|
|
8.OPTION Adjustment
8-1. Preparation for Adjustment
1)This option adjustment decides function in accordance with model. Press the SVC TX adjustment
2)Mark the option adjustment data like [111,111,111,111] in BOM.
8-2. Adjustment Method
OPTION data input
1)Function : 1, No function : 0
2)Select each OPTION function by the CH Up/Down button and then set up each OPTION by the VOL Up/Down button at OPTION 1,2,3,4.
8-3. OPTION Function
Option | Code | Function |
|
|
|
AV3 | 0 | Without A/V3 |
| 1 | With AV3 |
|
|
|
0 | With out | |
| 1 | With |
|
|
|
DVD | 0 | Without COMPONENT(480i) |
| 1 | With COMPONENT(480i) |
|
|
|
SCART | 0 | PHONE JACK |
| 1 | SCART JACK |
|
|
|
WIDE | 0 | Not WIDE MODEL |
| 1 | WIDE MODEL |
|
|
|
GAME | 0 | Without GAME function |
| 1 | With GAME function |
|
|
|
21inch | 0 | Not 21inch MODEL |
| 1 | 21inch MODEL |
|
|
|
A2ST | 0 | NICAM |
| 1 | NICAM & FM STEREO |
|
|
|
- 9 -
