READ AND UNDERSTAND THESE INSTRUCTIONS BEFORE INSTALLING FIXTURE

This fixture is intended for installation in accordance with the National Electrical Code and local regulations. To

assure full compliance with local codes and regulations, check with your local electrical inspector before

installation. To prevent electric shock, turn off electricity at fuse box before proceeding.

Retain these instructions for maintenance reference.

INSTRUCTION SHEET NO.

IS:1190

A0605


Page 1 of 1

INSTALLATION PROCEDURE FOR: 1190, 1090

1190 for use with 1100AICM/DICM/IC, 1102P1, 1103R, and 1104IC/ICR/ICX only.

1090 for use with 1000AICM/IC, 1002P1, 1003R and1004IC/ICR/ICX only.

CAUTION: USE ONLY REFLECTOR TRIMS PROVIDED BY LIGHTOLIER. USE OF OTHER MANUFACTURER’S REFLECTOR

TRIMS MAY VOID THE UNDERWRITERS LABORATORIES LISTING AND COULD CONSTITUTE A FIRE HAZARD.

CAUTION: (RISK OF FIRE) FOR NON-IC RATED INSTALLATIONS, DO NOT INSTALL INSULATION ABOVE

OR WITHIN 3 INCHES OF ANY PART OF FIXTURE.

CAUTION: BEFORE INSTALLING REFLECTOR TO FRAME-IN-KIT, READ MARKINGS IN REFLECTOR AND IN SOCKET CUP

OF FRAME-IN-KIT TO DETERMINE LAMP WATTAGE AND TYPE APPLICABLE FOR YOUR INSTALLATION.

1FRAME-IN KIT (FIK) INSTALLATION: See Frame-In Kit Instruction Sheet for installation procedure.

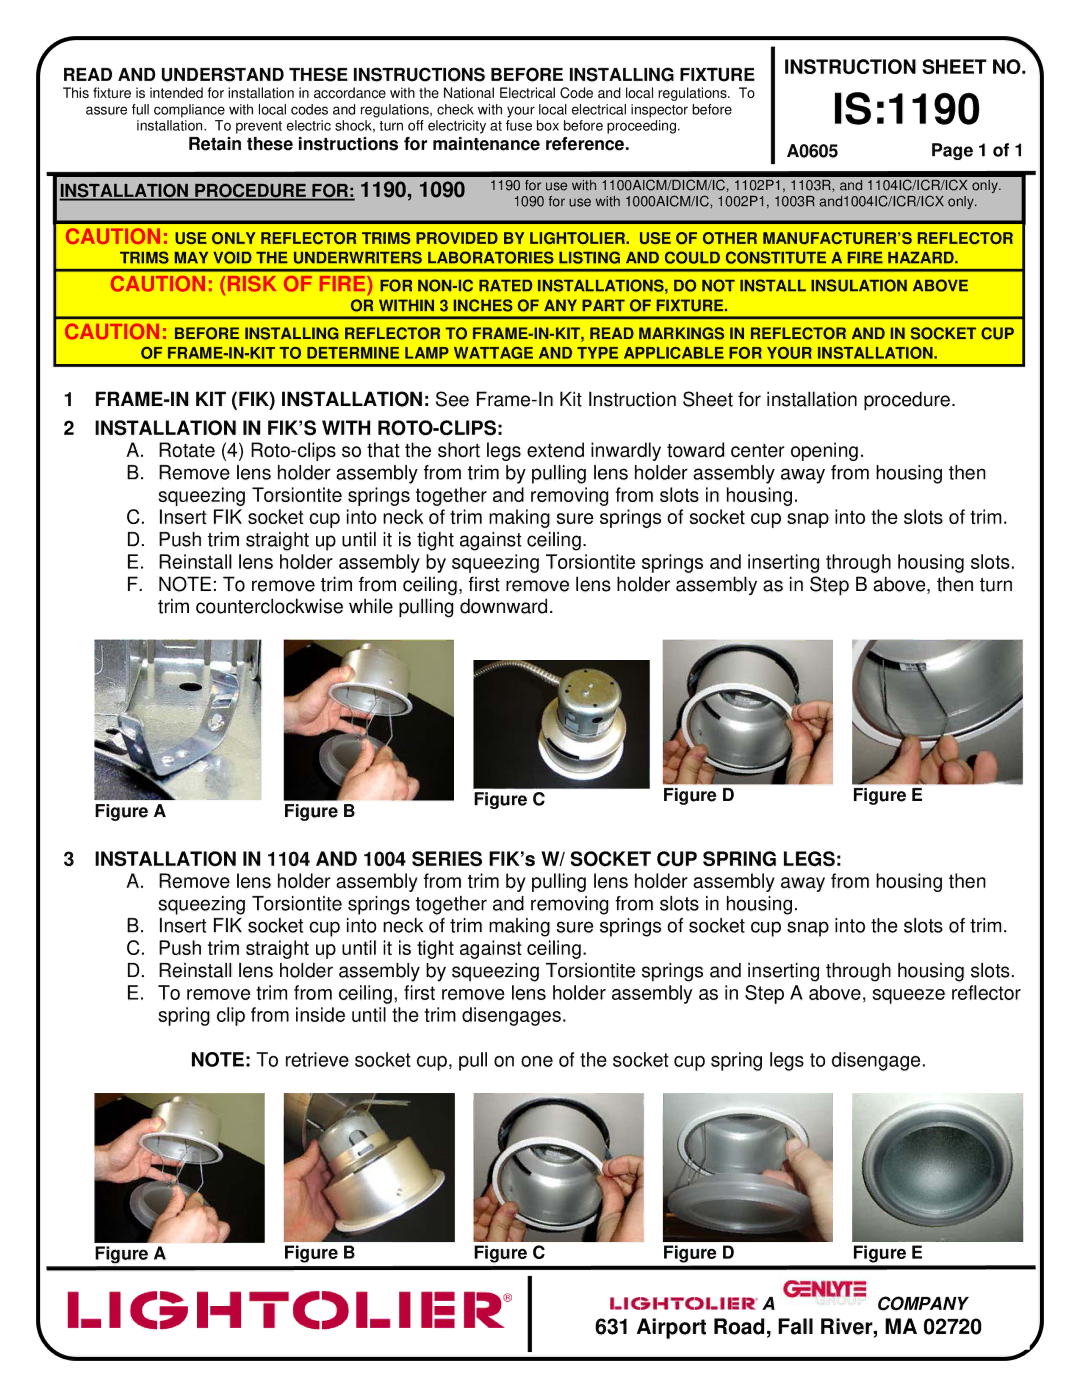
2INSTALLATION IN FIK’S WITH ROTO-CLIPS:

A.Rotate (4) Roto-clips so that the short legs extend inwardly toward center opening.

B.Remove lens holder assembly from trim by pulling lens holder assembly away from housing then squeezing Torsiontite springs together and removing from slots in housing.

C.Insert FIK socket cup into neck of trim making sure springs of socket cup snap into the slots of trim.

D.Push trim straight up until it is tight against ceiling.

E.Reinstall lens holder assembly by squeezing Torsiontite springs and inserting through housing slots.

F.NOTE: To remove trim from ceiling, first remove lens holder assembly as in Step B above, then turn trim counterclockwise while pulling downward.

Figure A

Figure B

Figure C

Figure D

Figure E


3INSTALLATION IN 1104 AND 1004 SERIES FIK’s W/ SOCKET CUP SPRING LEGS:

A.Remove lens holder assembly from trim by pulling lens holder assembly away from housing then squeezing Torsiontite springs together and removing from slots in housing.

B.Insert FIK socket cup into neck of trim making sure springs of socket cup snap into the slots of trim.

C.Push trim straight up until it is tight against ceiling.

D.Reinstall lens holder assembly by squeezing Torsiontite springs and inserting through housing slots.

E.To remove trim from ceiling, first remove lens holder assembly as in Step A above, squeeze reflector spring clip from inside until the trim disengages.

NOTE: To retrieve socket cup, pull on one of the socket cup spring legs to disengage.

Figure A

Figure B

Figure C

Figure D

Figure E

A COMPANY

631 Airport Road, Fall River, MA 02720

Page 1
Image 1
Lightolier instruction sheet IS1190, Instruction Sheet no, Installation in FIK’S with ROTO-CLIPS

1190 specifications

Lightolier 1190 is a versatile and innovative lighting solution designed to meet the high expectations of both commercial and residential applications. Renowned for its aesthetic appeal and effective lighting capabilities, the Lightolier 1190 combines form and function seamlessly, making it a prime choice for interior designers and architects alike.

One of the key features of the Lightolier 1190 is its energy-efficient design. Utilizing advanced LED technology, this fixture not only provides bright illumination but also reduces energy consumption significantly when compared to traditional incandescent or fluorescent lighting. The longevity of LED sources ensures that the Lightolier 1190 requires less frequent replacement, making it a cost-effective choice in the long run.

The Lightolier 1190 is available in a variety of finishes and styles, allowing it to complement different interior themes. Whether in a sleek modern space or a more traditional setting, this fixture's understated elegance ensures it blends harmoniously with its surroundings.

Another hallmark of the Lightolier 1190 is its versatility. It can be mounted on walls or ceilings, providing flexibility in installation and making it suitable for various applications. The fixture is compatible with dimmable drivers, offering users the ability to adjust light intensity according to their needs, which is particularly useful for creating ambiance in dining areas, living rooms, or commercial spaces.

The Lightolier 1190 also incorporates advanced thermal management technologies. These features ensure that the fixture operates within optimal temperature ranges, thereby prolonging the lifespan of the LED components and maintaining consistent light output.

Furthermore, the fixture is designed with ease of installation in mind. Its lightweight construction and intuitive mounting options make it straightforward for both professionals and DIY enthusiasts to set up.

In terms of performance, the Lightolier 1190 delivers high-quality light with excellent color rendering capabilities, making it suitable for tasks that require accuracy in color differentiation, such as in art galleries or display settings.

In conclusion, the Lightolier 1190 stands out as a sophisticated, efficient, and adaptable lighting solution. With its blend of modern aesthetics, energy efficiency, and innovative technology, it is positioned as a leading option for those looking to enhance their spaces with quality illumination. Whether used in homes, offices, or retail environments, the Lightolier 1190 proves to be an outstanding choice for contemporary lighting needs.