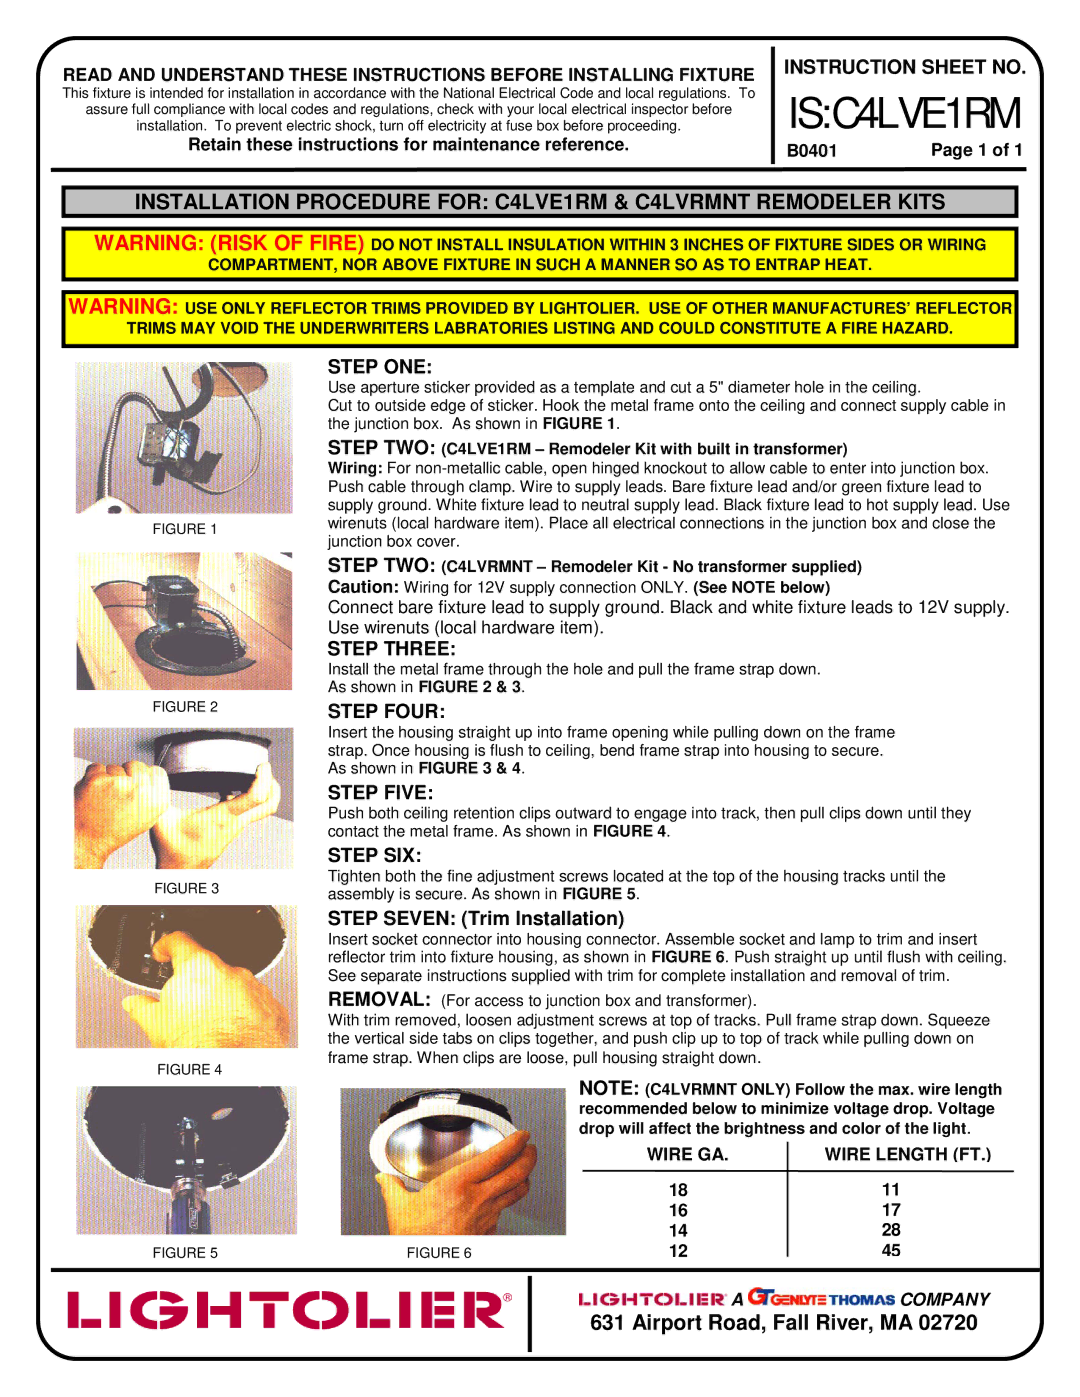
READWIREGAAND.NOTE:UNDERSTANDd THESE INSTRUCTIONS BEFORE INSTALLING FIXTURE

This fixture is intended for installation in accordance with the National Electrical Code and local regulations. To

assure full compliance with local codes and regulations, check with your local electrical inspector before

installation. To prevent electric shock, turn off electricity at fuse box before proceeding.

Retain these instructions for maintenance reference.

INSTRUCTION SHEET NO.

IS:C4LVE1RM

B0401


Page 1 of 1

INSTALLATION PROCEDURE FOR: C4LVE1RM & C4LVRMNT REMODELER KITS

WARNING: (RISK OF FIRE) DO NOT INSTALL INSULATION WITHIN 3 INCHES OF FIXTURE SIDES OR WIRING

COMPARTMENT, NOR ABOVE FIXTURE IN SUCH A MANNER SO AS TO ENTRAP HEAT.

WARNING: USE ONLY REFLECTOR TRIMS PROVIDED BY LIGHTOLIER. USE OF OTHER MANUFACTURES’ REFLECTOR

TRIMS MAY VOID THE UNDERWRITERS LABRATORIES LISTING AND COULD CONSTITUTE A FIRE HAZARD.

FIGURE 1

FIGURE 2

STEP ONE:

Use aperture sticker provided as a template and cut a 5" diameter hole in the ceiling.

Cut to outside edge of sticker. Hook the metal frame onto the ceiling and connect supply cable in the junction box. As shown in FIGURE 1.

STEP TWO: (C4LVE1RM – Remodeler Kit with built in transformer)

Wiring: For non-metallic cable, open hinged knockout to allow cable to enter into junction box. Push cable through clamp. Wire to supply leads. Bare fixture lead and/or green fixture lead to supply ground. White fixture lead to neutral supply lead. Black fixture lead to hot supply lead. Use wirenuts (local hardware item). Place all electrical connections in the junction box and close the junction box cover.

STEP TWO: (C4LVRMNT – Remodeler Kit - No transformer supplied)

Caution: Wiring for 12V supply connection ONLY. (See NOTE below)

Connect bare fixture lead to supply ground. Black and white fixture leads to 12V supply. Use wirenuts (local hardware item).

STEP THREE:

Install the metal frame through the hole and pull the frame strap down.

As shown in FIGURE 2 & 3.

STEP FOUR:

Insert the housing straight up into frame opening while pulling down on the frame strap. Once housing is flush to ceiling, bend frame strap into housing to secure. As shown in FIGURE 3 & 4.

STEP FIVE:

FIGURE 3

FIGURE 4

FIGURE 5

Push both ceiling retention clips outward to engage into track, then pull clips down until they contact the metal frame. As shown in FIGURE 4.

STEP SIX:

Tighten both the fine adjustment screws located at the top of the housing tracks until the assembly is secure. As shown in FIGURE 5.

STEP SEVEN: (Trim Installation)

Insert socket connector into housing connector. Assemble socket and lamp to trim and insert reflector trim into fixture housing, as shown in FIGURE 6. Push straight up until flush with ceiling. See separate instructions supplied with trim for complete installation and removal of trim.

REMOVAL: (For access to junction box and transformer).

With trim removed, loosen adjustment screws at top of tracks. Pull frame strap down. Squeeze the vertical side tabs on clips together, and push clip up to top of track while pulling down on frame strap. When clips are loose, pull housing straight down.

NOTE: (C4LVRMNT ONLY) Follow the max. wire length recommended below to minimize voltage drop. Voltage drop will affect the brightness and color of the light.


WIRE GA.


WIRE LENGTH (FT.)


18


11


16


17


14


28


FIGURE 6


12


45


A COMPANY

631 Airport Road, Fall River, MA 02720

Page 1
Image 1
Lightolier instruction sheet ISC4LVE1RM

C4LVE1RM specifications

The Lightolier C4LVE1RM is a distinguished lighting fixture widely recognized for its innovative design and advanced technology, making it a prime choice for both residential and commercial applications. This luminaire combines aesthetics with functionality, enhancing the ambiance of any space it illuminates.

One of the key features of the C4LVE1RM is its exceptional energy efficiency. Utilizing LED technology, this fixture provides a notable reduction in energy consumption compared to conventional lighting solutions. The LED light source not only ensures sustainability but also extends the lifespan of the product, reducing the frequency of replacements. As a result, users can enjoy long-lasting illumination while contributing to energy conservation efforts.

The design of the C4LVE1RM is sleek and modern, making it a versatile addition to various environments. Its minimalist aesthetic allows it to blend seamlessly with different interior styles, whether in a home, office, or retail space. Available in multiple color temperatures, users can select the perfect light quality to enhance the mood of their environment. The fixture is designed to provide excellent light distribution, eliminating dark spots and shadows while ensuring uniformity across the area it illuminates.

Another hallmark of the C4LVE1RM is its advanced dimming capabilities. This feature allows users to adjust the brightness according to their preferences or specific requirements, adding to the fixture’s versatility. The smooth dimming control enhances the user experience, transforming the atmosphere of a room to suit various occasions, whether it’s for a lively gathering or a quiet evening at home.

In terms of installation, the C4LVE1RM is designed for ease of use. It boasts a straightforward installation process that saves both time and effort. Additionally, its robust construction ensures durability, making it a reliable choice for high-traffic areas.

Overall, the Lightolier C4LVE1RM stands out in the lighting market due to its energy efficiency, stylish design, advanced dimming features, and ease of installation. It encapsulates the ideal blend of form and function, catering to the needs of modern consumers looking for sustainable and aesthetically pleasing lighting solutions. Whether for a sophisticated office environment or a cozy home setting, the C4LVE1RM proves to be an exceptional choice, bringing both elegance and practicality into the realm of lighting design.